Flowchart for Developing JDBC Applications

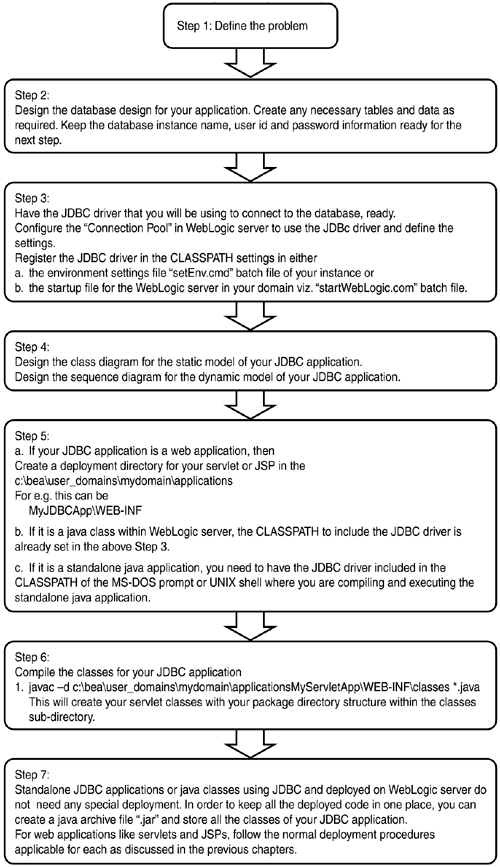
Figure 8.2 shows the steps involved in writing a JDBC application:

  1. In step 1, you define the requirements for your sample application. This is your problem statement for developing the JDBC application.

  2. Because this is a database application, step 2 involves either creating a new table with data in the database (if required), using an existing database table. To access the database, you will need to know details of the database such as instance name, user id, password, and the machine name/host name where the database resides.

  3. In the next step you create and configure a connection pool in the WebLogic Server. (Assume that the JDBC driver for the database that you need to connect to is available and compatible with WebLogic Server 7.0.) The connection pool settings will be stored in the config.xml file of the WebLogic Server instance/domain. Any CLASSPATH settings required for the JDBC driver will be added to either the setEnv.cmd or the startWebLogic.cmd batch files used to start up the WebLogic Server. Assuming that a pure Java (Type IV) JDBC driver is used, no client-side software/drivers are required to be installed or configured. If this is not the case, you should install the required JDBC driver and the client-side drivers and software.

  4. After configuring the database and the WebLogic Server, you'll need to design the static and dynamic behavior of the application. The static design will consist of the class diagram and the package diagram for the JDBC application. The dynamic behavior will be modeled by the sequence diagram. The JDBC application will load the JDBC driver (supported by WebLogic Server and found in the CLASSPATH) without a database connection from the connection pool defined in the WebLogic Server for a given database.

  5. To deploy the application, depending on whether it is a servlet, JavaServer Page (JSP), an Enterprise Java Bean, or a Java bean running in the WebLogic Server's environment, you'll place the Java classes or Java archive files in the appropriate directories and/or CLASSPATH.

  6. In the next step, compile the servlet and the support classes using the javac compiler. This step assumes that the relevant CLASSPATH is set correctly.

  7. The final step is to create either a Java archive or a Web application archive file. This will depend on the type of JDBC application whether a standalone or a Web application such as a servlet or JSP. Follow these steps to write a sample JDBC application.

Figure 8.2. Flowchart for developing JDBC applications.

graphics/08fig02.gif


Sams Teach Yourself BEA WebLogic Server 7. 0 in 21 Days
Sams Teach Yourself BEA WebLogic Server 7.0 in 21 Days
ISBN: 0672324334
EAN: 2147483647
Year: 2002
Pages: 339

flylib.com © 2008-2017.
If you may any questions please contact us: flylib@qtcs.net