Cisco VPN 3000 Concentrator Digital Certificate Configuration
| For the VPN Concentrator to support digital certificates, certain additional configuration steps must take place in addition to the configurations that were discussed for preshared keys in Chapter 4. The following sections explore the steps that are required to enroll the VPN Concentrator with a certificate authority. They also look at the changes that are essential to utilize digital certificates during the IKE phase 1 negotiation. Certificate EnrollmentIn the enrollment process, you must configure the VPN 3000 Concentrator to request an identity certificate from the certificate authority. This request message is a special type of standard specification produced by RSA Laboratories, called Public-Key Cryptography Standard #10 (PKCS#10). After the PKCS#10 request is received by the CA and the information contained within the request is considered valid, the CA merges information from the request with information from the CA to generate an X.509 identity certificate. The certificate bears a "seal of approval" in the form of a digital signature comprising a hash of the certificate and the certificate authority's private key. This signature is used to verify that the identity certificate was genuinely created by the trusted CA.
The following sections look at the configuration to initiate this enrollment process. As you will see, this enrollment can be a manual process in which you have to copy and paste the certificate information between the concentrator and the CA. On the other hand, if your CA supports it, the enrollment process can be automated over the network by a protocol called Simple Certificate Enrollment Protocol (SCEP). Manual Enrollment ProcessTo manually enroll the VPN Concentrator with the certificate authority, you must generate the PKCS#10 in the concentrator, which outputs the request to the computer that is consoled to the concentrator. The certificate request output must be copied and pasted in the certificate authority server screen so that it can be approved to generate the identity certificate. After the certificate is created, the connecting computer can download the identity certificate in addition to the CA's root certificate. Recall from the certification validation process (see previous section, "Certificate Revocation and Validation") that for a certificate to be considered legitimate, the concentrator must first validate the signed certificate with the root and/or subordinate certificate authority's public key. Thus, before you can install the identity certificate on the concentrator, you must first import the root certificate to validate the identity certificate. The configuration screens to initiate this process are located in Administration | Certificate Management | Enrollment menu. Figure 5.4 displays the screen to set in motion the PKCS#10 enrollment process. Simply click on the Enroll via PKCS10 Request (Manual) hyperlink to bring up the PKCS#10 request page. Figure 5.4. Identity certificate manual process initiation.
To initiate the request, you need to complete the user information fields in the PCKS#10 request form. These fields enable you to enter the certificate requestor's company information (Common Name, Organization Unit, and Organization) and location information (Locality, State/Province, Country Code).
The Subject Alternative Name is an optional field that enables you to define a fully qualified domain name (FQDN) to identify the concentrator (for example, concentrator@iminvpnheaven.com) and the email address of the concentrator administrator. After the user information fields have been completed, the last step to complete the PKCS#10 enrollment request is to select the strength of the RSA or DSA private/public key pair. Recall that DSA is typically used in government installations. Figure 5.5 displays the PKCS#10 request screen. Figure 5.5. PKCS#10 enrollment screen.
After completing the request, clicking on the "Enroll" button causes text file output to be displayed in a new browser window, as you can see in Figure 5.6. You can now cut and paste, email, or FTP the contents to the certificate authority to authenticate your information and generate the identity certificate. The certificate authority extracts information from your request so that it will contain the following fields in the identity certificate:
Figure 5.6. PKCS#10 request output.
The CA also adds its own specific information, including the following fields:
When the certificate authority generates the X.509 identity certificate, you must download the CA's certificate, in addition to the identity certificate, to the connected computer. You may be given the option of downloading them individually or in an envelope format of multiple certificates known as PKCS#7 message syntax (not to be confused with PKCS#10 requests).
To manually install the certificates, go to the Administration | Certificate Management | Install | CA Certificate screen, where you can choose between two of the manual processes. You can either open the certificate via a text editor and cut and paste the certificate's contents, or you can upload the .cer file from the attached management station that downloaded the certificates from the CA. Remember that you must load the root CA and subordinate CA certificates before the identity certificate. If you receive an expiration error during this process, verify the certificate's validity range, as well as the local system date and time settings. Automated Enrollment ProcessAutomated enrollment is a network-based enrollment, which basically rules out the attached computer as a middle man. With the use of the SCEP protocol, the concentrator can upload the request directly to the CA, which, in turn, generates the certificates and delivers them to the concentrator. To begin the process, you must define the CA server that is participating in the SCEP enrollment on the Administration | Certificate Management | Install | CA Certificate | SCEP screen depicted in Figure 5.7. After you place the URL and description in the fields, the concentrator and CA server will communicate via the SCEP protocol and the concentrator downloads the root certificate from the CA. At this point, you can begin the enrollment process by clicking on the newly created hyperlink for the SCEP-supported CA server. The enrollment screen is almost identical to the manual request, with the exception of a challenge password field. This field can be used if your CA requires a password for the PKCS#10 request process; otherwise, you can assign a password to the request to identify yourself to the CA. After the CA issues the identity certificate, it is automatically loaded in the concentrator. Figure 5.7. SCEP certificate enrollment screens.
Certificate ManagementAt the Administration | Certificate Management screen, you can govern the parameters of all installed certificates on the concentrator. As portrayed in Figure 5.8, you can view, delete, and renew all certificates from this management screen. Also, in the Certificate Authorities section of the Manager, you can configure extra parameters. If you click on the "Configure" hyperlink, it allows you to enable CRL checking via HTTP and Lightweight Directory Access Protocol (LDAP). By default, CRL checking is disabled during certificate validation. Figure 5.8. Certificate Manager screen.
Applying Certificates for AuthenticationNow that the certificates have been installed to the concentrator, you have to modify the IKE and IPSec SA parameters to include the certificate during IKE negotiations. Be sure to remember to install the root or subordinate certificates on the participating peer devices because they require the CA public key to validate your concentrator's identity. In addition, if you are connecting to another concentrator, ensure that the remote concentrator has a group name that coincides with your OU field in the identity certificate. The first change you need to apply is within the IKE proposal parameters. In the Configuration | System | Tunneling Protocols | IPSec | IKE Proposals screen, you need to activate or modify an IKE proposal that contains either RSA or DSA in the proposal. As illustrated in the example in Figure 5.9, the CiscoVPNClient-3DES-MD5-RSA proposal has been activated. The preconfigured CiscoVPNClient proposals are specifically created to support the capabilities of the Cisco Unity Client. Figure 5.9. IKE Proposal Certificate Activation Screen.
After you select the option to modify the proposal, you should ensure that the Authentication Mode drop-down box contains an RSA or DSA digital certificate value. Continuing with the example, Figure 5.10 demonstrates that the authentication algorithm is set to RSA digital certificates. Figure 5.10. IKE Proposal Certificate Configuration Screen.
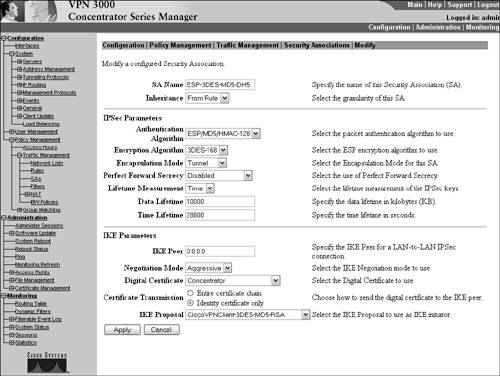
After the IKE proposal is defined to support digital certificates, you need to apply that proposal and identity certificate to an IPSec security association. In the Configuration | Policy Management | Traffic Management | Security Associations screen, choose which IPSec SA you want to utilize and click the Modify button. The screen should appear similar to Figure 5.11. In the IKE Parameters screen, be sure to use the pull-down menus to select the identity certificate you want to use, in addition to the IKE proposal that you modified in the previous section. Notice you are also given the choice to send only the identity certificate during IKE negotiations, or you have the option to send the entire certificate chain, which contains the root and subordinate certificates, as well. Figure 5.11. IPSec SA Certificate screen.
|


EAN: 2147483647
Pages: 185