In-depth Configuration Information
| Throughout the configuration of groups and users, selections were made from pre-defined lists contained in fields and drop-down boxes. Several of those lists can be modified or defined in the concentrator menus. The following sections look into how those particular list options are created or modified.
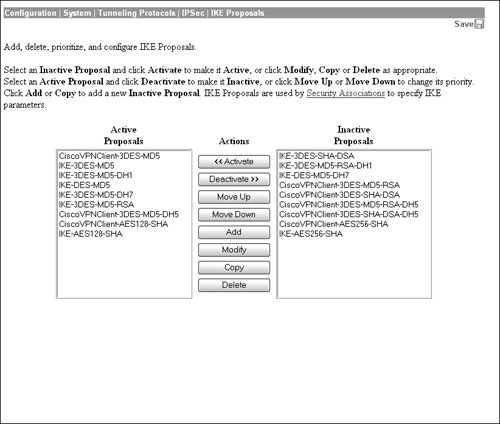
IPSec Security Association ActivationIn the user and group configurations, you could define the type of IPSec and IKE security associations for remote access clients. The Cisco VPN 3000 Concentrator series has several common security associations active in the drop-down menu of the IPSec Parameters tab. If the attaching clients require different security associations, additional associations must be created. In some instances, it might also be necessary to define or activate IKE proposals to be assigned to these security associations. To avoid putting the cart before the horse, first consider an example in which the IKE proposal needs to be defined, followed by another in which that IKE proposal is applied to a security association. Figure 4.15 depicts the IKE Proposal screen located at the Configuration | System | Tunneling Protocols | IPSec | IKE Proposals menu of the Concentrator Manager. Here you can either modify, create, or delete an IKE proposal. In addition, you can also prioritize the IKE proposals that are checked during IKE Phase 1 by moving a selected proposal up or down. Figure 4.15. Group Definition screen.
If you decide to modify or add an IKE proposal, a subsequent screen is displayed in which you have to define the following IKE parameters:
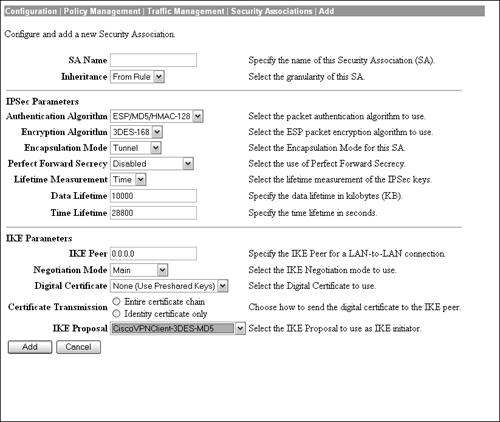
After the IKE proposal has been created and activated, the next step is to add it to a security association. At the Configuration | Policy Management | Traffic Management | Security Associations screen, you can add, modify, and delete security associations. Figure 4.16 displays the Add/Modify screen that enables you to define the parameters for an SA. Figure 4.16. Group Definition screen.
The security association process begins similarly to the IKE proposal in which a name has to be defined for the SA. The "Inheritance" attribute enables you to utilize a single tunnel with multiple hosts, versus multiple tunnels for each pair of addresses for this particular SA. Following these general parameters, the Security Association Add/Modify page lets you define the IPSec SA elements in phase 2 of IKE negotiation. Here you can determine the type of packet authentication and encryption strength, as well as whether ESP is going to operate in tunnel mode or transparent mode. You can also enable something called Perfect Forward Secrecy (PFS), which disables an attacker's ability to discover a new or prior session key if he happens to learn of a session key. This property, which is established during quick mode in IKE phase 2, entails both peers recalculating another Diffie-Hellman secret key in case the IKE phase 1 DH key was compromised. The Diffie-Hellman key exchange can be utilized with varying encryption strengths for the IKE phase 2 session key regeneration. The default is to have this disabled, which entails using a session key based upon the phase 1 keys. Also comparable to the IKE activation, you can also define the lifetime of the IPSec SA in seconds, kilobytes, or both. The bottom of the Security Association page is designated for IKE phase 1 parameters. The first field is used to specify the remote gateway address for LAN-to-LAN connections. If this SA is primarily used for remote access, then this field can be ignored. In the Negotiation field you can determine whether this security association uses Main Mode or Aggressive Mode for IKE Phase 1 establishment. Here you can also define the method in which peer authentication is managed. The default is to use preshared keys as opposed to digital certificates. In instances where digital certificates is the chosen attribute, you can further define whether the concentrator sends additional certificates to validate your identity certificate (discussed in the next chapter). The final parameter to define the security association is to select the IKE proposal that was created and activated in the previous steps. Network ListsRecall that in the Client Config tab you can specify networks in which you either allow or disallow split tunneling. This section illustrates how to define those network lists. After you navigate to the Configuration | Policy Management | Traffic Management | Network Lists page, you are given the standard options of creating, modifying, or deleting the network list. After clicking on the Add button, you are presented with a screen that is depicted in Figure 4.17. Here you can define a name for the list (The Farm), followed by the actual definition of the networks. In the field provided for the network lists, add the network, followed by the wildcard subnet mask on each line. Recollect that the wildcard mask is the inverse of a subnet mask, in which 0s represent a match and 1s mean to ignore the corresponding bit in the IP address. For our example, to create a list for network 10.2.2.0 255.255.255.0, then the syntax to enter it in the list is 10.2.2.0/0.0.0.255. After this network list is defined, it can be applied in the split tunneling policy to define which network the Cisco Unity Client will encrypt and send over the tunnel.
Access HoursFrom the example, in the General tab, recall that Mr. Ed was restricted to remote access connectivity during business hours. These business hours, which are based on Monday Friday from 9 a.m. to 5 p.m., are pre-configured access hour entries. If you need to create or modify the existing times, the Configuration | Policy Management | Access Hours | Add/Modify page enables you to customize access hours to match your company's schedule. |
EAN: 2147483647
Pages: 185
- Article 328 Medium-Voltage Cable Type MV
- Article 358 Electrical Metallic Tubing Type EMT
- Article 394 Concealed Knob-and-Tube Wiring
- Article 410: Luminaires (Lighting Fixtures), Lampholders, and Lamps
- Example No. D8 Motor Circuit Conductors, Overload Protection, and Short-Circuit and Ground-Fault Protection