Building a Document s Credibility Using Spelling and Grammar Tools
3 4
The two most frequently used reference tools in Word are the spelling and grammar tools. The popularity of these tools is understandable—most people know that nothing detracts from a document's credibility more than spelling and grammatical errors. To help you avoid the pitfalls of these types of errors, let's look at the ins and outs of the spelling and grammar tools in Word.
Caution
Using the spelling and grammar tools to check your documents shouldn't replace proofreading. These features are helpful, but they can't definitively correct your text in all instances. Instead of thinking of the spelling and grammar checking tools as a teacher correcting your work, visualize an assistant who taps you on the shoulder whenever your text seems to go astray and then offers advice on how to fix the problem. Ultimately, you'll need to carefully read through your document to ensure its accuracy.
Benefiting from Automated Spelling and Grammar Checking
By default, Word checks spelling and grammar whenever you open a document or type information in a document. With automatic spelling and grammar checking, Word flags potential spelling errors with a wavy red underline and potential grammatical errors with a wavy green underline, as shown in Figure 13-1 (although you won't be able to differentiate between green and red here).
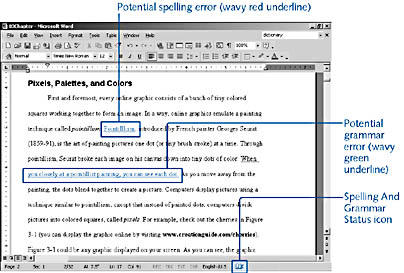
Figure 13-1. By default, Word automatically checks your document for spelling and grammar errors and flags the errors with wavy underlines.
Note
The red and green wavy underlines used to flag spelling and grammar errors are not printed when you print your document—they appear only on screen.
Word also displays the Spelling And Grammar Status icon on the status bar. This icon indicates whether your document contains any potential errors. If errors are detected, the icon contains an X mark; if no errors are found, the icon contains a check mark. (In the example document in Figure 13-1, the Spelling And Grammar Status icon contains an X, indicating that the document contains potential spelling or grammar errors.)
Tip - Flag formatting inconsistencies
In addition to displaying red and green wavy underlines to denote spelling and grammatical issues, you can configure Word to flag formatting inconsistencies with a blue wavy underline. Word marks text when it appears similar but not exactly the same as other formatting in your document. For example, Word can recognize when a list is formatted slightly differently than other lists in your document or when normal text appears in boldface in paragraph text. To use the formatting checker, choose Tools, Options, click the Edit tab, and then select the Mark Formatting Inconsistencies check box. In addition, the Keep Track Of Formatting check box must be selected on the Edit tab (the default setting).
Fixing Marked Text Quickly
After Word marks potential spelling and grammar errors, you can resolve each issue on a case-by-case basis. To access options for fixing potential errors, you can right-click text that has a wavy underline or double-click the Spelling And Grammar Status icon to select the next instance of a potential error. Both techniques open a shortcut menu containing error fixing options. The available options vary depending on whether the potential error is a spelling issue or a grammar issue.
The shortcut menu for a spelling issue is shown in Figure 13-2.
The possible remedies are as follows:
- List of possible replacement words provides one or more words that might represent the correctly spelled version of the incorrectly spelled word in your text. To replace a misspelled word with a correctly spelled word, simply click the word on the shortcut menu.
- Ignore All instructs Word to ignore all instances of the flagged spelling within the current document. When you ignore all instances of a particular flagged word, the red wavy underline is removed from the specified text throughout the document.
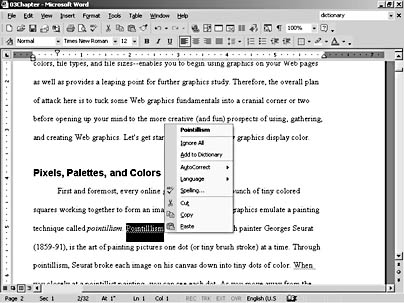
Figure 13-2. Word provides a selection of relevant error correction options when you right-click text flagged as a potential error.
- Add To Dictionary adds the word (as it's spelled in your document) to your custom dictionary, which ensures that the term won't be flagged as a potential error in future instances. (Custom dictionaries are discussed in detail in the section "Managing Custom Dictionaries.")
- AutoCorrect enables you to configure an AutoCorrect setting for the misspelled word. You can automatically replace the misspelled word with the correctly spelled word in the future by clicking the correctly spelled word on the AutoCorrect submenu, as shown in Figure 13-3. Alternatively, you can manually configure an AutoCorrect entry in the AutoCorrect dialog box by clicking AutoCorrect Options on the AutoCorrect submenu.
- Language enables you to specify that a particular word or phrase is written in another language. If proofreading tools are installed for that language, Word uses the appropriate language dictionary to check the text. If you don't have a corresponding language dictionary installed, Word will skip the specified words without marking them as potential errors.
- Spelling opens the Spelling dialog box, which provides additional spelling checking options. The Spelling dialog box is similar to the Spelling And Grammar dialog box, which you can access by choosing Tools, Spelling And Grammar or by pressing F7.
- Cut deletes the selected text and puts it on the Clipboard.
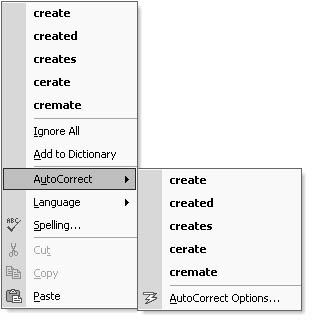
Figure 13-3. You can select a correctly spelled word on the AutoCorrect submenu so that future instances of the selected mistyped text are replaced with the correctly spelled word automatically.
- Copy copies the selected text to the Clipboard.
- Paste pastes the last item copied to the Clipboard. To replace a misspelled word using Paste, be sure that the entire misspelled word is selected.
Grammar correction options are accessed in much the same way as spelling correction options. In this case, you right-click text flagged with a green wavy underline or double-click the Spelling And Grammar Status icon. Both techniques display a shortcut menu containing the following options:
- Short error explanation or replacement text provides a brief description of the problem or possible replacement text. For example, the error explanation might state Fragment (Consider Revising), or it might show the flagged phrase followed by the plural form of the verb instead of the singular form.
- Ignore Once disregards the current instance of the grammatical error but doesn't disregard other text that breaks the same grammar rule. You might want to ignore an error once if a particular construct is acceptable in a specific area of your document but you don't want to ignore the construct in other areas. For example, you might want to allow a sentence fragment in a figure caption but still want Word to continue to scan for sentence fragments within the rest of your document.
- Grammar opens the Grammar dialog box, which provides additional grammar checking options. The Grammar dialog box is similar to the Spelling And Grammar dialog box; you can access it by choosing Tools, Spelling And Grammar or by pressing F7.
- About This Sentence provides additional information about the potential error flagged by Word.
- Cut deletes the selected text and puts it on the Clipboard.
- Copy copies the selected text to the Clipboard.
- Paste pastes the last item copied to the Clipboard. To replace a word using Paste, be sure that the entire word is selected.
You can also resolve spelling and grammar issues by correcting your text without accessing the shortcut menus. When you correct a misspelling or a grammatical error, Word removes the wavy underline.
Tip
To jump to the next spelling or grammatical error without opening the Spelling And Grammar dialog box, double-click the Spelling And Grammar Status icon or press Alt+F7.
Disabling Automatic Spelling and Grammar Checking
Word automatically checks for spelling and grammar errors by default, but you can turn off one or both of these features at any time. For instance, many users appreciate the spelling checker but find that the grammar checker doesn't serve their needs particularly well. To control automatic spelling and grammar checking, perform one of the following actions:
- Right-click the Spelling And Grammar Status icon, and choose Hide Spelling Errors or Hide Grammatical Errors on the shortcut menu.
- Choose Tools, Options, and click the Spelling & Grammar tab (or right-click the Spelling And Grammar Status icon, and choose Options). On the Spelling & Grammar tab, shown in Figure 13-4, clear the Check Spelling As You Type check box to turn off the spelling checker, or clear the Check Grammar As You Type check box to turn off the grammar checker.

Figure 13-4. The Spelling & Grammar tab enables you to customize how Word performs spelling and grammar checking tasks.
Tip - Turn off the wavy lines
If you want to use the Spelling Checking and Grammar Checking features but you don't want to see red and green wavy underlines throughout your document, you can turn off the underlines. To do so, choose Tools, Options, click the Spelling & Grammar tab, and then select the Hide Spelling Errors In This Document check box to hide red (spelling) underlines and select the Hide Grammatical Errors In This Document check box to hide green (grammar) wavy underlines. Or you can right-click the Spelling And Grammar Status icon and choose Hide Spelling Errors or Hide Grammatical Errors on the shortcut menu.
Scrutinizing Your Spelling
At times, you might prefer to check your spelling and grammar in one fell swoop instead of right-clicking every instance of a potential error. In those cases, your best bet is to work through your document using the Spelling And Grammar dialog box. To access the Spelling And Grammar dialog box, perform any of the following actions:
- Choose Tools, Spelling And Grammar.
- Click the Spelling And Grammar button on the Standard toolbar.
- Press F7.
When the Spelling And Grammar dialog box opens, it displays the first potential error it encounters after the insertion point in the current document. For each potential problem, the word or phrase in question is displayed in color: red for a spelling issue, and green for a grammar issue. Figure 13-5 shows the Spelling And Grammar dialog box when a potential spelling error is being addressed, and Figure 13-6 shows the Spelling And Grammar dialog box when a potential grammar error is being reviewed. Take a moment to compare the options in the two versions of the dialog box—you'll notice many similarities and a few differences. In this section, you'll learn how to handle potential spelling errors. The grammar options are discussed in the section "Brushing Up Your Grammar."
Inside Out
You can control whether the grammar checker is activated by selecting or clearing the Check Grammar check box in the Spelling And Grammar dialog box, but you can access this option only when you choose Tools, Spelling And Grammar or press F7. If you open the Spelling dialog box or the Grammar dialog box by right-clicking an underlined potential error, this check box will not be available.
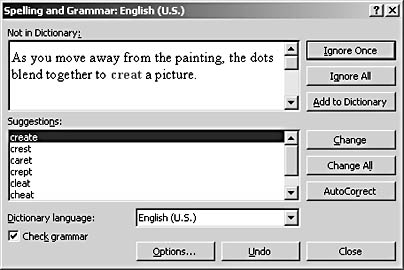
Figure 13-5. When you use the Spelling And Grammar dialog box to correct errors, you have a greater selection of suggestions and options to pick from than when you right-click potential errors. This version of the dialog box shows the options available for a potentially misspelled word.
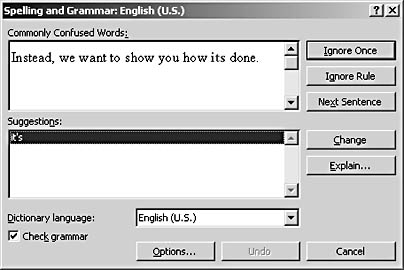
Figure 13-6. The grammar checker provides error checking options similar to the options available in the spelling checker.
Specifying How to Handle Spelling Errors
When a potential spelling problem is displayed in the Spelling And Grammar dialog box, you can modify the highlighted text by typing in the top text box, or you can handle the flagged text using one of the following techniques:
- Ignore the current instance. You can disregard the current instance of a particularly spelled word by clicking Ignore Once. If the ignored misspelling occurs elsewhere in your document, the spelling checker will continue to flag subsequent instances.
- Ignore all instances. You can disregard all instances of a particularly spelled word throughout the current document by clicking Ignore All. After you click Ignore All, Word won't flag or query you about any other instances of the misspelled word.
- Add a word to the dictionary. You can add the current instance of a particularly spelled word to your dictionary by clicking Add To Dictionary. The word will be added to your custom dictionary without further configuration on your part. For more information about controlling your custom dictionary, see the section "Managing Custom Dictionaries."
- Change the current instance. You can replace the selected text with a suggested word by double-clicking the correct word in the Suggestions list or by selecting a word in the Suggestions list and then clicking Change.
- Change all instances. You can replace the selected text and all other instances of the same text with a particular word by selecting a word in the Suggestions list and then clicking Change All.
- Add terms to the AutoCorrect list. You can add a correction to the AutoCorrect list by selecting a word in the Suggestions list and then clicking AutoCorrect. The misspelled and correctly spelled words are automatically added to your AutoCorrect list without further configuration on your part.
For more information about the AutoCorrect list, see Chapter 6, "Putting Text Tools to Work."
After you resolve the current spelling issue, Word automatically jumps to the next potential spelling error. If you change your mind about a spelling modification, you can undo the last spelling change by clicking Undo in the Spelling And Grammar dialog box or by clicking the Undo button on the Standard toolbar (after you close the dialog box or click in the document).
Tip - Edit text while checking spelling and grammar
You can click in your document and make changes directly to your text while the Spelling And Grammar dialog box is open. After you finish making changes to your document, you can continue your spelling check by clicking the Resume button in the Spelling And Grammar dialog box.
When every spelling issue has been addressed, Word displays a message box informing you that the spelling check is complete. If you want to stop the spelling checker before you've checked the entire document, simply click Close in the Spelling And Grammar dialog box.
Selecting the Text You Want to Check
By default, when you use the Spelling And Grammar dialog box, you check the entire document, starting at the current location of the insertion point. But if you prefer, you can check only selected text. To check only selected text, select the text, and then click the Spelling And Grammar button on the Standard toolbar. (Of course, if you select a single word, you can right-click to access the word replacement options on the shortcut menu.) The spelling checker works through the selected text. When the end of the selected text is reached, Word displays a dialog box stating that Word has finished checking the selected text and asking whether you'd like to continue checking the remainder of the document.
Tip - Omit selected text from spelling and grammar checking
In addition to selecting specific text you want to check, you can also indicate that portions of text should never be checked for spelling or grammar errors. (When you use this feature, you have to eliminate both spelling and grammar checking—you can't turn off only one feature for selected text.) To turn off spelling and grammar checking procedures for specific text, select the text you want to omit, choose Tools, Language, Set Language, and then select the Do Not Check Spelling Or Grammar check box and click OK.
Configuring Spelling Options
As mentioned, you can control a few spelling checker options by configuring settings on the Spelling & Grammar tab in the Options dialog box (accessed by choosing Tools, Options, and clicking the Spelling & Grammar tab; see Figure 13-4). The first two options in the Spelling section of the Spelling & Grammar tab—Check Spelling As You Type and Hide Spelling Errors In this Document—are discussed in the section "Disabling Automatic Spelling and Grammar Checking." The other options you can configure are described here:
- Always Suggest Corrections. By default, Word provides a list of suggested corrections for each misspelled word. If you find that Word doesn't provide the correct spelling in the majority of instances (for example, you might be working on a document that contains highly specific jargon, such as a medical document), you can clear this check box to save time.
- Suggest From Main Dictionary Only. Word checks all open dictionaries during spelling checks, including the main dictionary and your custom dictionaries. If you prefer to use only the main dictionary, select the Suggest From Main Dictionary Only check box.
- Ignore Words In UPPERCASE. This check box excludes words in all uppercase from spelling checks. The spelling checker would be hard pressed to understand all acronyms, so this check box is selected by default. If you use a number of acronyms and you'd like to check them, you can add the acronyms to your custom dictionary and clear the Ignore Words In UPPERCASE check box.
- Ignore Words With Numbers. By default, any words that contain numbers are ignored by the spelling checker. You'll especially appreciate this option if you're proofreading documents such as catalog or price lists in which product codes are combinations of numbers and letters.
- Ignore Internet And File Addresses. By default, the spelling checker ignores Internet addresses, file path names, and e-mail addresses. For example, text such as C:\clients\microsoft and www.microsoft.com is automatically ignored by the spelling checker. If you prefer to check these types of elements, clear the Ignore Internet And File Addresses check box.
By configuring these spelling checker options, you can customize spelling tasks to be as streamlined as possible for particular document types.
Rechecking Your Document
Once you've checked a document using the appropriate spelling checker options, Word doesn't recheck any of the spelling or grammar issues that you've addressed or dismissed. If you want to recheck your document a second (or third) time, you'll have to tell Word to recatch previously caught spelling and grammar issues. To do so, follow these simple steps:
- Click the Options button in the Spelling And Grammar dialog box, or choose Tools, Options, and click the Grammar & Spelling tab in the Options dialog box.
- Click the Recheck Document button. A message box appears, stating that the operation will reset the spelling and grammar checkers so that Word can recheck your document for potential errors, even if you've previously dismissed the error marks.
- Click Yes to close the message box, and then click OK to close the Options dialog box.
- After Word has finished rechecking your document, press F7 to open the Spelling And Grammar dialog box, and then check your document.
You can recheck a document as many times as necessary. This feature is especially handy if you've ignored particular corrections and later want to change the ignored text.
Managing Custom Dictionaries
When you install Word, you also install a main dictionary. The spelling checker uses the main dictionary whenever it checks your document for spelling errors. You can also add words to your custom dictionary or add existing dictionaries to the list of dictionaries Word uses to check documents.
When you click Add To Dictionary in the Spelling And Grammar dialog box, Word adds the selected term to your custom dictionary. After you add terms to your custom dictionary, Word checks both the main dictionary and your custom dictionary (named CUSTOM.DIC by default) whenever you run the spelling checker. You can also edit and delete terms in your custom dictionary, as well as create additional custom dictionaries that you can use whenever necessary.
Modifying Custom Dictionaries
As mentioned, you can add terms to your default custom dictionary by clicking Add To Dictionary in the Spelling And Grammar dialog box. You can also add terms to your custom dictionary by right-clicking words that are flagged by a red wavy underline and choosing Add To Dictionary on the shortcut menu. Because adding terms to the custom dictionary is so easy, many users mistakenly add words that shouldn't be included, such as words or abbreviations that should be ignored in one document but might be incorrect in other documents. For example, you might want to allow the word lite in a marketing piece but have Word catch the misspelling in other documents. If you regularly add terms to your custom dictionary or if you suspect that you've added incorrect terms, you should review and manually correct your dictionary to ensure accuracy.
To access and modify your custom dictionary, follow these steps:
- Display the Spelling & Grammar tab (by choosing Tools, Options and clicking the Spelling & Grammar tab; by pressing F7 and clicking Options; or by right-clicking the Spelling And Grammar Status icon and choosing Options).
- On the Spelling & Grammar tab, click Custom Dictionaries. The Custom Dictionaries dialog box opens, as shown in Figure 13-7. Notice that the CUSTOM.DIC dictionary is selected by default.
- Select a dictionary in the Dictionary List, and then click Modify to open a dictionary editing dialog box, as shown in Figure 13-8.
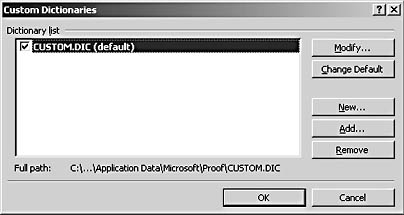
Figure 13-7. The Custom Dictionaries dialog box provides options for creating and modifying custom dictionaries used by Word in conjunction with the main dictionary.
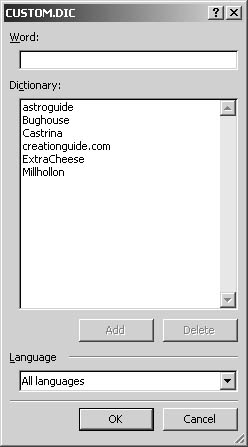
Figure 13-8. The dictionary editing dialog box provides an easy way to create and modify custom dictionaries. In earlier versions of Word, editing dictionaries entailed modifying a plain text file.
Within this dialog box, you can perform the following actions:
- Manually add a term to a custom dictionary. Enter a term in the Word box, and click Add. The dictionary arranges terms alphabetically.
- Delete a term included in a custom dictionary. Choose a word in the Dictionary list, and click Delete.
- Specify a language for a custom dictionary. Click the Language down arrow and choose a language in the drop-down list. By default, the CUSTOM.DIC dictionary is set to All Languages.
- Click OK when you have finished modifying your custom dictionary.
Tip
When you add terms to a custom dictionary, be sure that the words are 64 characters or fewer and do not contain spaces.
With careful maintenance of your custom dictionary, including adding frequently used terms, you can keep your spelling checker working in peak condition. By properly managing your custom dictionary, you automatically increase your efficiency because you'll avoid having to continually dismiss terms that appear regularly in your documents but aren't included in the main dictionary.
Creating New Custom Dictionaries
At times, you might work on jargon-laden documents that use very specific terminology or example, if you occasionally work on medical documents that contain terms such as brachytherapy, echography, and osteotomy, you could create a custom dictionary named Medical that you could activate whenever you're using medical terminology. To create a custom dictionary that you can use in addition to CUSTOM.DIC, follow these steps:
- Display the Spelling & Grammar tab in the Options dialog box (by choosing Tools, Options and clicking the Spelling & Grammar tab; by pressing F7 and clicking Options; or by right-clicking the Spelling And Grammar Status icon and choosing Options), and click Custom Dictionaries.
- In the Custom Dictionaries dialog box, click New. The Create Custom Dictionary dialog box opens. This dialog box displays a list of the custom dictionaries currently available to Word in the Proof folder. Figure 13-9 shows the Create Custom Dictionary dialog box, which contains the CUSTOM.DIC file and two additional custom dictionaries.
- Type a name for the new custom dictionary in the File Name box, and click Save. When you create a custom dictionary, the file is saved with the .dic extension in the Proof folder, along with the Custom.dic file and any other custom dictionaries you've created.
After you create a new dictionary, it is added to the Dictionary List in the Custom Dictionaries dialog box and its check box is selected. When the spelling checker runs, it refers to the main dictionary and all custom dictionaries that are selected in the Dictionary List.
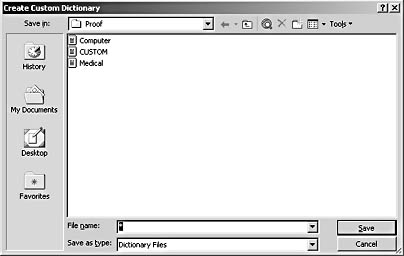
Figure 13-9. The Create Custom Dictionary dialog box enables you to create new dictionaries that you can use on an "as-needed basis" whenever you check documents.
Tip - Avoid suggestions from the main dictionary only
When you use custom dictionaries, make sure that the Suggest From Main Dictionary Only check box is cleared (the default setting) on the Spelling & Grammar tab in the Options dialog box. If this check box is selected, Word won't refer to your custom dictionaries when the spelling checker is started.
To add terms to a new custom dictionary, you can click Modify in the Custom Dictionaries dialog box and then manually enter terms. You can also add terms to the dictionary as you work, as described in the section "Choosing a Default Dictionary."
Tip - Create a Names dictionary
You might want to create a Names dictionary that contains the names of people you interact with on a regular basis. Not only will this streamline your spelling checker processes by not repeatedly flagging correctly spelled names, but you'll also avoid misspelling people's names in your documents because your custom dictionary will be keeping an eye on your spelling.
Adding Custom Dictionaries
Most of the time, you'll either use the CUSTOM.DIC dictionary or create a new custom dictionary. But you can also add existing dictionaries to the Dictionary List in the Custom Dictionaries dialog box. Adding an existing dictionary is similar to creating a new custom dictionary. To do so, follow these steps:
- On the Spelling & Grammar tab in the Options dialog box, click Custom Dictionaries.
- In the Custom Dictionaries dialog box, click Add to open the Add Custom Dictionary dialog box, which looks almost identical to the Create Custom Dictionaries dialog box.
- Navigate to the desired dictionary file, and double-click the dictionary's file name. The dictionary will be displayed in the Dictionary List and its check box will be selected.
By default, custom dictionaries are stored in the ...\Application Data\Microsoft\Proof folder. If you have a custom dictionary file (with a .dic extension), you can store the file in the Proof folder; it will then be easily accessible from the Custom Dictionaries dialog box.
Converting an Existing List of Terms to a Custom Dictionary
If you have an existing list of terms or a style sheet containing terms you frequently use, you can create a custom dictionary without having to retype or copy all the terms in the dictionary editing dialog box. To convert a list to a custom dictionary, follow these steps:
- Verify that each term is displayed on a separate line with no blank lines inserted between terms. Then save your document as a plain text (.txt) file, and close the file.
- Right-click the file name in Windows Explorer, and rename the file using the .dic extension. (You might have to clear the Hide File Extensions For Known File Types check box on the View tab in the Folder Options dialog box in Windows Explorer in order to view file name extensions.)
- After you rename the file, store it in ...\Application Data\Microsoft\Proof.
The next time you open the Add Custom Dictionary dialog box, you'll see your newly created dictionary listed among the available custom dictionaries. Double-click the newly added dictionary to add it to the Dictionary List in the Custom Dictionaries dialog box.
Choosing a Default Dictionary
By default, all terms you add to a dictionary while running a spelling check are added to the CUSTOM.DIC dictionary. You can change the custom dictionary in which added words are stored by changing the default custom dictionary. By reconfiguring your default dictionary, you can quickly build very specific custom dictionaries without having to manually enter terms. Let's return to the Medical dictionary example. While you're working on a medical document, you could specify the Medical dictionary as your default custom dictionary. Then whenever you click Add To Dictionary, the specified term would be added to the Medical dictionary instead of CUSTOM.DIC. Configuring Word in this way would serve two purposes: it would avoid adding unnecessary terms to the CUSTOM.DIC dictionary, and it would save you from manually typing terms into the Medical dictionary.
To specify which custom dictionary serves as the default file, perform the following simple actions:
- Choose Tools, Options, click the Spelling & Grammar tab, and then click the Custom Dictionaries button to open the Custom Dictionaries dialog box.
- Select the custom dictionary you want to be the default in the Dictionary List.
- Click Change Default.
The default custom dictionary will appear at the top of the list with (default) after its name, as shown in Figure 13-10. Now when you click Add To Dictionary in the Spelling And Grammar dialog box or right-click a word with a red wavy underline and click Add To Dictionary on the shortcut menu, the term will be added to the new default custom dictionary.
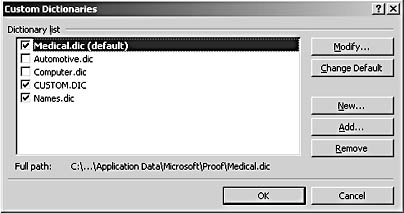
Figure 13-10. The default custom dictionary appears at the top of the Dictionary List, above the alphabetic list of custom dictionaries.
Disabling, Removing, and Deleting Dictionaries
Most of the time, you won't need to have Word check all your custom dictionaries every time you're working on a document. Therefore, you might want to disable some custom dictionaries until you need them. Other times, you might want to remove a custom dictionary from your Dictionary List altogether. Word allows you to do this without deleting the dictionary file. Or you might want to completely delete a dictionary file because you no longer use it. You can perform all these tasks easily, from within the Custom Dictionaries dialog box, as follows:
- Disable a dictionary. Clear the dictionary's check box in the Dictionary List. When a dictionary's check box is cleared, Word doesn't reference the dictionary during spelling checking operations.
- Remove a dictionary. Select the dictionary name you want to remove in the Dictionary List, and click Remove. This action does not delete the file; it simply removes it from the Dictionary List.
- Delete a dictionary. Click New or Add, select the dictionary file name in the Create Custom Dictionary or Add Custom Dictionary dialog box, and press Delete (or right-click the dictionary file name, and choose Delete on the shortcut menu). Click Yes in the Confirm File Delete message box, and then click Cancel to close the dialog box. This operation sends the dictionary file to your Recycle Bin.
Brushing Up Your Grammar
As we've seen, in addition to checking spelling, Word can check documents for grammatical accuracy. In a nutshell, Word's grammar checker works by reviewing standard grammar-related issues in your documents and flagging any potential errors with a wavy green underline. By design, the grammar checker focuses only on the most typical and frequent types of grammar problems, meaning that most but not every grammar issue will be flagged by the grammar checker.
As you become familiar with the grammar checker and its capabilities, you'll find that its usefulness fluctuates quite markedly from one document to the next. In some documents, the grammar checker will catch all sorts of useful errors, but in other documents, the grammar checker might flag numerous potential errors that are in fact grammatically correct. Therefore, you'll probably want to turn the Grammar Checking feature on and off depending on the current document.
Tip - Control the grammar checker
You can turn the grammar checker on and off by selecting or clearing the Check Grammar check box in the Spelling And Grammar dialog box. Similarly, you can hide the green wavy underlines without disabling grammar checking by right-clicking the Spelling And Grammar Status icon and choosing Hide Grammatical Errors on the shortcut menu.
Using the grammar checker in Word is similar to using the spelling checker. But the grammar checker has a few grammar-specific features of its own, which we'll look at now.
Checking Your Grammar
To run the grammar checker, right-click a potential grammar error and choose Grammar from the shortcut menu, or choose Tools, Spelling And Grammar, as described in the section "Benefiting from Automated Spelling and Grammar Checking." To resolve a grammar issue in the Spelling And Grammar dialog box (or in the Grammar dialog box), you can modify the highlighted text by typing in the top text box, or you can choose from among the following options:
- Ignore Once leaves the selected text as it is, without making any changes. Word removes the green wavy underline and displays the next grammar issue. If you click in the body of your document while the dialog box is open, the Ignore Once button changes to Resume, which you can click to continue the grammar checking process whenever you're ready to move on.
- Ignore Rule ignores the highlighted text and all other grammar issues that are classified as the same type of error. Word removes the green wavy underline from all instances and displays the next grammar issue.
- Next Sentence retains the currently selected text without making changes and jumps to the next grammatical error.
- Change replaces existing text with the text selected in the Suggestions list.
- Explain opens the Office Assistant, which briefly describes the currently selected grammatical error.
In addition to these options, you can also choose a dictionary language (by selecting a language in the Dictionary Language drop-down list), undo the last implemented correction (by clicking Undo), or display the grammar options (by clicking Options), as described next.
Configuring Grammar Options
Like the spelling checker, the grammar checker has options that you can configure on the Spelling & Grammar tab in the Options dialog box. As we've seen, the first two check boxes in the Grammar section—Check Grammar As You Type and Hide Grammatical Errors In This Document—control whether the grammar checker is turned on or off and whether green wavy underlines are displayed in the document.
The third option—the Check Grammar With Spelling check box—performs essentially the same function as the Check Grammar check box in the Spelling And Grammar dialog box: it enables you to turn off the grammar checker while you're using the spelling checker. When you clear this check box, you can check spelling without addressing grammar issues. (The green wavy underlines used to flag potential grammar problems will continue to be displayed in your document if the Check Grammar As You Type check box is selected.) Selecting this option usually speeds up document checking because Word skips the grammar issues and presents only the potential spelling errors.
The remaining options on the Spelling & Grammar tab, the Writing Style and Settings options, enable you to define grammar rules that Word should follow, as discussed in the next section.
For more information about the Show Readability Statistics check box in the Grammar section on the Spelling & Grammar tab, see the section "Judging a Document's Readability Level."
Specifying Grammar Rules
The grammar checker in Word can check up to 32 types of fundamental grammar rules, ranging from finding double negatives and clichés to identifying incorrect verb tenses and passive sentence structures. To specify grammar rule settings, follow these steps:
- Choose Tools, Options, click the Spelling & Grammar tab, and then specify whether you want the grammar checker to check grammar only or grammar and style (by selecting the appropriate option in the Writing Style drop-down list).
- Click Settings. The Grammar Settings dialog box opens, as shown in Figure 13-11.
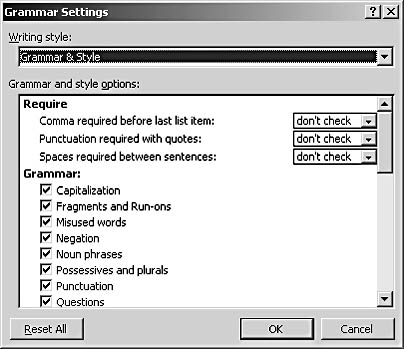
Figure 13-11. You can pick and choose which grammar rules you want Word to use when it searches for potential grammatical errors.
- Select and clear the check boxes to configure which grammar rules you want Word to use when it searches for potential grammatical problems.
Tip - View details of grammar and style options
To view brief descriptions of the grammar and writing style settings you can configure in the Grammar Settings dialog box, type grammar options in the Ask A Question search box on the menu bar, and press Enter. Then click the Grammar And Writing Style Options entry in the Results list. To view details about each option, click the Show All link in the Microsoft Word Help window. The Help window presents a brief summary of each grammar rule.
EAN: 2147483647
Pages: 337