Introducing Speech and Handwriting Recognition Tools
3 4
The speech and handwriting input features might not be installed on your computer, depending on the setup method you use to install Word. When you run Setup, look for Alternative User Input (shown in Figure 39-1) under Office Shared Features in the Features To Install tree, and make sure that Run All From My Computer is selected. If you are planning only to use one or the other, you can select the Speech or Handwriting item and install only that feature.
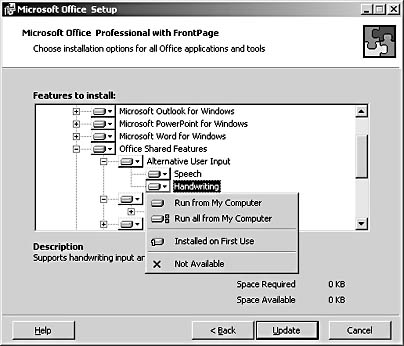
Figure 39-1. Choose to install speech and handwriting options during Word (or Office) installation.
If you didn't install speech or handwriting when you set up Word, you can add them by following these steps:
- Click Start, and choose Settings, Control Panel. In Control Panel, double-click Add/Remove Programs.
- In the list of currently installed programs, select either Microsoft Office XP or Microsoft Word, depending on which you installed, and click Change to launch Office Setup.
Tip - Install the Language bar on first use
If you're not sure whether you'll use the alternative input methods, use Setup's Installed On First Use option. This is especially handy if you're installing only one of the features. This way, the Language bar will be up and running as soon as you open Word, and when you use it to activate an uninstalled feature, Office Setup will prompt you to insert your CD so it can install the feature. If you installed from a networked source, Setup will go to the folder on the network and install the necessary software.
- When the setup wizard appears, click the Add Or Remove Features option and click Next.
- On the Features To Install page, click the plus sign (+) to the left of Office Shared Features to expand the item. Then click Alternative User Input, and choose Run All From My Computer to install both Speech Recognition and Handwriting Recognition.
Note
You can also install Speech Recognition alone by clicking the plus sign to the left of Alternative User Input, clicking Speech, and then choosing Run All From My Computer. - Click Update to install the additional components.
For more information on installing Office, see Appendix A, "Installing or Upgrading Word 2002."
Once either the Speech Recognition or Handwriting Recognition features are installed, the Language bar will be present by default, as shown in Figure 39-2. Clicking the appropriate button on the Language bar will start the respective features. (See Table 39-1.) The Language bar also enables you to set options and choose among several recognition feature modes. You can drag it with your mouse to move it to another location in your window, or you can minimize it.
Table 39-1. Language Bar Tools
| Tool | Name | Description |
|---|---|---|
| Correction | Allows you to automatically correct text you've entered with handwriting or speech features |
| English (United States) | Displays a drop-down menu of keyboard layouts that are installed for your computer |
| Microphone Command | Turns on the Speech Recognition feature and adds the Dictation and Voice buttons to the Language Bar |
| Speech Tools | Displays a list of options you can use to fine- tune and edit text you entered using speech recognition |
| Handwriting | Displays a menu of writing choices, enabling you to choose the method you will use to enter text |
| Writing Pad | Opens the Writing Pad window. |


If you minimize the Language bar, the System Tray will display a reference to the active language (such as EN for U.S. English). To restore the Language bar, click the System Tray icon and then click Show The Language bar on the shortcut menu that appears. You can also right-click the icon and click Show The Language bar on the longer shortcut menu that appears.

Figure 39-2. The new Language bar is the command center for Word's Speech and Handwriting Recognition features.
If you closed the Language bar, you can get it back by clicking Start and choosing Settings, Control Panel, and double clicking Text Services in Control Panel. In the Text Services dialog box, click the Language Bar Button, and in the Language Bar Settings dialog box, select the Show The Language Bar On The Desktop check box.
The Language Bar Settings dialog box, shown in Figure 39-3, also includes an option to show more icons (one for Speech and one for Handwriting Recognition) in the system tray, to include a text label or just icons on the Language bar, and to give the Language bar a cool, translucent effect when it's inactive. To set or change these Language bar options, select or clear the check boxes for the options you want to add or remove and click OK. Click OK again to close the Text Services dialog box and return to your document.
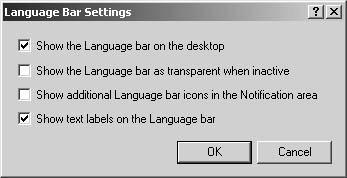
Figure 39-3. Set options for the Language bar in the Language Bar Settings dialog box.
Now that you've got a sense of the tools you'll be using to input text using speech and handwriting features, you are ready to put them to good use. The next section takes you quickly through the procedures for setting up, training, and working with speech recognition.
EAN: 2147483647
Pages: 337