Typing Field Codes Directly
3 4
If you know the name of the field you want to insert, you can enter it directly in your document by placing the insertion point where you want to insert the field, pressing Ctrl+F9, and typing the field name. Word inserts the field code directly in the document at the insertion point.
Note
Although the curly braces surrounding the field code look like regular braces you type from the keyboard, they're actually special characters Word inserts when you press the keyboard shortcut for entering a field. Instead of typing the braces, press Ctrl+F9 to add the braces.
In order to insert the complete field, you need to be able to type the field code name, any arguments you want to include, and the necessary switches.
Using Arguments in Field Codes
An argument is an additional piece of information that the field needs in order to complete the operation and display a result. You enter arguments in quotation marks. For example, if you're entering a code specifying the author of a document, you might enter
{ AUTHOR "Patricia Doyle" } The argument in this case is "Patricia Doyle," and the field code is AUTHOR. If you're entering a one-word argument, you can type it without quotation marks if you choose.
Entering Arguments in the Field Dialog Box
If you want to add arguments for the field code you're inserting by using the Field dialog box, follow these steps:
- Place the insertion point where you want to insert the field.
- Choose Insert, Field. The Field dialog box appears.
- Choose the field you want to add.
- Specify any necessary field options in the Field dialog box.
- Click the Field Codes button in the lower left corner of the dialog box. The Advanced Field Properties section of the Field dialog box appears. (See Figure 36-4.)
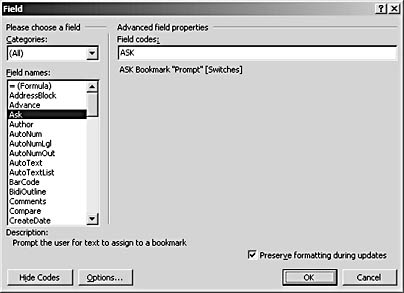
Figure 36-4. You can type field arguments in the Advanced Field Properties section of the Field dialog box.
Using Switches with Field Codes
Switches are special codes that change the way the field codes in your document act. There are two types of switches—general switches, which control the way the results of your field are formatted or displayed, and specific switches, which relate directly to the type of field you're using. Table 36-2, gives you an overview of the general switches you'll use with Word's field codes.
Table 36-2. Field Code Switches
| Category | Identifier | Description | Example |
|---|---|---|---|
Format | \* | Changes the way field results are displayed | {AUTHOR \* Lower} |
Numeric Picture | \# | Specifies format settings for displaying a numeric result | {NUMPAGES \# "0"} |
Date-Time Picture | \@ | Specifies the formatting for the display or a date or time | {PRINTDATE \@ "MMMM d, yyyy"} |
Lock Result | \! | Locks a BOOKMARK, INCLUDETEXT, or REF field, keeping it from being updated | {BOOKMARK C:\\Text\Myreport.doc \!} |
Note
The general switches shown in the preceding table will not work with the following fields: AUTONUM, AUTONUMGL, AUTONUMOUT, EMBED, FORMTEXT, TA, TC, XE, EQ, GOTOBUTTON, MACROBUTTON, RD, FORMCHECKBOX, FORMDROPDOWN, and LISTNUM. You'll be able to use field-specific switches with some of these fields, however.
Adding Switches
A field switch causes a specified action to be performed on a field result. For example, the \* switch specifies a formatting action, and \@ indicates a switch that controls the display of a date, time, or picture entry.
If you're entering the switches by hand, you'll need to type the switches following the argument in the field code. If you're inserting the field using the Field dialog box, you can add the switches by following these steps:
- Place the insertion point where you want to add the field.
- Choose Insert, Field to display the Field dialog box.
- Choose the field you want to add.
- Make any necessary field choices in the Field dialog box.
- Click the Field Codes button, and then click Options. The Field Options dialog box appears. (See Figure 36-5.)
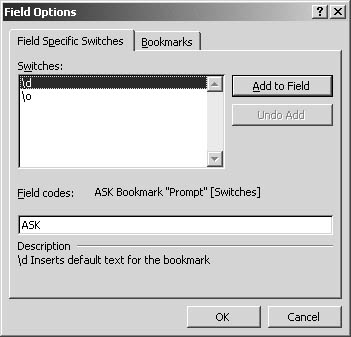
Figure 36-5. Add switches to your field in the Field Options dialog box.
- Click the switch you want to use, and then click Add To Field.
- Click OK to close the dialog box; click OK again to insert the field and return to the document.
Tip - Display specific switch functions
The switches shown in the Field Options dialog box are field-specific switches; that is, they perform a unique action on the selected field. If you want to find the function of individual switches, click each switch in the Field Options dialog box. The description of the switch's function appears in the Description section of the Field Options dialog box.
EAN: 2147483647
Pages: 337
- ERP System Acquisition: A Process Model and Results From an Austrian Survey
- Distributed Data Warehouse for Geo-spatial Services
- Data Mining for Business Process Reengineering
- Healthcare Information: From Administrative to Practice Databases
- Development of Interactive Web Sites to Enhance Police/Community Relations