Using Word to Send Faxes
3 4
Faxing is another fast, convenient way to get information from your desktop to other desktops around the country or the world. Word provides a Fax Wizard that walks you through most of the process.
Note
Some of the items discussed in this section will be available on your computer only if you have fax capability on your system. If you do not have a fax modem, or if you have a stand-alone fax with fax software installed on your system, Windows will not recognize your fax and will not enable some of the menu options discussed here. You can, however, use Word's fax feature even if you don't have a fax modem or fax machine close by—by using the Fax Wizard to access an Internet faxing service and sending faxes via the Web to your intended recipients.
Sending a Document, Fax Style
If you have a fax modem installed on your computer, you can send a document as a fax directly to a recipient. For example, you might want to do this if you are finalizing the workshop assignments for a conference you are coordinating and you want to send the agenda to your committee leaders for review.
To send a document as a fax, follow these steps:
- Save your finished document, and with the document still open, choose File, Send To to display a submenu of send options, as shown in Figure 30-24.
Figure 30-24. If you have fax capability on your system, you can fax an open document using the Send To submenu.
- Choose Fax Recipient to start the Fax Wizard, which leads you through the steps necessary to send your fax.
Starting a Fax from Scratch
If you want to create fax without having created a document first—for those times when you simply want to send a file as an attachment or send only a cover page with a note—you start by creating a new document, as follows:
- Choose File, New. The New Document task pane appears.
- Click General Templates. The Templates dialog box appears.
- On the Letters & Faxes tab, select Fax Wizard, and click OK. The Fax Wizard welcome page appears, as shown in Figure 30-25, leading you through a series of questions that enable you to choose the document, select the fax program, and configure the specifications and recipients for your fax. (We'll work through these wizard steps in the remainder of this section.)
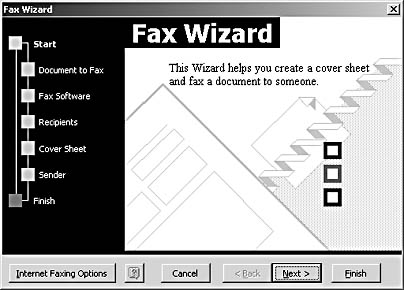
Figure 30-25. The Fax Wizard walks you step-by-step through the process of creating and sending your fax.
Troubleshooting
I Can't Find the Fax Wizard
If the Fax Wizard option is missing from the Letters & Faxes tab, you might need to install it. To do so, follow these steps:
- Choose Start, Settings, Control Panel.
- In Control Panel, double-click Add/Remove Programs, and in the Currently Installed Programs list, locate Microsoft Office.
- Click Office, and click the Add/Remove button. The Microsoft Office XP Setup Wizard appears.
- Click Add Or Remove Features, and click Next.
- In the Features To Install list, expand Microsoft Word For Windows, Wizards And Templates, click Faxes, and choose Run From My Computer on the drop-down menu. Click the Update button to install the Fax Wizard.
If you are using Office on a network, be sure to check with your network administrator before installing any new features.
Tip - Send a fax using the Internet
You can also use Word to send and receive faxes over the Internet if you don't have a fax machine or fax capability on your system. To do so, connect to the Internet and then start the Fax Wizard as described. Click the Internet Faxing Options button on the first page of the Fax Wizard to access the Microsoft Office Update Web page, where you can find out more about online faxing or link to a Web faxing site.
Selecting the Document to Fax
On the Fax Wizard Start page, click Next to begin. The Document To Fax page allows you to specify which document you want to fax. By default, the current document is selected. If you have more than one document open and you want to choose a document other than the one shown, click the down arrow for the drop-down list and select the document you want to send. You can also make the following choices about cover sheets: to send a cover sheet along with the fax, click With A Cover Sheet; to send the document as is, without a cover sheet, leave Without A Cover Sheet selected; and to send the document as is, without a cover sheet, leave Without A Cover Sheet selected.
After you make your selections, click Next to proceed to the Fax Software page of the wizard.
Note
The options that are available on the Document To Fax page of the Fax Wizard depend on the fax software you are using to send the document. Some programs do not have the capacity to send a cover sheet with the fax. If you select different fax software (in the next step of the wizard), you can click Back to return to the Document To Fax page and select the cover page options you want.
Choosing a Fax Program
The Fax Software page of the Fax Wizard enables you to select the fax program you want to use. By default, Microsoft Fax might be selected on your system. If you want to choose a different fax program (and you already have one installed), click A Different Fax Program Which Is Installed On This System, and then click the down arrow to select the program name from the list of installed programs. If you don't see the program you want to use, click the Other button and navigate to the folder containing the fax program you need. Click Next to continue on to the Recipients page in the Fax Wizard.
Tip
If you will be walking down the hall and using the office fax machine to send a fax, you can click the I Want To Print My Document option to tell Word to print the selected document in fax format.
Specifying Recipients
The Recipients page of the Fax Wizard, shown in Figure 30-26, lets you specify who you want to receive your fax. Here you can select individuals from your Address Book or you can type names and fax numbers in the boxes provided.
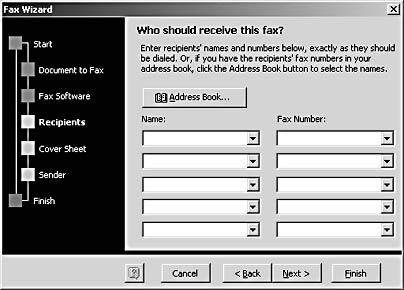
Figure 30-26. You can type the names and fax numbers of recipients or select them from your Address Book.
To choose recipients from your Address Book, follow these steps:
- Click the Address Book button on the Recipients page of the Fax Wizard. If you have more than one e-mail profile configured on your computer, the Choose Profile dialog box appears; otherwise, the Select Name dialog box appears. If you have only one profile, skip to step 3.
- If necessary, select the e-mail profile you want to use in the Choose Profile dialog box. (By default, the profile you use regularly will be displayed.) Click OK.
- In the Select Name dialog box, click the Show Names From The down arrow, and choose the Address Book you want to use from the drop-down list.
- Click the name you want in the list of recipients, and click OK. Word inserts the name in the first Name box on the Recipients page of the Fax Wizard.
- Continue entering information, either by typing names and fax numbers or by selecting recipients from your Address Book. When you've finished identifying recipients, click Next.
Tip - Send merged faxes
You can send multiple faxes that you create by using the Mail Merge Wizard. Start by opening the document you want to fax, and then choose Tools, Letters And Mailings, Mail Merge Wizard. When you are asked to specify the document type you want to merge, select Faxes. For more information about creating and working with mail-merged documents, see Chapter 35, "Performing Mail Merges."
Selecting the Fax Style
Word provides three styles for the fax cover sheet you send: professional, contemporary, and elegant. Each is displayed on the Cover Sheet page of the Fax Wizard (which appears only if you selected a fax program that has cover sheet capability). Make your selection, and then click Next to move to the next page of the Fax Wizard.
Configuring Sender Info
The next page of the Fax Wizard, the Sender page, is about you—or your company. Fill in whatever information you want the recipient to know about you in the following boxes: Name, Company Information, Mailing Address, Phone, and Fax. Click Next to continue.
Tip - Save time by using the Address Book
If you have entered your company's info in the Address Book, you can have Word plug in the information automatically by clicking Address Book, choosing the address Book you want to use, and selecting your name from the list. Word inserts the information you've entered on the Sender page so that you don't have to retype it.
Completing and Sending the Fax
The last page of the Fax Wizard simply tells you to click Finish to send the fax. Word prepares the fax and displays the cover sheet (if you elected to send one) in your document window, as shown in Figure 30-27. The Fax Wizard toolbar appears at the top of the document window. Make any last-minute changes, and click Send Fax Now on the Fax Wizard toolbar. Word launches your fax software, which dials the first number in your recipient list and begins to transmit the fax.
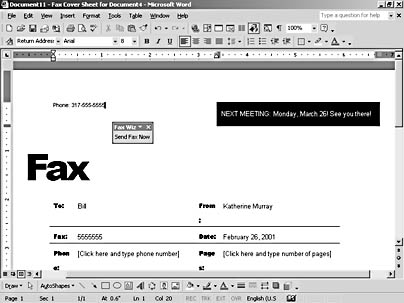
Figure 30-27. After you complete the Fax Wizard, Word displays the fax in the document window, where you can make final changes and send the fax.
Tip - Use Fax Service Management in Windows 2000
If you're using Windows 2000 Professional, another full-featured fax service is available to you. You can use the Fax Service Management utility to organize, manage, and send and receive faxes through your network. For more information about Fax Service Management, double-click Fax in Control Panel, and in the Fax Properties dialog box, click Advanced Options.
EAN: 2147483647
Pages: 337