Incorporating Other Reference Tables
3 4
TOCs aren't the only reference tables you'll use as you work with long documents. If you use illustrations, tables, diagrams, or equations, you'll like having the choice of numbering and labeling those elements automatically. If you work with legal briefings and citations, the ability to create a table of authorities will save you considerable time and trouble.
Building a Table of Figures
When you have Word generate a table of figures to use as a reference tool in your document, Word searches for and collects the figure captions in your document. This means that you need to set up your captions before you generate the table.
Adding Captions
First things first. Start by adding labels to the items you want to include in your table of figures. You can add captions while you work by using Word's AutoCaption feature. Here are the steps:
- Choose Insert, Reference, Caption. The Caption dialog box appears.
- Click the AutoCaption button. The AutoCaption dialog box, shown in Figure 26-7, appears.
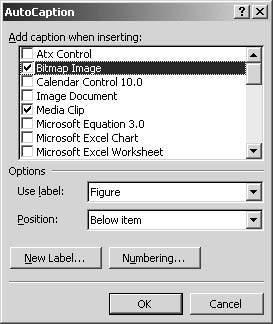
Figure 26-7. AutoCaption enables you to add labels and numbers to your figures automatically.
- In the Add Caption When Inserting list, select the check boxes next to the elements for which you want to add captions.
- In the Options section, choose the label you want to use, click the Position down arrow, and select Above Item or Below Item.
- Click OK to have Word search for and update the elements in your document.
Note
To view and work with the various options available for your table of figures, choose Insert, Reference, Index And Tables, and then click the Table Of Figures tab.
Controlling Figure Numbering
If you want to add figure numbering to your captions, choose Insert, Reference, Captions to display the Captions dialog box. Select the element to which you want to add the numbering (or update your other caption choices), and then click the Numbering button. The Caption Numbering dialog box appears, as Figure 26-8 shows.
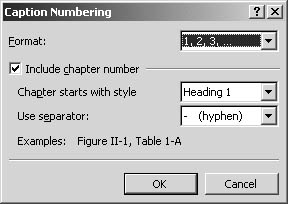
Figure 26-8. The Caption Numbering dialog box enables you to choose the format and style of the numbering sequence.
Begin by choosing the format you want to use for the numbering sequence. You can choose the traditional 1, 2, 3 or A, B, C, or you can choose roman numerals for figure numbering in the Format drop-down list. If you want to include chapter numbers (which Word picks up from the text), select the Include Chapter Number check box; then specify the heading style the chapter starts with (this shows Word where to begin looking), and select a separator character from the Use Separator drop-down list (Word will place this between the chapter number and the figure number in the caption). Click OK to save the settings. When you add your next figure, the caption will be applied automatically.
Generating a Table of Figures
After you've added captions to your illustrations by choosing Insert, Reference, Captions, you can use those captions to create a table of the figures in your document. Follow these steps to generate a table of figures:
- Place the insertion point where you want to create the table of figures.
- Click Insert, Reference, Index And Tables. The Index And Tables dialog box appears.
- Click the Table Of Figures tab. The default selections for the table are displayed in the preview boxes. (See Figure 26-9.)
- Change the settings as needed, and click OK to create the table. The table of figures is placed in the document at the insertion point.
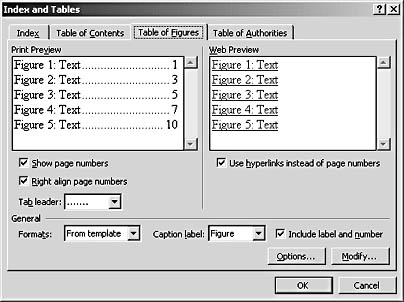
Figure 26-9. The preview boxes in the Index and Tables dialog box show the default selections.
Building a Table of Authorities
A table of authorities is a more specialized table reference that helps you track, compile, and display citations included in your document. You'll use this feature most often for legal documents that reference cases, rules, treaties, and other documents. Before you can create a table of citations, obviously, you need to have placed those citations within the body of the document.
Adding Citations Manually
You can easily track citations for inclusion in the table of authorities as you work in your document. To begin the process of adding a citation, follow these steps:
- Select the citation in the document.
- Press Alt+Shift+I. The Mark Citation dialog box appears with the selected citation displayed in the Selected Text box, as Figure 26-10 shows.
- Click the Category down arrow and choose the type of citation you're creating.
- Edit the citation, if needed, in the Short Citation box.
- Click Mark. Word adds the necessary codes in your document to identify the citation for inclusion in the table of authorities.
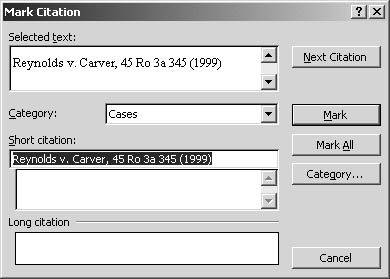
Figure 26-10. Use the Mark Citation dialog box to include citations in your table of authorities.
- In your document, select another citation, and then click in the Selected Text box. This adds the citation to the box. Again, click Mark to add the citation.
- Click Close to close the dialog box when you're finished adding citations.
Tip - Add citations directly
You can also add citations from the Table Of Authorities tab in the Index And Tables dialog box. To display the tab, choose Insert, Reference, Index And Tables, and then click the Table Of Authorities tab. Click Mark Citation to display the Mark Citation dialog box. Enter your citation as needed and click Mark to complete the entry.
Generating the Table of Authorities
After you've entered the citations you want to reference, you can start the process of creating a table of authorities by following these steps:
- Click Insert, References, Index And Tables.
- Click the Table Of Authorities tab, and enter your choices for the table of authorities you create. (See Figure 26-11.)
- Choose your category from the list on the right.
- Choose the formatting and styles you want, and then click OK to create the table of authorities.
Tip
If you've created multiple tables in your document, be sure to update each table independently. To update, click in the table and press F9.
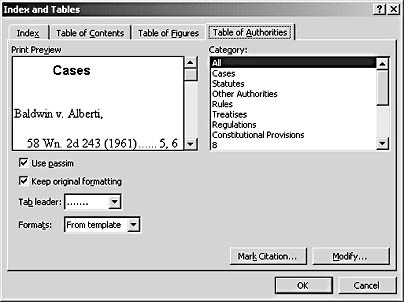
Figure 26-11. The Table Of Authorities tab includes everything you need for entering and formatting the table.
EAN: 2147483647
Pages: 337