Taking Advantage of AutoRecovery and Background Saves
3 4
As all computer users intuitively know, there's always a risk of losing data when you least expect it. To help reduce the risk of inadvertently losing data, Word is installed with the AutoRecovery and background saves features activated. These two features work together to help save your information without interrupting your workflow too much. These features can be summarized as follows:
- AutoRecovery automatically stores information about an active document that might be useful if your system crashes or if there's a power failure. By default, Word gathers AutoRecovery information every 10 minutes.
- Background Saves enables you to continue working in Word while you save a document. A pulsing disk icon appears on the status bar when a background save is taking place.
To verify that your system has these two features activated, choose Tools, Options, Save tab, and make sure that the Save AutoRecovery Info Every and Allow Background Saves check boxes are selected.
Keep in mind that the AutoRecovery feature isn't a replacement for saving your file. Instead, it's a tool Word can use when it attempts to recover a file after a system crash. You need to continue to save your documents regularly. If your system seems a bit shaky, you can also configure AutoRecovery to gather information more frequently by clicking the Save tab in the Options dialog box and changing the interval time in the Save AutoRecover Information Every box.
Note
By default, AutoRecovery files are stored in ...Application Data\Microsoft\Word. You can change the default location using the File Locations tab in the Options dialog box. (See Chapter 38, "Customizing Word and Maximizing Accessibility" for instructions about changing default file locations.)
newfeature! If you experience a system crash while working in Word, Word displays a Document Recovery task pane after you restart your system and reopen Word, as shown in Figure 2-17.
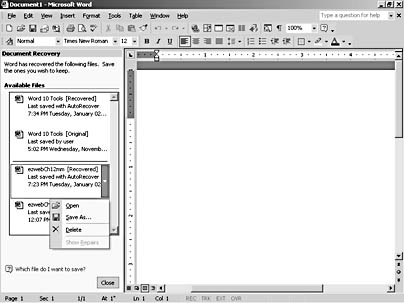
Figure 2-17. The Document Recovery task pane enables you to control how Word manages recovered files after a system crash.
You can select which files you want to recover from among the available recovered versions of documents within the Document Recovery task pane. The documents are referred to as recovery files, and they carry the .asd extension. To open a recovered document, double-click the entry in the task pane or choose Open on the item's drop-down menu. In addition, you can save or delete a recovered file or view repairs made to a recovered file by clicking the item's down arrow and selecting the desired command.
Tip - Recover the Most Recent Versions of Files
Frequently, you'll see a few versions of the same file listed in the Document Recovery task pane's Available Files list. When this occurs, keep in mind that a recovered file with "[Recovered]" in its title is usually in better shape than a file with "[Original]" in its title. Be sure to check the Last Saved time listed with each recovered document to verify that you're recovering the most recent version.
After you've made your recovery decisions, click the Close button in the lower-right corner of the Document Recovery task pane to close the pane. If you have not taken specified recovery action (such as deleting, saving, or opening and closing without saving) for each file in the Document Recovery task pane, a message box will appear asking whether you want to view the recovered files later or remove the files because you've saved the file you need. Select the action you want Word to take, and then click OK to complete the recovery process.
Caution
When you close a recovery file without saving it, the recovery file is deleted—you can't recover a deleted recovery file.
Troubleshooting
Recovery Files Aren't Displayed in Word After a Crash
In some instances, your recovery files might not appear when you reopen Word. Don't worry (yet)—all is not lost at this point. You can try to locate and open a recovery file manually when necessary. To do so, follow these steps:
- Click the Open button on the Standard toolbar, and navigate to Windows\Application Data\Microsoft\Word or Windows\Profiles\username\Application Data\Microsoft\Word.
- In the Files Of Type box, select All Files. You'll be looking for .asd files, but Word doesn't include a drop-down list item for that file type. (If you want to get really fancy, you can simply search for recovered files using the parameter AutoRecovery*.* in the Windows Search Results dialog box. To open the Windows Search Results dialog box, choose Start, Search, For Files Or Folders.)
- Find the recovery file named "AutoRecovery save of file name.asd", and then open the document.
- Click Save on the Standard toolbar, type or select the file name of the existing document, and then choose Yes when you're asked whether you want to replace the existing file.
EAN: 2147483647
Pages: 337