Working with the Document Grid
3 4
For those times when text flow, precise character placement, and spacing control are important, you can turn on Word's Document Grid feature to align and space the characters in your document. You choose grid settings on the Document Grid tab of the Page Setup dialog box. (See Figure 21-6.)
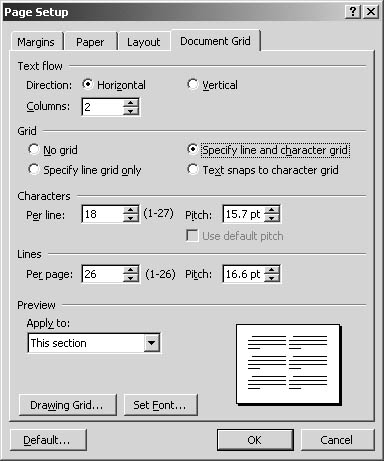
Figure 21-6. The Document Grid enables you to control precisely the line and character spacing in your document.
To use the Document Grid features, follow these steps:
- Choose File, Page Setup. The Page Setup dialog box appears.
- Click the Document Grid tab.
- If you want to text to be displayed vertically, appearing top to bottom as you type, click Vertical in the Text Flow section. Otherwise, for traditional right-to-left text display, leave Horizontal selected.
- To turn on the grid feature, select one of the following:
- Specify Line Grid Only enables only the settings in the Lines section, so that you can choose the amount of space between lines (by selecting the number of lines you want to appear on the page) and the pitch, or spacing between lines.
- Specify Line And Character Grid makes all settings in both Character and Lines sections available. This setting enables you to choose both the number of characters per line and the number of lines per page. You can also choose the pitch of both characters and lines.
- Text Snaps To Character Grid disables the Pitch settings and gives you the means to choose number of Characters Per Line and Lines Per Page.
- Click the Apply To down arrow, and choose the option reflecting the portion of the document to which you want to apply the grid. You can choose This Section, This Point Forward, or Whole Document.
- Click OK to apply the grid settings and close the dialog box.
If you changed the text direction from horizontal to vertical, Word starts a new page and the grid choices are in effect. If you left the text direction as it was, Word applies the grid effects as soon as you begin typing. As you type, you'll be able to see the effects of the new spacing selections you've chosen.
Displaying the Document Grid
If you want to see the grid while you work, choose File, Page Setup to display the Page Setup dialog box; then click the Document Grid tab. In the lower left portion of the dialog box, click the Drawing Grid button. In the Drawing Grid dialog box, select the Display Gridlines On Screen check box. (See Figure 21-7.) Click OK twice to return to the document. The gridlines are displayed throughout the entire document.
Note
If you want to see the document grid while you work, be sure to display your document in Print Layout view by choosing View, Print Layout. The document grid does not appear in Normal, Web Layout, or Outline view.
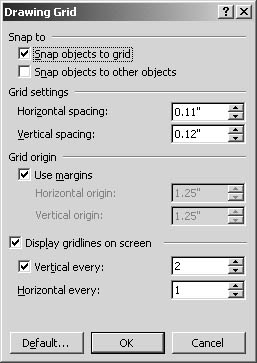
Figure 21-7. Customize the grid display by using the Document Grid settings.
Inserting Page Numbers
One of the first things you'll want to do with a multi-page document is add page numbers to the pages. Word gives you the option of controlling the placement, alignment and format of the page numbers you add. To add page numbers, choose Insert, Page Numbers. The Page Numbers dialog box appears. Here you make the following choices:
- Click the Position down-arrow, and choose the place on the page where you want the page number to appear. The Top Of Page choice inserts the page number in the header; the Bottom Of Page choice adds the page number to the footer. Other choices include Vertically Center Of Page, Vertically Outside, and Vertically Inside. As you choose each type, Word shows the effect of your selection in the Preview window.
- Click the Alignment down-arrow, and choose the way in which you want the page number to be aligned. Choices include Left, Center, Right, Inside, and Outside.
- Click Show Page Number On First Page if you want the page number to appear on your title page.
- Click Format to display the Page Number Format dialog box so that you can choose the type, style, and numbering sequence for your page numbers.
- Click OK twice to close the dialog boxes and add the page numbers to your document.
EAN: 2147483647
Pages: 337
- Measuring and Managing E-Business Initiatives Through the Balanced Scorecard
- A View on Knowledge Management: Utilizing a Balanced Scorecard Methodology for Analyzing Knowledge Metrics
- Governance in IT Outsourcing Partnerships
- The Evolution of IT Governance at NB Power
- Governance Structures for IT in the Health Care Industry