Linking Objects
3 4
Word provides two different ways for you to bring linked objects into your documents. You can use the Insert Object dialog box to place an existing object in your document, and you can use the Paste Special command to use the basic copy-and-paste procedure to establish and maintain a link with the source file.
Inserting a Linked Object
Suppose you have a great new banner ad design that you want to incorporate in the document you're preparing for a client. Although the banner ad isn't quite finished, you want to show the client how the ideas are developing in the presentation. You decide to add the entire presentation to your document as a link in the report.
To insert the object and create a link to the source file, follow these steps:
- Place the insertion point where you want to include the object.
- Choose Insert, Object. The Object dialog box appears.
- Click the Create From File tab (see Figure 15-1). Here you can enter the name for the file you want to insert and choose whether to link or embed the file.
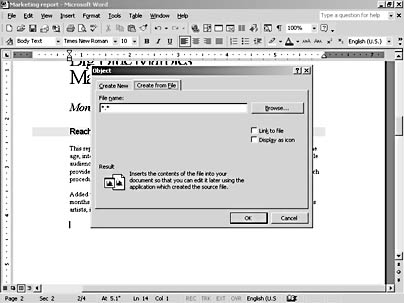
Figure 15-1. The Object dialog box gives you the means to link or embed objects.
- Click Browse. The Browse dialog box is displayed. Navigate to the folder in which the file you want to link is stored, select the file, and click Insert. You are returned to the Object dialog box.
- Select the Link To File check box. This tells Word to establish the link to the source.
- Click OK. The object is inserted, as Figure 15-2 shows.
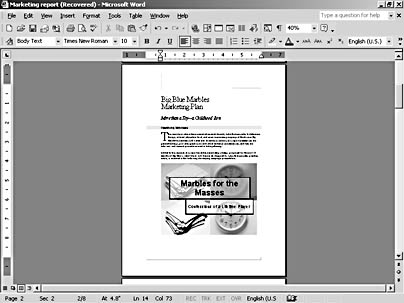
Figure 15-2. The object is placed at the insertion point.
Tip - Run a Presentation
If your linked object is a PowerPoint presentation, run the presentation by double-clicking it. You won't be able to edit the presentation, however, without opening the source file.
Troubleshooting
The Linked Object Is Missing
So after you go through the steps to insert a linked object, it starts to appear in your file and then—nothing. Just an outline, no object. What's going on?
If you have enabled Picture Placeholders in the Options dialog box, Word is saving memory and screen update time by showing only the outline of the object. You can fix this by choosing Tools, Options and clearing the Picture Placeholders check box on the View tab.
Tip - Create Objects with Create New
The process of embedding uses the Create New tab in the Object dialog box. Embedding an object enables you to include in your document objects you have created in other programs, and it also lets you actually create the objects from scratch while you are working with Word. When you use the items in the Create New tab to create an embedded object, Word launches the program you used to create the object; and then after you save and close the other program, you are returned to Word, and the object is embedded in your current document.
Adding Linked Objects with Paste Special
Another way to add a linked object in your document is to use Paste Special. This command (available from the Edit menu) copies and pastes not only the data but also a link to the source file. Start in the Word document to which you want to add the linked object, and then follow these steps:
- Position the insertion point where you want to add the object.
- Launch the program in which you have created the object to be linked. Select the section or object, and copy the item to the Clipboard.
- Return to Word, and choose Edit, Paste Special. The Paste Special dialog box appears. (For an example of the Paste Special dialog box, see Figure 15-5.)
- Click the Paste Link option, select the object type in the As list box, and click OK. Word adds the data and the link to your document. Note: The Paste Link option is available only for objects you've created in programs that support linking.
Tip
When you want to review the links in your current document, choose Edit, Links to display the Links dialog box.
Changing Linked Objects
Any editing you do on a linked object actually takes place in the source file. You can edit a linked object in several different ways:
- You can double-click the object to launch the source program.
- You can click the object, choose Edit, Linked Object, and click Edit Link.
- You can right-click the object to display the shortcut menu. You can then click Linked Object and select Edit Link (see Figure 15-3). This takes you to the source file so that you can make changes as needed.
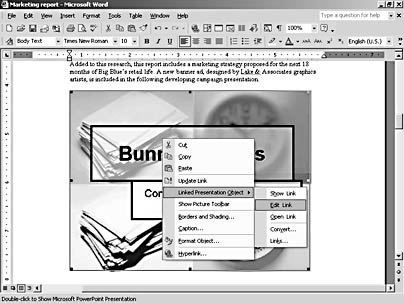
Figure 15-3. You can modify a linked object and update the changes.
To modify the source object directly, make your changes in the originating program. Save and close the object as you would normally.
When you return to the linked document, select the linked object and choose Edit, Update Link (or press F9). Depending on how you've set up your options for updates, the destination file might be updated as soon as you return to it or it might be delayed until you manually choose an update.
For more information on controlling the update of linked objects, see the section "Updating Links."
Working with Links
The only tricky part to working with linked objects in your documents is that managing a variety of links can be confusing and a drain on your system's resources. For this reason, Word pulls link management together in one place—the Links dialog box. To display this box, choose Edit, Links (see Figure 15-4).
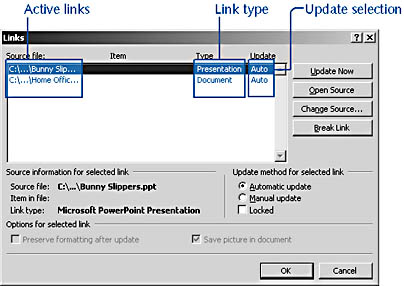
Figure 15-4. The Links dialog box gives you the means to review, change, update, and remove links to objects you've inserted in your document.
Reviewing Links
In the Source File section of the Links dialog box, you see a list of the currently active links in your document. You can scroll through the list to determine the following:
- The source file for the object
- The type of object that's linked
- The type of update assigned to the object
Using the various options in the Links dialog box, you can change the update method of the link, check the source file, modify the location of the source file, and review information about the link. You can also lock the link or break it to protect the destination document from any further changes.
Tip - Update Now
It's possible for you to have some links in the Source File list in the Links dialog box that show Auto updates and others that show Manual updates. You can force the update of a Manual link by selecting it in the Source File list and clicking Update Now.
Updating Links
By default, Word updates any links in your document. Each time you open the file, Word checks whether any links have changed—a process that can take a few minutes if you've added many links to your current document. Similarly, when you make a change to the source file and the destination file happens to be open, Word updates the destination file if you've got the updating options set to update automatically.
Manually Updating Links
Word gives you the option of updating links automatically or manually. Automatic is nice—you don't have to worry about it—unless sharing files is an issue and you want to limit others' ability to change or modify the linked document by editing the source. When you want to set a link in your document to be manually updated, follow these steps:
- Choose Edit, Links. The Links dialog box appears.
- Select the linked object in the Source File list.
- In the Update Method For Selected Link section, click the Manual Update option.
- Click OK. The object will be updated only when you choose Update Link from the Edit menu or press F9.
Locking a Link
When you get an object just the way you want it—your PowerPoint presentation is finished, for example, or that logo has finally been approved—you can protect the destination from further changes by locking the link. When you lock a link, it will no longer be updated, even if the source file is modified.
To lock a link, display the Links dialog box, select the linked object in the Source File list, and select the Locked check box in the Update Method For Selected Link section. You can unlock a link later if you choose by repeating the first two steps and clearing the Locked check box.
Troubleshooting
My Changes Are Lost
If Word crashes and then AutoRecover restores your document, you might find that your linked object has lost its most recent changes and is appearing as an outline instead of a fully displayed object. To fix these problems, save the document, click the object, and choose Tools, Options. Clear the Picture Placeholders check box on the View tab, and click OK to close the dialog box. Then, with the object still selected, press F9 to force a manual update. Word compares the object against the source file and updates any missing changes.
Going to the Source
When you want to look at the source file for your document, you can use the Open Source button in the Links dialog box to get to it. Simply select the link in the Source File list and click Open Source. The source program is opened and the file is displayed.
Tip - Edit Your Slide Show
If your source's native application is PowerPoint, Open Source will run a slide show rather than displaying editing mode for the presentation. To launch PowerPoint so that you can make changes in the file, right-click the object in your Word document and choose either Edit Link or Open Link. The PowerPoint work area will be displayed with the first slide shown in Slide view.
Changing the Source
When you want to move a source file, the linked document needs to know a move has taken place. To tell Word the source has moved, choose Edit, Links and, with the link selected, click Change Source in the Links dialog box. The Change Source dialog box appears. Navigate to the folder where the source file is now located, click the file, and click Open. Click OK to close the Links dialog box.
Breaking Links
After you have a file in its finished state, you might want to break a link to keep the object from future modifications. To break the link of a selected object, follow these steps:
- Display the Links dialog box by choosing Edit, Links.
- In the Source File list, select the link you want to break.
- Click Break Link. Word displays a message box asking you to confirm that you want to proceed with the operation.
- Click Yes to break the link. The link is removed from the list, although the object remains in your document. Any further changes to the source file will not affect your document.
- Click Close to close the Links dialog box.
Note
If you want to re-establish the link you just broke, you can press Ctrl+Z or select Undo to re-establish the link.
Linking Considerations for Shared Files
As you can see, managing the links for your documents could be a fairly complicated process, especially if you create a number of links to each document and choose to have some updated automatically and others updated manually. Reviewing your links regularly, as well as keeping a list of active links for current files, is a way to ensure that an important source file doesn't disappear 15 minutes before a major meeting.
If your document is linked to a source file on a network server, you run the risk that the document might be changed, moved, or deleted by another user. Although Word looks for the missing file, there's no guarantee it will find it. Make sure that you keep active backups of important files and that you review your links often.
Another network consideration: If your source file is stored in a shared directory, it's possible that another user can access your file and make a change without your knowledge. This is fine if the change makes things better, but what if the change introduces an error you miss? To control the access to the file, you can choose to manually update the link when you add the linked object.
Troubleshooting
The Source File Has Moved
If you get an error when you try to edit a linked or embedded object, check to see whether the source file has been moved. To do this, click the linked object, choose Edit, Links. Use the Change Source button in the Links dialog box to reconnect the links.
EAN: 2147483647
Pages: 337