Scrutinizing Document Statistics
|
| < Day Day Up > |
|
In addition to the standard reference book features included in Word, you have several other electronic reference tools that you can use to analyze your documents. Namely, you can instruct Word to quickly summarize the content in a document by using the AutoSummarize feature, you can analyze a document's readability level using Flesch Reading Ease and Flesch-Kincaid Grade Level scores, and you can display word count statistics to track the length of your text while you work.
Getting to the Point with AutoSummarize
Word can automatically summarize key points in documents, enabling you to create brief versions of documents that readers can quickly scan. You'll find that AutoSummarize works best on structured documents such as reports, white papers, technical documents, articles, and so forth. AutoSummarize doesn't work especially well for fiction, correspondence, and other more loosely structured documents.
The AutoSummarize feature determines key points in your document by analyzing and scoring sentences. Sentences are given higher scores if they contain words that are frequently used in the document.
You can choose one of the following four options for displaying the summary information:
-
Highlight Key Points Summarizes the current document by highlighting summary information (in yellow, by default). The remainder of the document text appears in gray. The AutoSummarize toolbar appears by default; it includes a Highlight/Show Only Summary button, a Percent Of Original slider that enables you to adjust the percentage of the document included in the summary, and a Close button that returns you to your original document. Figure 6-23 shows a sample document with key points highlighted; notice the AutoSummarize toolbar in the upper-right corner.
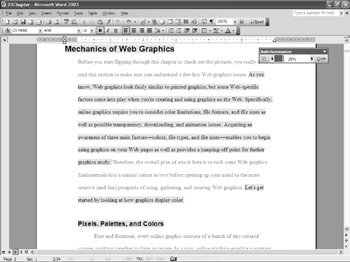
Figure 6-23: You can temporarily highlight a document's key points using the AutoSummarize feature, which automatically displays the AutoSummarize toolbar. -
Create A New Document And Put The Summary There Displays the summarized information in a new document. This option creates a separate document with no link to the original text. The only way you can adjust the percentage of information in this type of summary is to re-create the summary. This type of summary is helpful if you want to create an abstract or executive summary of a document.
-
Insert An Executive Summary Or Abstract At The Top Of The Document Inserts the summary at the beginning of the document under the heading Summary. Using this option, the summary becomes part of your document. To remove the summary, click Undo (or press Ctrl+Z), or delete the added text manually.
-
Hide Everything But The Summary Without Leaving The Original Document Hides all document text except the text included in the summary. This option doesn't change your text; it merely temporarily hides the text not included in the summary. If you print your document, only the summary will be printed. To return to the display of the complete document, click the Close button on the AutoSummarize toolbar.
Cross-Reference AutoSummarize can't summarize text in textboxes, frames, or tables. For more information about text boxes and frames, see Chapter 17, "Formatting Layouts Using Text Boxes, Frames, Backgrounds, and Themes," and for more information about tables, see Chapter 13, "Organizing Concepts in Tables."
To summarize a document using the AutoSummarize tool, follow these steps:
-
Open the document you want to summarize, and then choose Tools, AutoSummarize to display the AutoSummarize dialog box, shown in Figure 6-24.
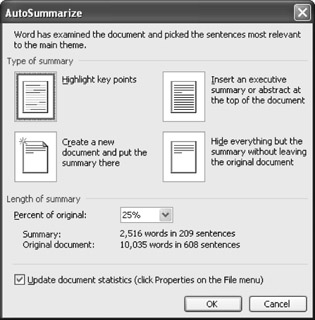
Figure 6-24: AutoSummarize provides various options for displaying a summary of the current document.Tip The AutoSummarize processing can take a few moments to complete. If you find the processing is taking too long, you can stop it by pressing Esc.
-
In the AutoSummarize dialog box, choose the type of summary you want to create.
-
In the Percent Of Original box, specify the level of detail that you want to include in your summary. You can choose among the following options: 10 Sentences, 20 Sentences, 100 Words Or Less, 500 Words Or Less, 10%, 25%, 50%, or 75%. A higher percentage includes more details in your summary, whereas a lower percentage includes less detail.
-
Specify whether you want AutoSummarize to replace existing keywords and comments in the Summary tab in the document's Properties dialog box (the document's Properties can be viewed by choosing File, Properties, and clicking the Statistics tab). If you don't want AutoSummarize to replace this information, clear the Update Document Statistics check box.
-
Click OK to create the summary.
After you create a summary using the AutoSummarize feature, you should proofread and edit the summary to smooth any rough edges, especially if you chose to create a new document or inserted the summary at the beginning of your document. Sometimes, you might find that it's better to include more in your summary at first and then pare down the information as needed—generally, it's easier to cut text than to put text back in.
| Note | AutoSummarize creates summaries based on the language in use when Office was installed on the computer. If you use AutoSummarize on a document written in another language, the summary is created in the document's language. Further, if multiple languages are used in a document that's being summarized, AutoSummarize generates the summary in the language that's used most frequently in the document. |
| Tip | Include text formatted with the No Proofing option in a summary AutoSummarize can't summarize text that's marked not to be checked for spelling or grammar. To ensure that text isn't formatted with the No Proofing option, choose Tools, Language, Set Language, and ensure that the Do Not Check Spelling Or Grammar check box is not selected. |
Judging a Document's Readability Level
You can configure Word to display a readability level for a document after you finish checking spelling and grammar. Word determines readability levels by assigning Flesch Reading Ease scores and Flesch-Kincaid Grade Level scores to documents. These scores are obtained by rating the average number of syllables per word and average number of words per sentence. The Flesch Reading Ease score is based on a 100-point scale, in which a higher score means that a document is easier to read. You should aim for scores ranging from 60 to 70 in most cases. The Flesch-Kincaid Grade Level score rates text based on U.S. school grade level. For example, a score of 8.0 means that an eighth grader should be able to understand the text. Most documents intended for the general public should score near the 7.0 or 8.0 level.
To display reading statistics, you must select the Show Readability Statistics option and completely check your document's spelling and grammar as follows:
-
Choose Tools, Options, and click the Spelling & Grammar tab. Select the Check Grammar With Spelling check box (if necessary), select the Show Readability Statistics check box, and click OK.
-
Run a complete spelling and grammar check by choosing Tools, Spelling And Grammar. When the check is complete, Word automatically displays information about the reading level of the document, as shown in Figure 6-25.
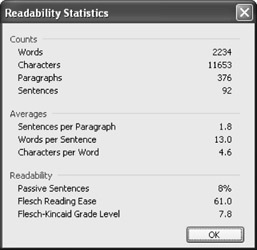
Figure 6-25: The Readability Statistics dialog box shows readability levels in addition to other details, such as word count, average words per sentence, and so forth.
Displaying Word Count Statistics
At times, you might want to show word count statistics without obtaining readability or AutoSummarize information. For example, you might have been given a limit on how many words a document can be for a particular assignment—magazines and newspapers commonly set this type of limit. You can easily count the words in your document in Word. To do so, choose Tools, Word Count. The Word Count dialog box appears, displaying page, word, character, paragraph, and line count information, as shown in Figure 6-26.

Figure 6-26: The Word Count dialog box gives you a quick summary of your document's statistics.
You can also use the following keyboard shortcuts to conduct word counts:
-
Ctrl+Shift+G displays the Word Count dialog box.
-
Ctrl+Shift+R conducts a recount to update the word count statistics.
The Word Count dialog box includes the Include Footnotes And Endnotes check box so you can choose whether to include those elements in your word count. Further, the Word Count dialog box contains a Show Toolbar button. Click this button to display the Word Count toolbar, shown in Figure 6-27, and then close the Word Count dialog box. The Word Count toolbar remains on your desktop while you work; you can click Recount at any time to quickly check your word count statistics, and click the arrow to view additional count statistics, including page, word, character (with and without spaces), paragraph, and line counts. Note that if your document has the revisions feature turned on, the Word Count feature will include the revisions in the count totals.
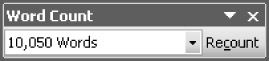
Figure 6-27: You can display various word count statistics on the Word Count toolbar by selecting the type of statistic from the list.
Finally, you can also perform a word count on selected text, including noncontiguous selections. To do so, select the text you want to count, and then choose Tools, Word Count or click Recount on the Word Count toolbar bar (if it's open).
|
| < Day Day Up > |
|
EAN: 2147483647
Pages: 373