Working with Web Graphics
|
| < Day Day Up > |
|
As you've seen up to now in the chapter, creating Web pages is much like creating standard Word documents, with a few twists here and there. So you won't be surprised to learn that adding graphics to your Web pages is similar to adding graphics in standard Word documents. The main difference is that Web page graphics have to be stored as one of the following graphic file types so that browsers can display them:
-
GIF GIFs are the most widely supported graphics type on the Web (which means that almost all browsers-old, new, and in-between-can display GIF images). GIF images can support up to 256 colors, and they are generally used for simple logos, line art, icons, cartoonlike illustrations, buttons, horizontal rules, bullets, backgrounds, and other graphics elements that require few colors. In addition, GIFs can include transparency and can be used to create simple animations, referred to as animated GIFs. (In a nutshell, an animated GIF can be likened a stack of GIF graphics that the browser flips through, like old movie flip cards, to create the appearance of movement.)
-
JPEG (or JPG) The JPEG image file format was created by and named after the Joint Photographic Experts Group. This image format supports millions of colors (24-bit color), and JPEGs are almost universally supported by browsers. Because JPEGs can contain millions of colors, this file format is usually used to display photographic images online.
-
PNG PNG (pronounced "ping") images are similar to GIF images. They're small files that load quickly and are limited to 256 colors. PNG images transmit slightly faster than GIF files, but PNGs are supported only on newer browsers. At this point, if your Web pages are going to be viewed by a diverse audience using a variety of browsers, you should use GIF files instead of PNG files.
Cross-Reference For more information about transparency, see Chapter 12, "Enlivening Documents with Drawings and AutoShapes."
If you're creating a Web page in Word and you insert a graphic in your document that's stored as a file type other than these three file types, Word will create copies of the graphic and convert it to a JPG, GIF, or PNG file when you save the Web page document. Word will store copies of all graphics files in the HTML document's supporting files folder by default. This default action is desirable because when you use graphics files in your Web pages, you must store your files in an orderly manner to ensure that your HTML code works properly. And when you upload your Web pages to a server, you must retain your Web page's HTML and graphics file organization so that the server can properly find all graphics files referred to in your HTML document.
Now that we have some of the Web graphics particulars taken care of, let's look at how you can use graphics in your Web pages. Generally, graphics are used in Web pages to create the following components:
-
Photographs and illustrations
-
Buttons and logos
-
Icons, bullets, and horizontal rules
-
Graphical text
-
Simple animations
-
Backgrounds
As mentioned, inserting and adjusting graphics in Web pages is fundamentally the same as inserting and adjusting graphics in standard Word documents. But among Web graphics tasks, a few Web-specific topics stand out. In particular, when you create Web graphics, you'll want to specify alternative text for each graphic. Further, you'll probably want to insert horizontal rules, picture bullets, and animated clip art items. The next section of the chapter briefly addresses these topics.
| Cross-Reference | For more information about working with graphics, objects, and WordArt, see Part 2, "Reinforcing Your Message with Tables, Charts, Diagrams, and Pictures," and for more information about inserting backgrounds, see Chapter 17, "Formatting Layouts Using Text Boxes, Frames, Backgrounds, and Themes." |
Adding Alternative Text
When you use graphics on your Web pages, you should take a moment to think about the people who won't see your graphics, especially if your Web pages will be posted on the Internet. Because the Internet is worldwide, you can't accommodate all the types of Internet connections and browsers that people will be using to view your pages. It's highly likely that at least some of the people viewing your pages might be using text-only browsers or they might turn off the display of graphics in their browsers when they surf the Web so that they can display Web pages more quickly. As a Web page developer, you can specify alternative text (generally referred to as ALT text by Web designers) that will automatically appear while a graphic is loading or in a graphics area when a browser doesn't display graphics. Figure 26-14 shows how ALT text appears in a Web page with the graphics display turned off.
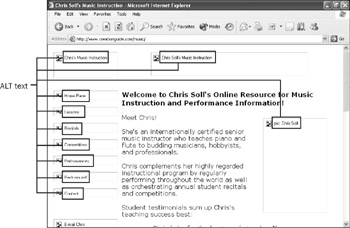
Figure 26-14: ALT text can be used to describe content areas to users who view your Web pages without graphics.
ALT text is displayed in place of images under the following conditions:
-
When a browser doesn't support graphics
-
When a browser's settings are configured to not show graphics
-
When a user experiences slow downloads
-
When viewers have special needs due to visual impairment
To specify ALT text for Web page graphics in Word, follow these steps:
-
With your Web page document open in Word, double-click the picture or drawing object in your Web page that you want to configure, and then click the Web tab in the Format Picture dialog box.
Tip You can also display the Format Picture dialog box by right-clicking a picture or drawing object and then choosing Format Picture, or clicking the picture or drawing object and then choosing Format, Picture (or Format, AutoShape).
-
In the Alternative Text box, type the text you want to display in place of the graphic or when the viewer's pointer hovers over the graphic, and then click OK.
When you supply ALT text, you can insert as much text as you want, but keep in mind that some browsers might display only a limited number of characters. When you create ALT text, try to keep it concise and descriptive. Remember, the main purpose of ALT text is to provide information to viewers who won't be viewing your graphics or to explain graphics for Web page viewers.
Adding Horizontal Rules
A typical kind of graphic on Web pages is a horizontal rule. Horizontal rules can be created in two main ways: by typing HTML code directly into a Web page's source code or by inserting a graphical divider. To enter HTML code for a horizontal rule (you use the <HR> tag), you need to open the Microsoft Script Editor, and then add the source code. The Microsoft Script Editor is introduced in "Editing Source Code Using the Microsoft Script Editor". This section of the chapter looks at the other typical way to insert horizontal rules, by inserting a graphic divider.
Word makes inserting horizontal rules in Web pages easy. You can access Word's default horizontal line graphics in two main ways:
-
Position the insertion point where you want to insert a divider, display the Clip Art task pane, type Web Dividers in the Search For box, and then press Enter.
-
Position the insertion point where you want to insert a divider, choose Format, Borders And Shading, click the Borders tab, and then click Horizontal Line.
As you can see in Figure 26-15, both approaches result in a similar display of available horizontal rules. To select a rule from either the Horizontal Line dialog box or the Clip Art task pane, double-click the line you want to include in your Web page.
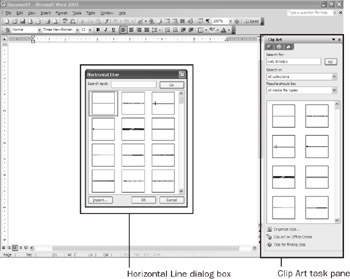
Figure 26-15: You can insert horizontal rules by displaying Word's default graphic lines and double-clicking the line you want to insert in your Web page.
After you insert a horizontal rule, you can modify its properties. If you inserted a rule using the Horizontal Line dialog box, you can right-click the line and then choose Format Horizontal Line from the shortcut menu (or click the line and then choose Format, Horizontal Line) to display the Format Horizontal Line dialog box, shown in Figure 26-16. Notice that you can control a line's width, height, color, and alignment using the Format Horizontal Line dialog box.

Figure 26-16: The Format Horizontal Line dialog box enables you to control the appearance of horizontal lines used in your Web pages.
If you inserted the rule using the Clip Art task pane, you can right-click the line, and then choose Format Horizontal Line or Format Picture from the shortcut menu (or click the line, and then choose Format, Horizontal Line or Format, Picture depending on the available option) to display the Format Horizontal Line or Format Picture dialog box. In most cases, you'll use the Format Picture dialog box when you work with horizontal lines that you inserted using the Clip Art task pane. (The Format Picture dialog box is discussed in Chapter 11, "Adding Visual Impact with Pictures and Objects.")
| Tip | Use AutoFormat to create horizontal lines By default, the AutoFormat As You Type tab in the AutoCorrect dialog box (which you can access by choosing Tools, AutoCorrect Options) is configured to replace some instances of repeated characters with formatted horizontal lines. For example, if you type - - - (hyphens), ==== (equal signs), ____ (underscores), or **** (asterisks) and then press Enter, Word will replace the characters with a straight line, double line, thick line, or thick dotted line, respectively. For more in formation about AutoFormat features, see Chapter 7, "Putting Text Tools to Work." |
Adding Picture Bullets
You can (and often should) use bulleted lists in your Web pages to help present information clearly and concisely. But being clear and concise doesn't have to be synonymous with boring. Instead of showing standard black dots every time you want to display a list, you might want to liven up your Web pages with graphics bullets. Word makes displaying a bulleted list with graphics a simple task, as described here:
-
Select the bulleted list you want to reformat with graphics bullets.
-
Choose Format, Bullets And Numbering, and then click the Bulleted tab.
-
Choose a bulleted list display box, and then click the Customize button. The Customize Bulleted List dialog box appears, as shown in Figure 26-17.
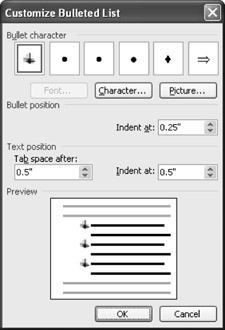
Figure 26-17: You can modify the layout of a bulleted list by configuring the Customize Bulleted List dialog box. -
In the Customize Bulleted List dialog box, click the Picture button to open the Picture Bullet dialog box.
-
Double-click the bullet you want to use. Notice that some bullet options have a star in the lower-right corner. This star indicates that the bullet is displayed as an animated bullet when it is viewed in a browser.
-
Click OK in the Customize Bulleted List dialog box to reformat the bulleted list.
Cross-Reference For more information about creating and modifying bulleted lists, see Chapter 8, "Aligning Information and Formatting Paragraphs and Lists."
Adding Animated Clip Art
 The Clip Art task pane includes some animated graphics that you can include in your Web pages. Animated clip art items in the Clip Art task pane can be identified by the small yellow star in the lower-right corner of the item's preview picture. You can insert animated clip art the same way you insert other clip art items-simply click the item in the Clip Art task pane. To view the animation, you must preview your document in a Web browser. To do so while working in Word, choose File, Web Page Preview.
| Tip | Test animated clip art To see an animated clip art item in action, display the Clip Art task pane; type an action word, such as walking, in the Search For box; click Go; click an animated clip art item to insert it in your document; and then click File, Web Page Preview to view the animation. |
|
| < Day Day Up > |
|
EAN: 2147483647
Pages: 373