Sharing Files and Folders
|
| < Day Day Up > |
|
Part of the beauty of working on a network is that you can easily share files, folders, networked locations, and hardware resources (such as Zip drives, printers, scanners, and so forth) with anyone linked to your network. In addition, you can access networks from various locations. This capability can come in quite handy and can save you time because you won't have to continually copy information to a disk to use the information on another computer, and you won't be stranded in one location while your files sit in another. Because Word is a document creation program and sharing files and folders represents one of the most significant reasons for networking, we'll look at sharing those resources in more depth here.
Sharing Word Information Online
You can share information with other Word users in a number of ways. To share your information effectively, you should design your resource-sharing setup based on who will be accessing the information and how the information should appear. You can share files or folders using any of the following techniques:
-
Post the information to a public folder on Microsoft Exchange Server. For example, you can open a file and choose File, Send To, Exchange Folder if your network has the Exchange Server extensions installed.
-
Save the information in a shared workspace. A shared workspace is a Microsoft Windows SharePoint Team Services Web site. Shared workspaces are discussed in more detail in Chapter 25, "Working with Shared Documents."
-
Save the information in a shared network or Internet folder. To learn more about Internet folders and network locations, refer to the discussion earlier in this chapter.
-
Send a copy of a file to others using an instant messaging (IM) application. Many instant messaging services enable you to send documents to contacts. Windows Messenger and MSN Messenger provide this capability, and you can access IM from within Word as described earlier in this chapter.
-
Send a copy of a file to others or collaborate online using Word e-mail, fax, or NetMeeting features. Word's e-mail, fax, and meeting capabilities are discussed later in this chapter.
-
Store comments about a document on a discussion server. You can discuss online documents by participating in Web Discussions hosted by discussion servers or SharePoint Team Services, as described later in this chapter.
Choosing how you want to share resources can be fairly straightforward. For example, if you're sharing a few computers on a peer-to-peer network made up of trusted resources, you'll probably feel comfortable simply specifying files and folders as shared resources through Windows itself. On the other hand, if you know you have resources that people will need to access from many parts of the world, you'll be better served by sharing documents in a Web folder. To take advantage of other sharing options, such as public folders and SharePoint Web sites, you'll need to determine whether your server has Exchange Server extensions, Office Server extensions, or SharePoint Team Services installed.
Windows 2000 and Windows XP make it easy to share folders on intranets. The minor catch is that before you can share a folder with others on your intranet, you must be logged on as a member of the Administrators group or as another type of user with sufficient privileges. After you've verified your logon status, follow these steps to share a resource:
-
In Windows Explorer, right-click the folder you want to share, and then choose either Sharing And Security (Windows XP) or Sharing (Windows 2000) from the shortcut menu.
-
In the Sharing tab in the folder's Properties dialog box, click Share This Folder On The Network (Windows XP) or Share This Folder (Windows 2000).
-
Click OK to close the Properties dialog box.
After you share a folder, the folder icon changes to a hand holding a folder. This lets you quickly determine which folders on your computer are shared. Others on your network can now navigate to your computer and view the contents of the folders you've shared.
You can also share documents on your computer with other users by placing the documents in your computer's Shared Documents folder. You can access your Shared Documents by choosing Start, My Computer. In the My Computer window, you'll see the Shared Documents folder.
Sharing Documents with People Using Other Versions of Word
As you know, the software world changes much more frequently than many offices and people tend to update their systems. In addition, people use a variety of hardware platforms and operating systems. Therefore, you'll find that you occasionally want to share Word documents with people who are using earlier versions of Word or using Apple Macintosh versions of Word. Conveniently, Word includes several features that assist you when you want to share documents with people using other versions of Word (or people who aren't using Word at all).
| Note | You can use Word 2003 to open documents created in Word 2003, Word 2002, Word 2000, Word 97, Word 95, or Word 6. All data and formatting in documents using those versions of Word are fully supported in Word 2003. |
Sharing Documents with Users of Word 97 and Later
If you share documents with people who use Word 97 or later versions, you can save your documents in the standard Word document format. If desired, you can quickly create new documents or modify existing documents specifically for use in these versions of Word by turning off features not supported in that version. To do this, follow these steps:
-
Ensure that the document you want to save is open in Word.
-
Choose Tools, Options, and then click the Save tab. The Save tab in the Options dialog box is shown in Figure 24-6.
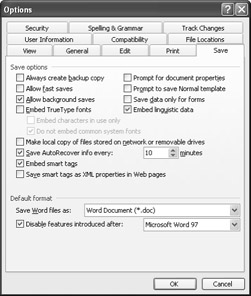
Figure 24-6: You can configure the settings in the Save tab to establish a default file format for new documents as well as to disable features that aren't supported in earlier versions of Word. -
Select the Disable Features Introduced After check box, select the version of Word you want in the list, and then click OK. If appropriate, Word will display a summary of features in the document that aren't supported in the selected version of Word, as shown in Figure 24-7. Click Continue to proceed.
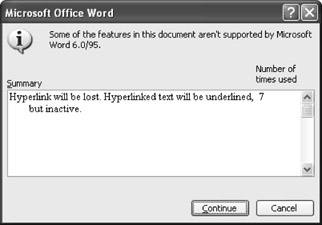
Figure 24-7: Word displays a summary of features found in the current document that aren't supported in the newly selected document format.
After you turn off features not supported by earlier versions of Word and save the document, the document can be used in the specified version of Word. If you work with the document in later versions of Word, you'll notice that some of the features are not available on menus. If you choose an unavailable option (such as choosing Insert, Hyperlink when you're working on a document for Word 6), a dialog box will appear, stating that the feature is currently disabled. The dialog box includes a Tell Me More button that you can click for further information about the disabled feature.
| Note | You can't use the Disable Features Introduced After option when you're saving Web pages—Word 97 and earlier versions don't support HTML documents. |
Sharing Documents with Word for Windows 95 Users
In addition to saving documents for people who use Word 97 and more recent versions, you can prepare your documents so that they're accessible in Word 6 or Word 95 for Microsoft Windows 95. You can achieve this compatibility using one of the following techniques:
-
Save existing documents in Rich Text Format (RTF) for most versions of Word, including Word 6 or Word 95. To save your document as an RTF file, choose File, Save As, and then select Word 97-2003 & 6.0/95 – RTF (*.doc) in the Save As Type list. When you save a document with this format, many word processing programs can read and display the document. The drawback to using this format to save a Word document is that some types of data or formatting might be lost. Furthermore, documents saved with this file format or the standard RTF format will often be larger than documents saved in more recent versions of Word because Word 97 and later versions of Word handle image compression better than earlier versions of Word and RTF.
-
Turn off unsupported features while you work. To turn off unsupported features while you work, choose Tools, Options, click the Save tab, and then configure the Disable Features Introduced After setting. (For more detailed information, see the "Sharing Documents with Users of Word 97 and Later".) When you turn off unsupported features, you can create new documents or modify existing documents specifically for use in Word 6 or Word 95.
-
Send users a Word converter or viewer application. Microsoft includes converters and viewers with Word, and they are also available for download from the Microsoft Office Resource Kit Web site and the Microsoft Office Online Web site. You can send a converter or a viewer application to users of Word 6, Word 95, or Microsoft Works, for Microsoft Windows, Microsoft Windows NT, or Apple Macintosh operating systems. After users install a converter or viewer, they can directly open Word documents.
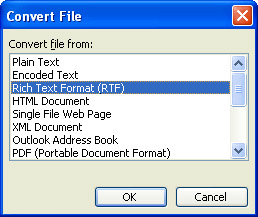
If you want to know which converter (if any) is being used when you open a document, you can display the Convert File dialog box, shown here:
To configure Word to notify you when files are converted, follow these steps:
-
Choose Tools, Options, and then click the General tab.
-
Select the Confirm Conversion At Open check box, and then click OK.
After you set this option, the Convert File dialog box will appear when you open a file that must be converted. When you see the Convert File dialog box, simply click OK to open the document normally. (The file's default file format will be selected unless you specify another format.) If you click Cancel, the process will be aborted, and the document won't be opened. If you select another file format in the Convert File dialog box, the document will be opened in the selected format. For example, if you select Plain Text in the Convert File dialog box when you're opening a Web page document, you'll see a text document that shows the HTML source code for the Web page instead of the standard WYSIWYG view Word normally displays when you open HTML documents.
Converting a Batch of Files to or from Word Format
Although you can easily convert a document into another format by using the Save As feature, in some cases you might want to convert a number of Word files to another format. For example, you might want to convert a collection of files from a client who uses WordPerfect. You can easily convert a batch of files by using the Conversion Wizard included with Word. To do so, follow these steps:
-
Put the documents that you want to convert in a single folder.
-
Choose File, New to open the New Document task pane.
-
In the Templates section, click On My Computer.
-
In the Templates dialog box, click the Other Documents tab.
-
Double-click the Batch Conversion Wizard icon. The Start page is shown in Figure 24-8.
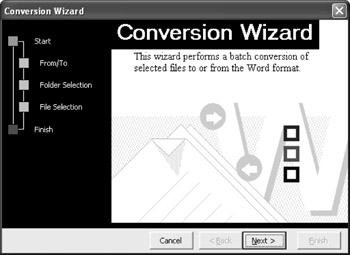
Figure 24-8: The Conversion Wizard walks you through the process of converting a number of files at one time.Note The first time you use the Batch Conversion Wizard, you might have to wait a moment or two while the wizard is installed.
-
Click Next, and then specify whether you want to convert documents to Word format or convert Word documents to another format by selecting the appropriate option and choosing the file type in the list.
-
Click Next, and on the Folder Selection page, click the Source Folder Browse button. The Browse For Folder dialog box appears, as shown in Figure 24-9. Select the appropriate folder, and then click OK.
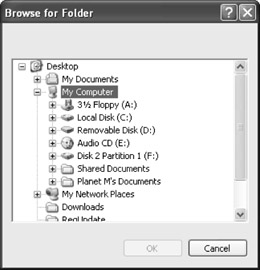
Figure 24-9: You can use the Browse For Folder dialog box to specify the folder that contains the files you want to convert and the location where you want to store the converted files. -
Click the Destination Folder Browse button, select the folder in which you want to store the converted files, and then click OK.
-
Click Next to display the File Selection page, shown in Figure 24-10, where you can specify the files you want to convert. To select a file, double-click the file name in the Available list; the file name will appear in the To Convert list. Continue to double-click file names in the Available list until all the files you want to convert appear in the To Convert list. If you want to convert all the files, click Select All. You can filter the Available list view by choosing a file type in the Type list.
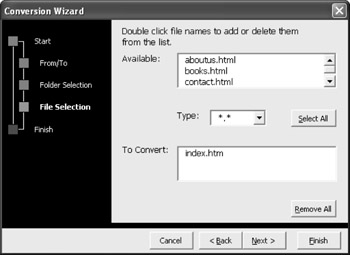
Figure 24-10: The File Selection page enables you to pick and choose the files you want to convert. -
After you've added files to the To Convert list, you can remove a single file by double-clicking it or click Remove All if you decide not to convert any of the specified files. When you've completed the File Selection page, click Next, and then click Finish to complete the conversion. You'll see the Batch Conversion Progress dialog box, and then a final message box will appear, asking whether you want to perform another conversion. Click Yes to perform another conversion, or click No to close the dialog box.
Keep in mind that when you perform a batch conversion, you don't delete or change the original files. Instead, you create copies of existing files that are stored in another file format.
If you frequently save documents in a format other than the standard Word document format (for example, perhaps you need to share most of the documents you create with a client who uses Microsoft Works 6 or Works 7), you can change the default file format Word uses to save new documents. To do so, follow these steps:
-
Choose Tools, Options, and then click the Save tab.
-
In the Default Format section, click the Save Word Files As arrow, and choose the file format you want to use as your default file format in the list.
-
Click OK.
Remember that when you configure the default file format, the setting affects only new documents you create. Word saves existing documents in the same format in which they were opened.
|
| < Day Day Up > |
|
EAN: 2147483647
Pages: 373