Creating a Multi-Column Document
|
| < Day Day Up > |
|
There are several ways to format your document in multiple columns. If you want to create columns on the fly, click the Columns button on the Standard toolbar. If you have certain specifications-for example, exact column measurements, a spacing requirement of a certain size, or more than four columns-use the Columns dialog box to choose those settings.
| Tip | Switch to Print Layout view Be sure to display your document in Print Layout view before you begin working with columns. Normal view, Web Layout view, and Outline view won't enable you to see columns as they will appear in print. To display Print Layout view, Choose View, Print Layout or click Print Layout View to the left of the horizontal scroll bar. |
Using the Columns Button
 The easiest way to create a multi-column document is to click Columns on the Standard toolbar. When you click the button, a menu presents the choice of one to four columns, as shown in Figure 19-4. Click the column setting you want, and Word will automatically update the layout in your document.
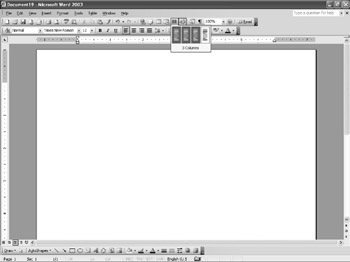
Figure 19-4: The Columns button allows you to select up to four columns from the Standard toolbar.
| Tip | Define columns the quick way If you want to create columns for only a portion of a document, select the area to which you want to apply the column format before you click the Columns button. |
| Note | The only way you can see that Word has, in fact, created columns in your document is that the margins on the ruler will show the new boundaries. If the ruler isn't currently displayed in your document, choose View, Ruler to display it. |
Choosing Column Specs in the Columns Dialog Box
If you have certain column specifications that you need to enter-for example, you're creating a followup report based on a format your department has adopted as its report format of choice-you can create and work with columns by using the Columns dialog box. Follow these steps:
-
Choose Format, Columns. The Columns dialog box is displayed.
-
Click the preset column format you want, if you see one that meets your needs. The Preview section will show you the format you've selected, as shown in Figure 19-5.
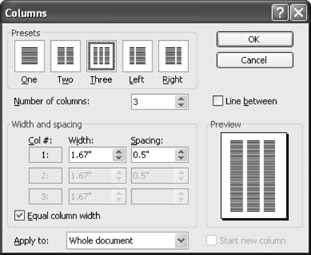
Figure 19-5: You can enter more specific column settings in the Columns dialog box. -
Click OK to apply your formatting.
By default, Word assumes that you want your columns to be created equally (unless you choose either the Left or Right preset selection) and that you don't want a line to be placed between the columns you create. If you want to add a line between columns, select the Line Between check box, and Word will add the necessary rule.
Creating Columns for Part of a Document
Another assumption Word makes is that you want to apply the column format to the entire document. If you want to apply the format only from this point forward, click the arrow in the Apply To box and select This Point Forward. You might want, for example, to open your document with a paragraph or two in single-column format and then break up the rest of the document into three columns, as shown in Figure 19-6.
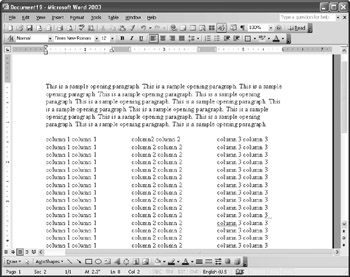
Figure 19-6: You can mix single-column and multi-column formats in the same document.
| Note | Once you add section breaks to your document, you'll discover that This Section becomes one of your choices in the Apply To box. |
To create a mixed format, follow these steps:
-
Type the opening paragraph, leaving the document set to single-column format.
-
At the point where you want to create columns, Choose Format, Columns. The Columns dialog box is displayed.
-
Choose the number of columns you want; enter any spacing specifications as needed.
-
Select the Line Between check box if you want a line to be displayed between columns.
-
Click the Apply To arrow and choose This Point Forward. Click OK. The Columns dialog box closes and you're returned to the document.
Creating Unequal Column Widths
Although Word sets a number of options for you in the Columns dialog box, you can change those options to create columns that suit your document specifications. By choosing the Left or Right preset format, you can tell Word to create unequal formats, meaning the columns should not be of equal width. When you choose the Left preset format, the column to the left will be proportionately smaller than the one to the right. When you choose the Right preset, the right column will be the smaller one.
To customize column widths using the Columns dialog box, follow these steps:
-
Choose Format, Columns to display the Columns dialog box.
-
Click in the Number Of Columns box and type the number of columns you want to create.
-
Clear the check box to the left of Equal Column Width. The Width settings will become available for columns 1 through n, so that you can customize the settings, as shown in Figure 19-7.
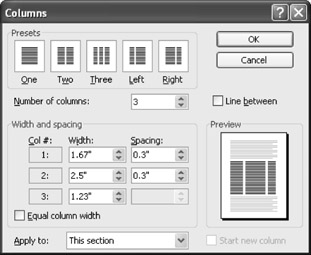
Figure 19-7: Use the Columns dialog box to specify the width and spacing for unequal columns. -
Modify the Width and Spacing settings for your columns to get the effect you want. The Preview section shows the result of your choices.
-
Click OK to save your choices and return to the document.
Changing Column Width on the Ruler
You can also change the width of columns by dragging the column margins in the ruler at the top of your work area. If you want to keep the spacing the same between columns, position the pointer on the center of the spacing bar. When the pointer changes to a double-headed arrow, move the spacing bar in the direction you want to change the column. For example, to make the left column narrower, drag the spacing bar to the left. To make the left column wider, drag the spacing bar to the right. (See Figure 19-8.)
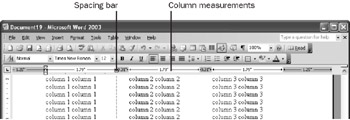
Figure 19-8: You can easily change the width of a column by dragging the spacing bar in the ruler.
You can also increase or decrease the amount of spacing between columns by dragging the edge of the spacing bar to the right or left. For example, to extend the spacing into the right column, drag the right edge of the spacing bar to the right. The size of the right column is reduced by the same amount of space you added to the spacing bar.
| Tip | Use the ruler to make precise column measurements You can also display and control the accurate size of your columns when you're resizing them by using the ruler. Press and hold Alt while you drag the edge of the spacing bar in the ruler. The measurements of the column appear in the ruler, helping you know when the column you're working with is just the size you want it. |
Getting Text into a Column Layout
Everything in Word should be as simple as getting text into a column layout. When you're turning a single-column document into a multiple-column document, Word does all the work for you. You simply display the Columns dialog box, choose the number of columns you want, specify any width and spacing settings, choose whether you want a line divider, and click OK. Word then puts the text in the format you selected, whether you already have a document full of text or an empty page.
If you're entering text into columns as you go, no text will appear in the second column until the previous column has been filled; that is, if you intend to have only headings in the left column and flow your text into the right column of a two-column format, you'll need to fill the left column with line spaces between headings until you get to the end of the column and Word wraps back up to the top of the right column. In the example shown in Figure 19-9, you can see the paragraph marks showing the line spacing inserted to cause the text to wrap to the next column.
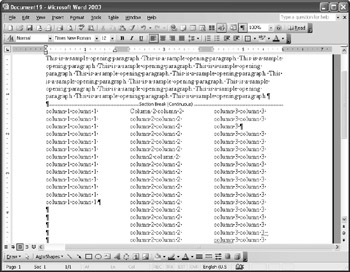
Figure 19-9: Before text will wrap to the second column, the first column must be filled.
| Note | There is a quicker way to do this, if your left column is going to be blank except for perhaps a heading at the top. When you know you've entered all you want in a column, you can add a column break. You'll learn how to do this in the section "Inserting Column Breaks,". |
Choosing Text Alignment
The way your text looks-and how readable your readers think it is-has a lot to do with the alignment you choose for the text. Traditional document alignment is often left justified, in which the text is aligned along the left margin of the page only. Other alignments include centered, which is often used for headings, and right justified, which aligns text along the right margin and rarely is used for traditional documents. Another alignment, full-justified text, aligns text along both the left and right margins, adding spaces in between words to spread out the text enough to make the both-edge alignment possible. Table 19-2 gives you a look at alignment differences.
| Example | Alignment Type | Use |
|---|---|---|
| | Left | For traditional body text, headlines, captions, and more |
| | Centered | For headlines, special text effects, captions or callouts |
| | Right | For specialty text designs, table text, captions |
| | Full | For text in columns, some special text elements, quotes |
Users often prefer left-justified text for just about everything; however, some people like using full-justified text for documents with multiple columns. In some cases, formats work well with the left column right justified, lining up along the leftmost edge of the right column, which is full justified. (See Figure 19-10 for examples of the various types of alignment.)
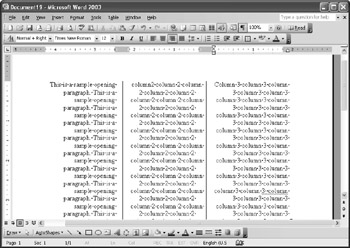
Figure 19-10: Mix and match alignment to see what looks best in your particular publication.
Beginning a New Column Layout
Longer documents often require a number of different general layouts-the introduction and summary of your report might read story-like, in a single-column format. When you begin to talk about the specification of your new product line, however, you might go to a multi-column format that presents information in the clearest way possible. You might also want to incorporate graphs and tables in the body of those columns.
How can you easily switch between column layouts without disturbing the way text flows in your document? The easiest way to change to a multi-column format is to place the insertion point where you want to start the new column layout and then follow these steps:
-
Choose Format, Columns. Select the number of columns you want to include in the Columns dialog box; add width and spacing settings, if necessary.
-
Select the Line Between check box if you want a line separating the columns.
-
In the Apply To box, click the arrow and choose This Point Forward.
-
Select the Start New Column check box.
-
Click OK to return to the document. Word moves to the top of the next column, and your column settings are in effect.
Inserting Column Breaks
When you've entered everything you want in a specific column and you're ready to wrap text to the next column, you can add a column break to force the wrap. To add a column break, follow these steps:
-
Place the insertion point where you want to insert the column break.
-
Choose Insert, Break. The Break dialog box appears, as shown in Figure 19-11.
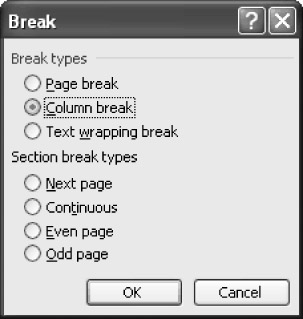
Figure 19-11: You can force a column break to cause text remaining in that column to wrap to the top of the next column. -
In the Break Types section, click Column Break.
-
Click OK. You will be returned to the document, and Word will add a Column Break at the insertion point. The text in the column past that point will be wrapped to the top of the next column.
Removing Column Breaks
In Word, you can delete columns as easily as you add them. They can be removed simply by removing a character-just position the insertion point immediately following a break and press Backspace (or select the break itself and press Delete). The column break is removed and the text is flowed back into the previous column.
Balancing Your Columns
Lining up text isn't always easy, and Word includes a feature that can help you automatically balance the text in your columns. When you create a column break, as described in the preceding section, you can have Word create a continuous break, which ensures that the columns will be balanced. The "continuous" part of the break gives Word permission to end the column wherever necessary to even out the text placement.
To create a continuous break, follow these steps:
-
Place the insertion point where you want the break to be added.
-
Display the Break dialog box by choosing Insert, Break.
-
Select Column Break as usual and, in the Section Break Types section, click Continuous. Word then adds the continuous break, which will break the text at the appropriate point to balance the text columns most effectively.
|
| < Day Day Up > |
|
EAN: 2147483647
Pages: 373