Adding a Simple Border
|
| < Day Day Up > |
|
![]() The easiest way to add a nothing-fancy border to an item in your document is to select the item, and then click the Border button on the Formatting toolbar. If you click the Border button, the selected border option (the border option shown on the face of the button) is applied; if you click the Border button's arrow, you can select from a number of border options, as described in Table 18-1. Keep in mind that the Border button is a toggle button; this means that with a click of the button, you can add borders if they aren't present or remove borders if they are present.
The easiest way to add a nothing-fancy border to an item in your document is to select the item, and then click the Border button on the Formatting toolbar. If you click the Border button, the selected border option (the border option shown on the face of the button) is applied; if you click the Border button's arrow, you can select from a number of border options, as described in Table 18-1. Keep in mind that the Border button is a toggle button; this means that with a click of the button, you can add borders if they aren't present or remove borders if they are present.
 You can also create borders by using the Tables And Borders toolbar. To display the Tables And Borders toolbar, click the Tables And Borders button on the Standard toolbar or choose View, Toolbars, Tables And Borders. The Tables And Borders toolbar, shown in Figure 18-1, contains a Border button in the same way the Standard toolbar contains a Border button.
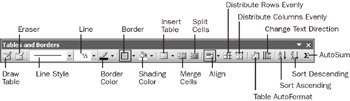
Figure 18-1: You can use the Tables And Borders toolbar to draw tables and add borders of various weights and colors.
| Note | If you've previously used the Border button on the Tables And Borders toolbar or the Standard toolbar, the border choice you last used will appear on the Border button during the current session. For example, if you chose Outside Border from the menu the last time you used the Border button on the Standard toolbar, the Outside Border option will appear on the Border button as the default border style on the Standard toolbar. But don't expect your border style choices to carry over from the Standard toolbar Border button to the Border button on the Tables And Borders toolbar-they won't. Adjusting one toolbar's Border button doesn't affect the border choice on the other toolbar. When you restart Word, the Border button resets to the default border style, which is Outside Border, on both toolbars. |
| Tip | To create a simple border that outlines a selection, click Outside Border in the Border button's list. |
| Note | The various buttons on the Tables And Borders toolbar are described in Table 13-2 in Chapter 13, "Organizing Concepts in Tables." |
| Button | Name | Description |
|---|---|---|
| | Outside Border | Adds or removes the outline around the selected or current table or cells, paragraph, element, or image |
| | All Borders | Adds or removes the border around the selected or current element (if the selected element is text, horizontal and vertical lines are added to outline each paragraph; if the selected element is a table, cells are outlined) |
| | Top Border | Adds or removes the border at the top of the selected or current table or cells, paragraph, element, or graphic |
| | Left Border | Adds or removes the border along the left edge of the selected or current element |
| | Inside Horizontal Border | Adds or removes the horizontal line or lines between the selected paragraphs, table cells, or other elements |
| | Descending Diagonal | Draws or removes a descending (top right to bottom left) diagonal line through a cell or selected cells in a table |
| | Horizontal Line | Adds a graphical horizontal line at the cursor position (to insert a line above the current line of text, position the cursor at the beginning of the text; to insert a line below the current line of text, position the cursor at the end of the text or press Enter and insert it on a separate line); you can add horizontal lines in text as well as in table cells and adjust which graphic to use for the horizontal lines (see "Inserting Graphical Horizontal Lines".) |
| | Inside Border | Adds or removes the border between rows and columns in a table but excludes the outside border; in text, horizontal lines are placed between each paragraph |
| | No Border | Applies no borders and clears all existing borders |
| | Bottom Border | Adds or removes the border along the bottom edge of the selected table or cells, paragraph, or element |
| | Right Border | Adds or removes the border along the right edge of the selected table or cells, paragraph, or element |
| | Inside Vertical Border | Adds or removes a vertical line in a table or through selected cells |
| | Ascending Diagonal | Draws an ascending (bottom right to top left) diagonal line through a cell or selected cells in a table |
| Tip | Clear all borders before applying new border settings Although you can use the toggle effect of the Border button to remove border lines, frequently you'll want to clear all existing borders before you apply new settings. To clear existing borders, select the section you want to modify, click No Border in the Border button's list, and then, while the section is still selected, click the border style you want to use. |
|
| < Day Day Up > |
|
EAN: 2147483647
Pages: 373
- Challenging the Unpredictable: Changeable Order Management Systems
- The Effects of an Enterprise Resource Planning System (ERP) Implementation on Job Characteristics – A Study using the Hackman and Oldham Job Characteristics Model
- Distributed Data Warehouse for Geo-spatial Services
- Intrinsic and Contextual Data Quality: The Effect of Media and Personal Involvement
- Healthcare Information: From Administrative to Practice Databases