Making Layout Choices
|
| < Day Day Up > |
|
Depending on a document's specific characteristics, you might need to make layout choices that affect the number of columns you use, the settings you choose for headers and footers, text alignment, line numbering, and more. The Layout tab in the Page Setup dialog box presents all these options together so that you can make your choices in one place.
Selecting and Formatting Sections
Word gives you the option of choosing where you want your new sections to begin. Whenever you choose the This Point Forward option in the Apply To list while you're creating a document, Word begins a new section and applies the page settings you've selected. To change the settings for an existing section, click in the section. After you've positioned the insertion point, display your section choices by clicking the Section Start arrow in the Layout tab in the Page Setup dialog box (as shown in Figure 15-4). Then select your choice from the list that appears:
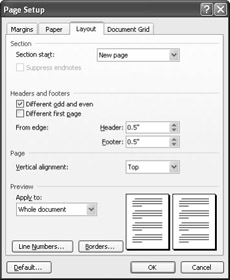
Figure 15-4: The Layout tab provides options that enable you to control section starting positions, header and footer displays, vertical content alignment, line numbers, and page borders.
-
Continuous Begins the new section at the insertion point.
-
New Column Starts a new column when you begin a new section.
-
New Page Jumps to a new page to begin a new section.
-
Even Page Moves to the next even page to begin a new section.
-
Odd Page Moves to the next odd page to begin a new section.
Cross-Reference For more information about working with sections, see Chapter 19, "Formatting Columns and Sections for Advanced Text Control."
Accessing Page Setup Options for Headers and Footers
Headers and footers are an important part of long documents. Headers appear at the tops of pages, while footers provide information at the bottoms of pages. For example, in a book, the chapter name and book title often appear in the header, while the page number appears in the footer. You'll often use headers and footers to provide readers with important information about the publication, which could include the title, the author, the page number, creation date, last modified date, confidentiality statements, and other items. Using the Page Setup dialog box, you can control whether headers and footers are different for odd and even pages, whether the first page should have a different header or footer, and where headers and footer are placed relative to the edge of a printed page. To access these options, follow these steps:
-
Choose File, Page Setup to display the Page Setup dialog box, and click the Layout tab.
-
Make your selections in the Headers And Footers section. You can configure the following settings:
-
Different Odd and Even-Enables you to create headers and footers that are different for right and left pages. This allows you, for example, to place the page numbers in the outside bottom corner of every page, whether you're printing an odd or even page.
-
Different First Page-Enables you to disable the display of headers or footers on the first page. Or, if you prefer, you can enter header or footer information that prints only on the first page.
-
From Edge-Controls the amount of spacing between the edge of the page and the headers and footers. To enter this setting, type in the value box or use the up or down arrow to adjust the measurement.
Note For more information about using headers and footers, see "Including Headers and Footers".
-
Aligning Sections Vertically
Word gives you the option of indicating how you want the content between the top and bottom margins of your page to be aligned. To control vertical alignment, display the Page Setup dialog box (choose File, Page Setup), click the Layout tab, click the Vertical Alignment arrow, and then select an alignment option. You can choose among Top, Center, Justified, or Bottom. Word aligns the page content based on your selection. For example, if you click Center, Word will center the page contents between the top and bottom margins. If you choose Bottom, Word will align the page contents with the bottom margin and place whatever extra space remains at the top of the page.
Adding Line Numbers
If you're working on a document that requires line numbering, you can use Page Setup settings to add the numbers automatically. You can choose whether you want to number the entire document, selected content, or a particular section. To turn on line numbering, follow these steps:
-
Position your cursor where you want to start numbering or in a section you want to number, or select existing text that you want to display with line numbers.
-
Choose File, Page Setup, and then click the Layout tab.
-
In the Apply To list, select where you want to apply numbering. Some options you might see include This Section, This Point Forward, Selected Sections, Selected Text, and Whole Document.
Tip By default, Word creates a new section on a new page when you add numbers to selected text. If you want to add numbers to selected text without placing the numbered text on a separate page, remember to select Continuous in the Section Start list in the Layout tab. When you select Continuous, Word creates a section without adding a page break.
-
In the Layout tab, click Line Numbers. The Line Numbers dialog box appears, as shown in Figure 15-5.

Figure 15-5: In the Line Numbers dialog box, you can choose to add line numbering for a section, selected text, or the entire document. -
Select the Add Line Numbering check box. In the Start At box, type the number with which you want numbering to begin.
-
In the From Text box, specify number placement by using the up or down arrows or typing a number (by default, the From Text spacing is measured in inches), or accept Auto (the default setting).
-
In the Count By box, enter a value to specify which lines should be accompanied by numbers. For instance, if you want to show a number next to every other line, you would enter 2 in the Count By box. To display a number next to each line, retain the default Count By setting of 1.
-
In the Numbering section, click Restart Each Page if you want each page to be individually numbered, click Restart Each Section if you want the numbering to begin again with each subsequent section, or click Continuous if you want numbers to increase throughout the document.
-
Click OK to close the Line Numbers dialog box and return to the Page Setup dialog box. Click OK to close the Page Setup dialog box.
Inside Out: Making room for line numbers
If you've created heading styles that extend all the way to the left margin of your page, you might find them truncated when you add line numbering. You can fix this by displaying the Line Numbers dialog box and changing the From Text setting. By default, From Text is set to Auto, but by decreasing the amount of space between numbering and text, you can usually make room for both line numbering and headings.
Creating a Page or Section Border
If you want to set up page and section borders for your document while you're taking care of the rest of your page settings, you can do so in the Page Setup dialog box. To access border settings, display the Page Setup dialog box (choose File, Page Setup), click the Layout tab, and then click Borders. The Borders And Shading dialog box appears. Using this dialog box, you can add borders to selected text and paragraphs, sections, and pages, as well as to the entire document.
| Cross-Reference | For full coverage of adding page borders, see Chapter 18, "Drawing Attention to Documents by Using Borders and Shading." |
|
| < Day Day Up > |
|
EAN: 2147483647
Pages: 373