Development Cycle Fifth Iteration
Development Cycle Fourth Iteration
The RobotRat code framework is in place. Users can run the program, select menu choices, and see the results of their actions via stub method console messages. It’s now time to start adding detailed functionality to the RobotRat class.
Plan (Fourth Iteration)
It’s now time to start adding more attributes to the RobotRat class and manipulating those attributes. Two good attributes to start with are the robot rat’s direction and pen_position. Another good piece of functionality to implement is the floor. A good goal would be to create, initialize, and print the floor. It would also be nice to load the floor with one or more test patterns.
Table 3-9 lists the design considerations for this development cycle iteration. As you will soon see, more detailed analysis is required to implement the selected robot rat program features. This analysis may require the use of design drawings such as flow charts, state-transition diagrams, and class diagrams, in addition to pseudocode, and other design techniques.
| Check-Off | Design Consideration | Design Decision |
|---|---|---|
| Implement Robot Rat’s direction | direction will be an integer (int) variable. It will have four possible states or values: NORTH, SOUTH, EAST, and WEST. You can implement these as class constants. This will make the source code easier to read and maintain. The robot rat’s direction will change when either the turnLeft() or turnRight() methods are called. The initial direction upon program startup will be EAST. | |
| Implement pen_position | pen_position will be an integer variable. It will have two valid states or values: UP and DOWN. These can be implemented as class constants as well. The robot rat’s pen_position will change when either the setPenUp() or the setPenDown() methods are called. The initial pen_position value will be UP upon program startup. | |
| floor | The floor will be a two-dimensional array of boolean variables. If an element of the floor array is set to true it will result in the '*’ character being printed to the console. If an element is false the '0’ character will be printed to the console. The floor array elements will be initialized to false upon program startup. |
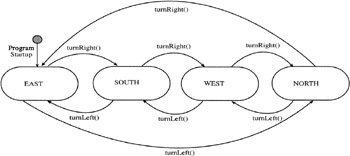
This will keep you busy for a while. You might have to spend some more time analyzing the issues regarding setting the robot rat’s direction and its pen_position. It is often helpful to draw state transition diagrams to graphically illustrate state changes to objects. Figure 3-9 shows the state transition diagram for pen_position.

Figure 3-9: pen_position State Transition Diagram
As figure 3-9 illustrates, the pen_position variable is set to the UP state upon program startup. It will remain UP until the setPenDown() method is called, at which time it will be set to the DOWN state. A similar state transition diagram is shown for the direction variable in figure 3-10.

Figure 3-10: State Transition Diagram for the direction Variable
As is illustrated in figure 3-10, the robot rat’s direction is initialized to EAST upon program startup. Each call to the turnLeft() or turnRight() methods will change the state (value) of the direction variable.
Implementing State Transition Diagrams
State transition diagrams of this nature are easily implemented using a switch statement. (You could use an if/else statement but the switch works well in this case) Example 3.4 gives a pseudocode description for the turnLeft() method:
Example 3.4: Pseudocode for turnLeft() Method
1 check the value of the direction variable 2 if direction equals EAST then set the value of direction to NORTH 3 else if direction equals NORTH then set the value of direction to WEST 4 else if direction equals WEST then set the value of direction to SOUTH 5 else if direction equals SOUTH then set the value of direction to EAST 6 else if direction equals an invalid state set the value of direction to EAST.
You could construct a pseudocode description for the turnRight(), setPenUp(), and setPenDown() methods as well, using the state transition diagrams as a guide.
Implementing The printFloor() Method
Example 3.5 gives the pseudocode for the printFloor() method.
Example 3.5: Pseudocode for printFloor() Method
1 for each row in the floor do the following 2 for each column in each row do the following 3 check the value of each floor element 4 if the value is true print the '*' character to the console 5 else if the value is false print the '0' character to the console 6 print a newline character at the end of each row
When you feel you have done enough analysis of the current set of RobotRat features you can move to the code phase of development cycle.
Code (Fourth Iteration)
The printFloor(), turnLeft(), turnRight(), setPenUp(), and setPenDown() methods already exist as stub methods. You will proceed in this phase to add the required code to each of these methods, then compile and test the results. Just like the previous iteration, this code phase will comprise multiple code, compile, and test cycles.
To proceed you must first add the RobotRat field declarations at the top of the class. Any fields declared here should be initialized in the constructor method. The floor is initialized with a special method named initializeFloor(). Example 3.6 shows a partial code listing for this section of the ![]() RobotRat.java source file along with the constructor method.
RobotRat.java source file along with the constructor method.
Example 3.6: RobotRat.java (4th Iteration Partial Listing)
1 import java.io.*; 2 3 public class RobotRat { 4 /** 5 * private instance attributes 6 **/ 7 private BufferedReader console = null; 8 private int pen_position = 0; 9 private int direction = 0; 10 private boolean floor[][] = null; 11 12 /** 13 * class constants 14 */ 15 private static final int NORTH = 0; 16 private static final int SOUTH = 1; 17 private static final int EAST = 2; 18 private static final int WEST = 3; 19 private static final int UP = 0; 20 private static final int DOWN = 1; 21 22 23 public RobotRat(int rows, int cols){ 24 //Initialize RobotRat attributes 25 console = new BufferedReader(new InputStreamReader(System.in)); 26 direction = EAST; 27 pen_position = UP; 28 floor = new boolean[rows][cols]; 29 initializeFloor(); 30 } 31 32 private void initializeFloor(){ 33 for(int i = 0; i<floor.length; i++){ 34 for(int j = 0; j<floor[i].length; j++){ 35 floor[i][j] = false; 36 } 37 } 38 } 39 There are a few items to note with this code example. First, in addition to the pen_position, direction, and floor fields, the class constants were added as well. More field initialization code was added to the constructor method as well as two new method parameters named rows and cols. The purpose of the constructor parameters will be to initialize the size of the floor array when the RobotRat object is created in the main() method.
The initializeFloor() method is defined beginning on line 32. It simply sets each element of the floor array to false. Notice that the initializeFloor() method is declared to be private since it is only intended to be used internally by the RobotRat class.
It’s now time to turn your attention to the setPenUp(), setPenDown(), turnLeft(), and turnRight() methods. Example 3.7 shows the source code for the setPenUp() method.
Example 3.7: setPenUp() method
1 private void setPenUp(){ 2 pen_position = UP; 3 System.out.println("The pen_position is UP"); 4 } As you can see it’s fairly straightforward. It just sets the pen_position attribute to the UP state and then prints a short message to the console saying the pen_position is UP. Example 3.8 gives the code for the setPenDown() method.
Example 3.8: setPenDown() method
1 private void setPenDown(){ 2 pen_position = DOWN; 3 System.out.println("pen_position is DOWN"); 4 } This method is similar to the previous method only it’s setting the pen_position to the opposite state. Let’s look now at the turnLeft() method as shown in example 3.9.
Example 3.9: turnLeft() method
1 private void turnLeft(){ 2 switch(direction){ 3 case NORTH: direction = WEST; 4 System.out.println("RobotRat facing WEST"); 5 break; 6 case EAST: direction = NORTH; 7 System.out.println("RobotRat facing NORTH"); 8 break; 9 case SOUTH: direction = EAST; 10 System.out.println("RobotRat facing EAST"); 11 break; 12 case WEST: direction = SOUTH; 13 System.out.println("RobotRat facing SOUTH"); 14 break; 15 default: direction = EAST; 16 System.out.println("RobotRat facing EAST"); 17 } 18 } Notice in the turnLeft() method above that the switch statement checks the value of the direction field then exe-cutes the appropriate case statement. The turnRight() method is coded in similar fashion using the state transition diagram as a guide.
The printFloor() method is all that’s left for this iteration and is shown in example 3.10.
Example 3.10: printFloor() method
1 private void printFloor(){ 2 for(int i = 0; i<floor.length; i++){ 3 for(int j=0; j<floor[i].length; j++){ 4 if(floor[i][j] == true) 5 System.out.print('*'); 6 else System.out.print('0'); 7 } 8 System.out.println(); 9 } 10 }
Test (Fourth Iteration)
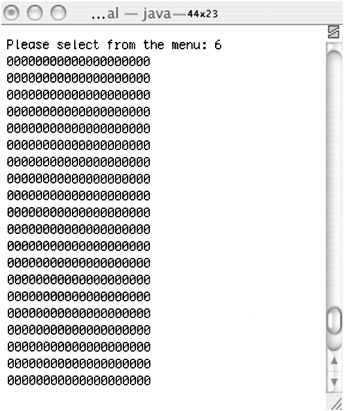
There’s a lot to test for this iteration. You’ll need to test all the methods that were modified and you’ll be anxious to test the printFloor() method since now you’ll see the floor pattern print to the console. Figure 3-11 shows the print-Floor() method being tested.

Figure 3-11: printFloor() Method Test
As you can see, it just prints the '0' characters to the screen. You might find it helpful to load the array with a test pattern to test the '*' characters as well.
Integrate/Test (Fourth Iteration)
Check to see how all the new functionality you added has affected any previously working functionality. It would also be a good idea to see how the floor looks using different floor array dimensions. The changes to the RobotRat constructor method makes it easy to create RobotRat objects with different floor sizes. When you are happy with all the work done in this iteration it is time to move on to the next development cycle iteration.
EAN: 2147483647
Pages: 452