Creating Java Projects Using Linux
Creating Java Projects Using Microsoft® Windows® 2000/XP
This section shows you how to create Java projects using the Microsoft Windows operating system. However, success as a Java programmer requires more than just knowing how to click icons. You must learn to use the Windows Command Processor as well as how to configure your operating system for Java development.
Two important topics covered in this section include the setting of the PATH and CLASSPATH system variables. Once you ve learned these concepts, you can safely and confidently let an IDE manage these issues for you.
Suns Java 2 Standard Edition Software Development Kit (J2SDK)
The J2SDK, or simply the SDK, consists of the javac compiler, the java interpreter, the javadoc documentation generator, and many other command-line tools, some of which this book covers later.
You will need to perform the following steps to create Java programs using the SDK:
-
¥Step 1 : Download and install the J2SDK
-
¥Step 2 : Configure the operating system s PATH variable
-
¥Step 3 : Configure the operating system s CLASSPATH variable
-
¥Step 4 : Select a suitable text editor
-
¥Step 5 : Create source files
-
¥Step 6 : Compile source files
-
¥Step 7 : Execute the main-application class file
Step 1: Download and Install the J2SDK
You must first install the SDK before you can use the command-line tools to compile and run your Java programs. The Java For Artists supplemental CD-ROM contains the SDK. You can also download the latest version of the J2SDK direct from SUN. [ www.java.sun.com ] Figure 2-2 shows a partial view of Sun s Java 2 Standard Edition version 1.4.2 download page. (The screen capture used in figure 2-2 was taken in late 2004. The look and feel of the Sun web site will change over time, but the content will remain similar to that shown here.)
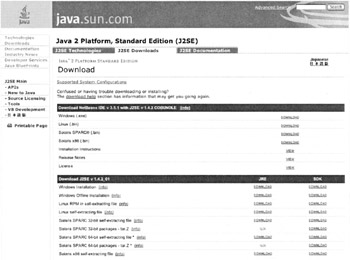
Figure 2-2: Suns Java Download Page
Referring to figure 2-2 take note of several important things shown on this web page. First, the SDK is available for many other operating systems besides Microsoft Windows. Second, you can download the NetBeans IDE along with the SDK. Third, you can download the Java Runtime Environment (JRE) by itself. The JRE consists of the Java platform class files required to run Java applications. Fourth, you can download the SDK by itself. The SDK includes all the Java command-line tools required to build Java applications. The SDK also includes the JRE.
For this section you need only download the SDK or get it from the CD-ROM. Once the SDK download is complete, you will need to install it. The download process downloads and places an executable file on your desktop or other designated download directory. To begin the installation process simply double-click this executable file.
You can customize the Java SDK installation with the Custom Setup dialog as shown in figure 2.3. However, until you gain experience as a Java programmer, I strongly advise you to accept the recommended default installation. This installs the SDK in a directory that reflects the name of the version of the SDK being installed. Figure 2-3 illustrates the installation of the 1.4.2_01 version of the SDK. The directory in which this SDK will be installed is named j2sdk1.4.2_01 . The installer selects the C: drive as the default installation drive. This results in the full path name to the SDK of C:\j2sdk1.4.2_01 . If you install a different version of the SDK, your installation directory will have a different name.
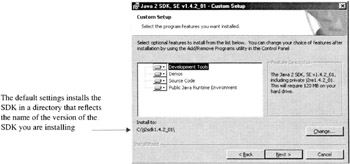
Figure 2-3: Custom Setup Dialog
Steps 2 & 3: Setting Microsoft Windows Environment Variables
Before you can use the Java SDK, you must tell the Microsoft Windows operating system where to find the Java command-line tools (javac, java, etc.), where to find the classes associated with the Java Runtime Environment (JRE), and where to find the classes you create when you compile your own Java source files. You can address all of these issues by setting two important operating system environment variables: PATH and CLASSPATH.
Purpose Of PATH & CLASSPATH
The purpose of the PATH environment variable is to tell the operating system where to look for executable files. (An executable file has a .exe file extension.) The PATH environment variable is already set to some value by the operating system during initial installation, and perhaps modified later by additional software package installations. You must modify the PATH environment variable so that it knows where to look in the SDK directory for the Java command-line tools.
The purpose of the CLASSPATH environment variable is to tell the java interpreter where to look for Java class files. If this is the first time you are loading the Java SDK, or any Java-related tool on your computer, the CLASSPATH environment variable most likely does not yet exist.
Setting The System PATH
You must modify the PATH environment variable s value to include the fully-qualified path to the directory that contains the Java command-line tools. This directory is named bin ( for binary ), and is a subdirectory of the jdk1.4.2_01 directory. Figure 2-4 shows the folders and files located in the jdk1.4.2_01 folder, including the bin folder. Figure 2-5 shows a listing of the bin directory contents
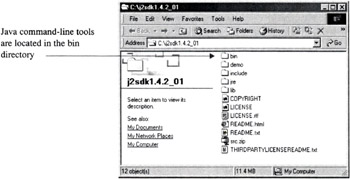
Figure 2-4: Window Showing Subfolders and Files in the j2sdk1.4.2_01 Folder
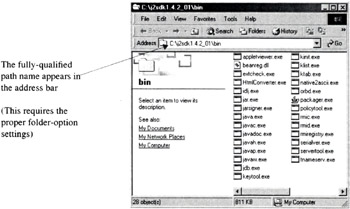
Figure 2-5: Contents Listing of C:\j2sdk1.4.2_01\bin
You will need the fully-qualified path name to the SDK bin directory when you set the PATH variable s value. The fully-qualified path name includes the drive letter, the name of the J2SDK directory, and the bin directory. For example, as is shown in figure 2-5, if you are using the J2SDK version 1.4.2_01 and it is installed on the C: drive, the fully-qualified path name to the bin directory will look like this:
C:\j2sdk1.4.2_01\bin
To set the PATH environment variable s value, right-click on the My Computer icon located on your desktop. This opens a pop-up menu. From the menu, click Properties to open the System Properties window. In the System Properties window, click the Advanced tab at the top right, then click the Environment Variables button located in the center of the tab window. This opens the Environment Variables window. Figure 2-6 shows the complete sequence described thus far.
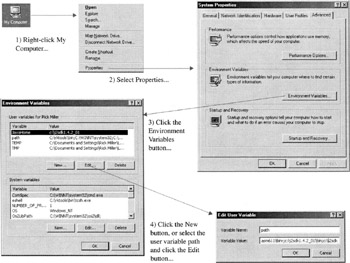
Figure 2-6: Setting the PATH Environment Variable in Microsoft Windows 2000/XP
When you open the Environment Variables window, you will see two sections. The upper part of the window shows the user variables. User variables apply to your user login. The lower part of the window shows the system variables. System variables apply to all users, but they can be augmented by user variables. System variables can only be modified by users having Administrator privileges.
There will be a system PATH variable, but I recommend leaving the system variable alone and creating a user PATH variable. If your user PATH variable does not already exist, click the New button located below the user variables section. In the Variable Name field enter the name of the user variable:
PATH
In the Variable Value field add the fully-qualified path value to the SDK bin directory:
C:\j2sdk1.4.2_01\bin;
To this I would also add the path to the JRE bin directory. The complete PATH variable value will now resemble the following string:
C:\j2sdk1.4.2\bin;C:\j2sdk1.4.2_01\jre\bin;
Notice how the C:\j2sdk1.4.2_01 portion of the path must be repeated for both the SDK and the JRE portion of the PATH variable value. Also notice how each separate path entry is separated by a semicolon.
When you are finished creating or editing the PATH environment variable, be sure to click the OK button on each window to save your changes.
It s now time to test the PATH environment variable. Open a command-processor window as shown in figure 2-7 and enter the command javac . This should display the Java compiler help summary.
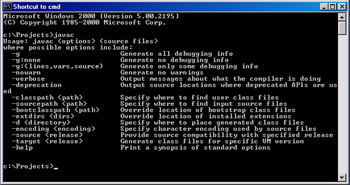
Figure 2-7: Testing PATH Environment Variable by Typing javac
Now that you have set the PATH environment variable, the operating system can find the Java command-line tools. You must now tell the operating system where to find the Java Platform class files, as well as the class files you will create as part of your programming projects. You do this by setting the system CLASSPATH variable.
Setting The CLASSPATH Environment Variable
You set the CLASSPATH environment variable the same way you set the PATH environment variable. In fact, you can follow the same steps shown in figure 2-6. However, before setting the CLASSPATH, you will need to know two things: 1) where the Java Platform class files are located, and 2) where you are going to put your class files when you do your program development.
Let s start with the location of the Java Platform class-file location. To run Java programs, you will need the JRE. The JRE was installed along with the SDK, and is located in the jre subdirectory of the SDK. In the jre subdirectory you will find another subdirectory named lib which stands for library. The lib directory contains the Java Platform Application Programming Interface (API) files required to run Java programs. The fully-qualified path name that should be used for the CLASSPATH environment variable will be similar to this:
C:\j2sdk1.4.2_01\jre\lib
Now, to tell the java interpreter to look in the current directory for your project s class files (wherever you happen to be when you try running your Java programs) add the following path value:
.;
Yes, it s a period followed by a semicolon. The full CLASSPATH variable value will now look like this:
C:\j2sdk1.4.2_01\jre\lib;.;
While you re at it, you may as well add one more search location to the CLASSPATH. Do this by adding the following path value:
.\classes;
This will instruct the JVM to search for classes in a directory named classes , which is located in the working directory. The complete CLASSPATH variable value should now look like this:
C:\j2sdk1.4.2_01\jre\lib;.;.\classes;
When you have finished setting the CLASSPATH variable click the OK buttons to save your changes. You should now have both your PATH and CLASSPATH environment variables set. It s time to test everything by creating a few classes, compiling them, and running the resulting application class file.
Another Helpful Hint: Display Files Suffixes And Full Path Names
Before you do another thing, open a folder and select Tools > Folder Options and click the Views tab at the top as shown in figure 2-8. These settings will turn Microsoft Windows into a novice-Java-programmer-friendly environment. When you are finished setting the folder options, click the OK button to apply the changes.
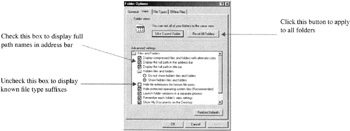
Figure 2-8: Setting Some Important Folder Options
Steps 4 & 5: Select A Text Editor And Create The Source Files
Use a text editor of your choosing to create any Java source files you need for your project. To test your development environment, use the two source files ![]() SampleClass.java and
SampleClass.java and ![]() ApplicationClass.java from chapter 1. They are given again below in examples 2.1 and 2.2. (Leave out the line numbers when copying code from the book.)
ApplicationClass.java from chapter 1. They are given again below in examples 2.1 and 2.2. (Leave out the line numbers when copying code from the book.)
Example 2.1: SampleClass.java
1 package com.pulpfreepress.jfa.chapter1; 2 3 import java.util.*; 4 5 public class SampleClass { 6 /************************************** 7 Class and instance field declarations 8 ***************************************/ 9 public static final int CONST_VAL = 25; 10 private static int class_variable = 0; 11 private int instance_variable = 0; 12 13 public SampleClass(){ 14 System.out.println("Sample Class Lives!"); 15 } 16 17 public static void setClassVariable(int val){ 18 class_variable = val; 19 } 20 21 public static int getClassVariable(){ 22 return class_variable; 23 } 24 25 public void setInstanceVariable(int val){ 26 instance_variable = val; 27 } 28 29 public int getInstanceVariable(){ 30 return instance_variable; 31 } 32 }
Example 2.2: ApplicationClass.java
1 package com.pulpfreepress.jfa.chapter1; 2 3 public class ApplicationClass { 4 5 public static void main(String args[]){ 6 SampleClass sc = new SampleClass(); 7 System.out.println(SampleClass.CONST_VAL); 8 System.out.println(SampleClass.getClassVariable()); 9 System.out.println(sc.getInstanceVariable()); 10 SampleClass.setClassVariable(3); 11 sc.setInstanceVariable(4); 12 System.out.println(SampleClass.getClassVariable()); 13 System.out.println(sc.getInstanceVariable()); 14 15 System.out.println(sc.getClassVariable()); 16 } 17 } Notice how each of these source files belongs to the package named com.pulpfreepress.jfa.chapter1. I will leave that package name the same. When you create these files, you will want to put them in a directory somewhere on your hard drive. For the following examples I will use a directory with the following path name:
C:\projects\Java\SampleClass
The SampleClass directory will be the project directory. In the project directory you must create a subdirectory structure that reflects the package name specified in the source files. I also recommend that you place the package directory structure in a directory named src (which stands for source). Figure 2-9 shows the tree and dir commands being used to display the newly-created package structure and the two source files.
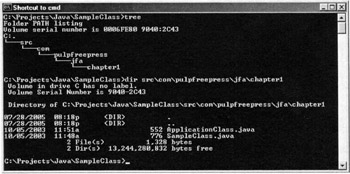
Figure 2-9: SampleClass Project Source-Code Directory Structure
Lastly, in the project directory, create one more subdirectory named classes . This directory will come in handy in the next step. Figure 2-10 shows the tree command being used, once again, on the SampleClass directory to reveal its final subdirectory structure.
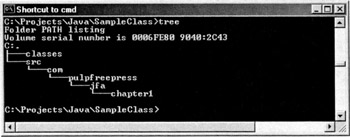
Figure 2-10: Final SampleClass Subdirectory Structure
Step 6: Compiling The Source Files
When you ve finished creating the ![]() SampleClass.java and
SampleClass.java and ![]() ApplicationClass.java source files, and have placed them in the chapter1 sub-directory of the source-file package structure, you are now ready to compile them with the javac compiler tool. From the SampleClass project directory issue the following command:
ApplicationClass.java source files, and have placed them in the chapter1 sub-directory of the source-file package structure, you are now ready to compile them with the javac compiler tool. From the SampleClass project directory issue the following command:
javac -d .\classes src\com\pulpfreepress\jfa\chapter1\*.java
Figure 2-11 shows the javac compiler command being used at the command prompt:

Figure 2-11: Compiling the Java Source Files
If all goes well, and there are no compilation errors, the javac compiler will compile the source files, and place the resulting .class files in the classes directory, automatically creating the correct package structure. Figure 2-12 shows the tree command being used on the SampleClass directory after compilation.
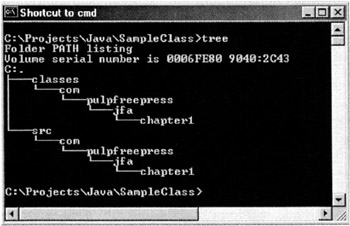
Figure 2-12: SampleClass Sub-directory Structure After Compilation
Figure 2-13 shows the dir command being used to display the .class files created as a result of the compilation process.
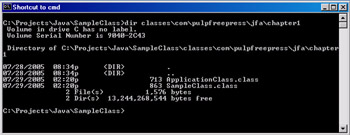
Figure 2-13: The .class Files are Located in Their Proper Package Structure
Step 7: Executing The Main Application Class
You are now ready to run the program. Both source files have been compiled and the resulting class files have been automatically placed in the com\pulpfreepress\jfa\chapter1 directory. From the command prompt enter the following command to run the program:
java com.pulpfreepress.jfa.chapter1.ApplicationClass
Figure 2-14 shows the results of running the ApplicationClass program.

Figure 2-14: Results of Running ApplicationClass Program
Borland’s JBuilder
JBuilder is an excellent example of a Java IDE. JBuilder integrates project-management features, source-code editing, debugging, GUI layout tools, and much, much more. When you use an IDE like JBuilder, you will notice an increase in your development efficiency. (After you learn to use the tool of course!)
Before you can effectively use JBuilder, however, you still must understand the purpose and use of the PATH and CLASSPATH environment variables and how to set them in the Windows operating system. Therefore, I strongly recommend mastering the techniques of creating Java projects with the SDK, as presented in the previous section, before moving to an IDE.
Steps To Creating Java Projects In JBuilder
JBuilder, like any IDE, is project-centric. Once you understand this concept you can use just about any IDE, even though each may have a different look and feel and have slightly different features. The following general steps are required to create and run Java programs using JBuilder:
-
¥Step 1: Create project
-
¥Step 2: Create or add source files, packages, or other components
-
¥Step 3: Set project properties if required
-
¥Step 4: Identify the main application class
-
¥Step 5: Make the project
-
¥Step 6: Run the project
I discuss these steps in detail below as I show you how to create a JBuilder project with the ![]() SampleClass.java and
SampleClass.java and ![]() ApplicationClass.java source files given in examples 2.1 and 2.2.
ApplicationClass.java source files given in examples 2.1 and 2.2.
Step 1: Create Project
Open JBuilder and close any projects that may automatically open. The JBuilder window should look similar to that shown in figure 2-15. Next, select File > New Project as shown in figure 2-16. This will open the Project Wizard Step 1 of 3 dialog window as shown in figure 2-17.
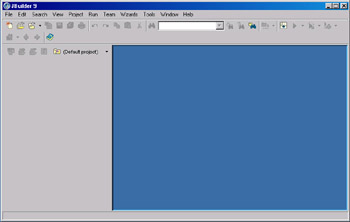
Figure 2-15: JBuilder with No Open Projects
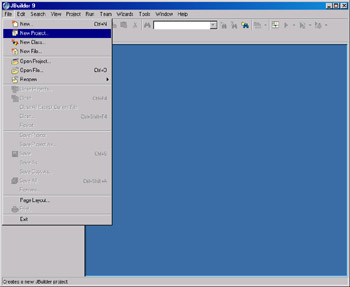
Figure 2-16: New Project Menu
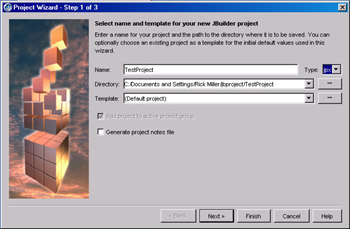
Figure 2-17: Project Wizard Step 1 of 3
The Project Wizard will guide you through the set up of your project. In step 1, select the project type, project name, project directory, and what template to use to create the project. For this example, I have selected the jpx project type and named the project TestProject . I have left JBuilder s recommendation for the project location unchanged and accepted the default project as the template. Click the Next button to go to step 2.
Figure 2-18 shows step 2 of the Project Wizard. In this dialog window you set various project-path settings as well as any additional source-file locations, documentation, and shared libraries. For now, you can accept the default values recommended by JBuilder. Click the Next button to proceed to step 3.
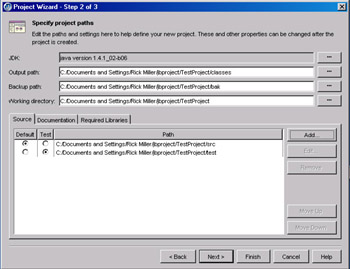
Figure 2-18: Project Wizard Step 2 of 3
Figure 2-19 shows step 3 of the Project Wizard. Here you can set the project encoding, package-exposure level, and default values for javadoc comments. You can accept all the JBuilder recommended defaults for this example. When you ve finished step 3 of the Project Wizard click the Finish button.
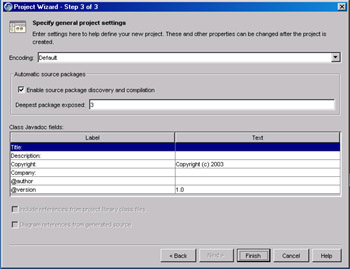
Figure 2-19: Project Wizard Step 3 of 3
Step 2: Create or Add Source Files, Packages, or Other Components
Now that you have created the project, you are ready to add source files. This section shows you how to create a Java source file using the JBuilder Class Wizard. Select File > New Class. This will open the Class Wizard dialog window as shown in figure 2-20.
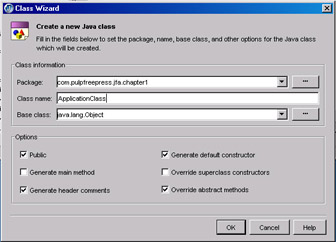
Figure 2-20: Creating ApplicationClass.java Source File
The Class Wizard lets you set the package name, class name, base class, and other options. For this example, I have entered com.pulpfreepress.jfa.chapter1 as the package name, ApplicationClass as the class name, and used the JBuilder default recommendation java.lang.Object as the base class. (In Java, if you don’t explicitly extend another class, you implicitly extend java.lang.Object.)
For the options, I ve accepted the JBuilder recommend defaults. When you are satisfied with the Class Wizard settings, click the OK button to create the source file. At this point, you will have a new source file named ![]() ApplicationClass.java added to the TestProject in the com.pulpfreepress.jfa.chapter1 package. The
ApplicationClass.java added to the TestProject in the com.pulpfreepress.jfa.chapter1 package. The ![]() ApplicationClass.java file will have a few lines of automatically generated source code. This will generally include the package declaration, class declaration, any default import statements, and some comments. You can modify this file so that it looks like the code given in example 2.2.
ApplicationClass.java file will have a few lines of automatically generated source code. This will generally include the package declaration, class declaration, any default import statements, and some comments. You can modify this file so that it looks like the code given in example 2.2.
After you have created the ![]() ApplicationClass.java file, you must now create the
ApplicationClass.java file, you must now create the ![]() SampleClass.java file in the same fashion. When you have finished creating both source files, your TestProject will look similar to that shown in figure 2-21.
SampleClass.java file in the same fashion. When you have finished creating both source files, your TestProject will look similar to that shown in figure 2-21.
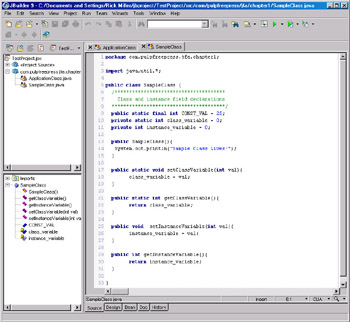
Figure 2-21: TestProject After Creating SampleClass.java and ApplicationClass.java
Step 3: Set Project Properties
Before running a JBuilder project, you may have to set some project properties. Some of these properties were automatically set when you created TestProject using the Project Wizard previously in step 1. These included project paths and javadoc comments. The number of properties that need to be configured will vary depending on the type of project and the version of JBuilder you are using.
To set or change a project s properties select Project > Project Properties. The Project Properties dialog window will open as is shown in figure 2-22. The property we are most concerned about setting in this example is the project s runtime configuration. This property is discussed in detail in the next step.
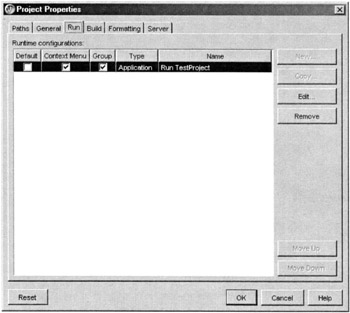
Figure 2-22: Project Properties Dialog
Step 4: Identify the Application Class
To run the TestProject, you must tell JBuilder which class contains the main() method. Do this by selecting Project > Project Properties and clicking the Run tab. (Refer again to figure 2-22.) Click the New or Edit button to display the Runtime Configuration dialog window as is shown in figure 2-23.
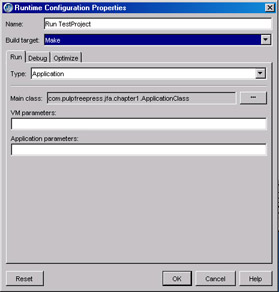
Figure 2-23: Runtime Configuration Properties Dialog
The Runtime Configuration dialog window allows you to name the configuration setting, set the runtime type, and specify JVM and application parameters. You can also make debug settings and configure the JBuilder optimizer if you have that option installed.
For this example, all you need to set is the name of the class that contains the main() method, and that would be ApplicationClass. When you have finished making the runtime configuration setting, click the OK button. You are now ready to run the program. Well, almost!
Step 5: “Make” The Project
You are almost ready to run TestProject, but before you can do so, you must compile the source files. You can do this by making the project. This is where IDEs really shine. They handle all the messy details about project source files and their relationships to other files. IDEs like JBuilder track changes made to source files and will recompile any source files that have changed since the last project make.
Since this is the first attempt at running TestProject, you must first compile all its associated source files. You can do this either by selecting Project > Make Project or by pressing Ctrl+F9, as is shown in figure 2-24.
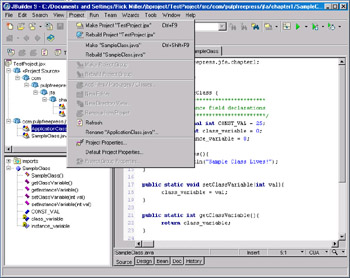
Figure 2-24: JBuilder Project Menu Showing the Make Project Item
As the project builds, you will see one or more Build Progress dialog windows open on the screen. If all goes well, you will be ready to run the project once JBuilder completes the make process. However, don t be surprised if you have made a few mistakes when entering the source code. If there are problems with the project, JBuilder will report them to you. If this happens, you must edit the source files and correct the errors before attempting, once again, to make and run the project.
Step 6: Run The Project
When TestProject builds successfully, you can run it either by selecting Run > Run Project or by pressing the F9 key. The results of running TestProject are shown in figure 2-25.
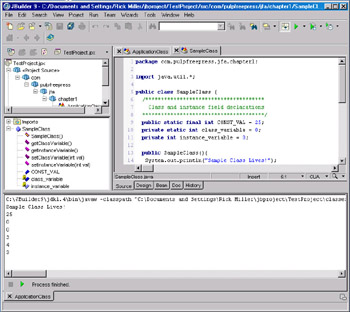
Figure 2-25: Running TestProject
Quick Review
A Java IDE combines many software-development tools into one convenient package. Having a set of tightly-integrated development tools speeds software development. JBuilder is an excellent example of a Java IDE. JBuilder is project-centric. This means you begin the program-creation process with JBuilder by creating a project. JBuilder will then manage just about every aspect of the project from source-file creation to project execution.
EAN: 2147483647
Pages: 452