Summary
Remote Method Invocation (RMI) Overview
The Java platform Remote Method Invocation (RMI) mechanism provides a way for you to utilize the power and flexibility of network programming without getting your hands dirty with network programming details. (Although your hands will still get dirty doing other things as you’ll soon see!)
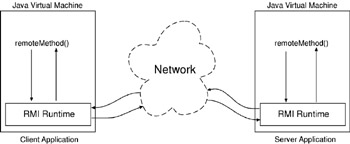
RMI enables you to call a method on an object located somewhere on the network as if you were making a local method call. Figure 19-23 illustrates this concept.

Figure 19-23: The Remote Method Invocation (RMI) Concept
Referring to figure 19-23 — a client application calls a method on a remote object as if it were an ordinary method call. Behind the scenes the Java RMI runtime environment handles all the necessary networking details such as socket set-up and object serialization. The RMI runtime on the server machine translates the incoming RMI method call request, invokes the method on the remote object, and handles the networking details for any return values that may result when the method call returns. The client-side RMI runtime passes the returned values to the client application, again handling all the nasty networking details such as object deserialization, etc. Again, from the client application’s perspective, it appears as though it is making a local method call (...with a few extra twists...).
The remainder of this section steps you through the creation of a simple RMI application using Java versions 1.4.2 and 1.5 (Java 5) and the Java Remote Method Protocol version 1.2 (JRMP v1.2).
Creating & Running An RMI Application In Java 1.4.2
This section steps you through the process of creating an RMI application using Java 1.4.2. Read this section even if you are using Java 1.5 as most of what you learn here applies to creating RMI applications in Java 1.5 as well.
Required Steps
I have broken up the process of creating an RMI application into 9 sequential steps:
-
Step 1: Define A Remote Interface
-
Step 2: Define A Remote Interface Implementation
-
Step 3: Compile The Remote Interface & Remote Interface Implementation Source Files
-
Step 4: Use The rmic Tool To Generate Stub Class
-
Step 5: Create Server Application
-
Step 6: Create Client Application
-
Step 7: Start The RMI Registry
-
Step 8: Run The Server Application
-
Step 9: Run The Client Application
I discuss each of these steps in detail below.
Before We Get Started —What Are We Going To Build?
Before getting started, though, let’s talk about what it is we are going to build. The example RMI application in this section will implement a class named RemoteSystemMonitorImplementation whose method named getSystem-Specs() can be called remotely by a network client application. The getSystemSpecs() method returns an array of String objects that represents a list of server property values such as the type of operating system, Java virtual machine version, etc.
Step 1: Define A Remote Interface
The first step in creating an RMI application is to define an interface to the remote object. Client applications will utilize the remote object’s interface to make method calls on the remote object. Example 19.2 gives the listing for the ![]() RemoteSystemMonitorInterface.java source file.
RemoteSystemMonitorInterface.java source file.
Example 19.2: RemoteSystemMonitorInterface.java
1 import java.rmi.*; 2 3 interface RemoteSystemMonitorInterface extends Remote { 4 public String[] getSystemSpecs() throws RemoteException; 5 } Referring to example 19.2 — the RemoteSystemMonitorInterface extends the Remote interface which is found in the java.rmi package. The RemoteSystemMonitorInterface declares one method named getSystemSpecs() which returns an array of Strings.
Step 2: Define A Remote Interface Implementation
You must now implement the RemoteSystemMonitorInterface interface created in the previous step. Example 19.3 gives the listing for one possible approach to an implementation.
Example 19.3: RemoteSystemMonitorImplementation.java
1 import java.rmi.*; 2 import java.rmi.server.*; 3 4 public class RemoteSystemMonitorImplementation extends UnicastRemoteObject 5 implements RemoteSystemMonitorInterface { 6 7 public RemoteSystemMonitorImplementation()throws RemoteException{ 8 System.out.println("RemoteSystemMonitorImplementation object created!"); 9 } 10 11 public String[] getSystemSpecs(){ 12 String[] specs = { System.getProperty("user.name"), 13 System.getProperty("user.home"), 14 System.getProperty("user.dir"), 15 System.getProperty("os.name"), 16 System.getProperty("os.arch"), 17 System.getProperty("java.version"), 18 System.getProperty("java.vendor"), 19 System.getProperty("java.vendor.url"), 20 System.getProperty("java.vm.name"), 21 System.getProperty("java.vm.version") }; 22 return specs; 23 } 24 } Referring to example 19.3 — The RemoteSystemMonitorImplementation class must extend the UnicastRemoteObject class and implement RemoteSystemMonitorInterface. The UnicastRemoteObject is found in the java.rmi.server package.
Step 3: Compile The Remote Interface & Remote Interface Implementation Source Files
When you’ve finished creating the implementation class compile both the interface and implementation source files. If both source files are in the same directory you can compile them using the javac compiler in the following fashion:
javac *.java
This will result in two class files named ![]() RemoteSystemMonitorInterface.class and
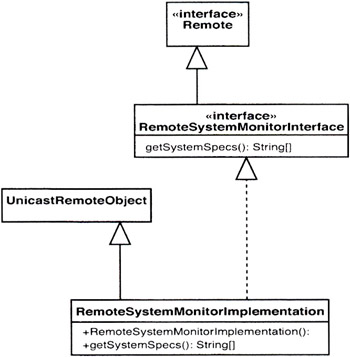
RemoteSystemMonitorInterface.class and ![]() RemoteSystemMonitorImplementation.class. The class diagram for what you have created is shown in figure 19-24.
RemoteSystemMonitorImplementation.class. The class diagram for what you have created is shown in figure 19-24.

Figure 19-24: Class Diagram for RemoteSystemMonitorInterface & RemoteSystemMonitorImplementation
Step 4: Use The rmic Tool To Generate Stub Class
In the same directory use the rmic tool to generate a stub class for the RemoteSystemMonitorImplementation class. Use the rmic tool in the following fashion:
rmic -v1.2 -d . RemoteSystemMonitorImplementation
The -v1.2 option tells rmic to generate only stub classes for use with Java Remote Method Protocol (JRMP) version 1.2. (JRMP v1.1 required the use of skeleton classes for use on the server. This example targets JRMP version 1.2 and skeleton classes are not necessary.)
The -d option followed by the “.” tells rmic to generate the classes in the current directory. This option is the default and not necessary in this example.
Running rmic for this example results in the creation of the RemoteMethodMonitorImplementation _Stub.class file in the current directory.
Step 5: Create Server Application
Now that you have created the RemoteSystemMonitorInterface, RemoteSystemMonitorImplementation, and generated the stub class for the RemoteSystemMonitorImplementation (RemoteSystemMonitorImplementation _Stub.class) you are ready to create a server application that uses these classes. The purpose of the server application is to create an instance of RemoteSystemMonitorImplementation and bind the object to a service name in a running RMI registry instance. This assumes that a registry instance is running. The approach I take in this example is to programmatically create and start an instance of an RMI registry from the server application. (This eliminates the need to execute step 7 below. However, if you write a server application that does not start a registry instance you will need to start the RMI registry externally before running a server that tries to bind a remote object to a service name with a registry.)
Example 19.4 lists the source code for the SystemMonitorServer class.
Example 19.4: SystemMonitorServer.java
1 import java.rmi.*; 2 import java.rmi.registry.*; 3 4 public class SystemMonitorServer { 5 public static void main(String[] args){ 6 try{ 7 System.out.println("Creating RemoteSystemMonitorObject..."); 8 RemoteSystemMonitorInterface remote_object = new RemoteSystemMonitorImplementation(); 9 System.out.println("Starting Registry on port 1099..."); 10 LocateRegistry.createRegistry(1099); 11 System.out.println("Registry started on port 1099"); 12 System.out.println("Binding Remote_System_Monitor service name to remote_object..."); 13 Naming.bind("Remote_System_Monitor", remote_object); 14 System.out.println("Bind successful..."); 15 System.out.println("Ready for remote method invocations..."); 16 17 }catch(Exception e){ 18 System.out.println("Problem creating remote object!"); 19 e.printStackTrace(); 20 } 21 } 22 } Referring to example 19.4 — an instance of RemoteSystemMonitorImplementation is created on line 8 and assigned to the reference named remote_object. On line 10 the LocateRegistry class’s createRegistry() method is called which starts an RMI registry instance on port 1099. (The common RMI registry port number.) On line 13 the object pointed to by the remote_object reference is bound to the service name “Remote_System_Monitor”. This service name will be used by RMI client applications to find an instance of RemoteSystemMonitorImplementation using the registry running on a server machine.
Compile the ![]() SystemMonitorServer.java source file. At this time I recommend you create separate folders or directories named RMI_Server and RMI_Client. In the RMI_Server folder place the following class files:
SystemMonitorServer.java source file. At this time I recommend you create separate folders or directories named RMI_Server and RMI_Client. In the RMI_Server folder place the following class files: ![]() RemoteSystemMonitorInterface.class,
RemoteSystemMonitorInterface.class, ![]() RemoteSystemMonitorImplementation.class, RemoteSystemMonitorImplementation _Stub.class, and
RemoteSystemMonitorImplementation.class, RemoteSystemMonitorImplementation _Stub.class, and ![]() SystemMonitorServer.class. Make a copy of the
SystemMonitorServer.class. Make a copy of the ![]() RemoteSystemMonitorInterface.class file and move it into the RMI_Client folder along with a copy of the RemoteSystemMonitorImplementation_Stub.class file.
RemoteSystemMonitorInterface.class file and move it into the RMI_Client folder along with a copy of the RemoteSystemMonitorImplementation_Stub.class file.
Step 6: Create Client Application
The client application will make a remote method call on a RemoteSystemMonitorImplementation object located on some machine connected via the network. To do this it must get a reference to a remote object. It does this by looking it up by name on a registry running on the server. Example 19.5 gives the code for the SystemMonitorClient application class.
Example 19.5: SystemMonitorClient.java
1 import java.rmi.*; 2 3 public class SystemMonitorClient { 4 public static void main(String[] args){ 5 try{ 6 RemoteSystemMonitorInterface remote_system_monitor = (RemoteSystemMonitorInterface) Naming.lookup("rmi://" + args[0] + "/Remote_System_Monitor"); 7 String[] specs = remote_system_monitor.getSystemSpecs(); 8 for(int i = 0; i<specs.length; i++){ 9 System.out.println(specs[i]); 10 } 11 }catch(ArrayIndexOutOfBoundsException iae){ 12 System.out.println("Usage: java SystemMonitorClient <hostname | hostIP>"); 13 } 14 catch(Exception e){ 15 e.printStackTrace(); 16 } 17 } 18 } Referring to example 19.5 — On line 6 a reference to a RemoteSystemMonitorImplementation object is fetched from a remote registry using the Naming.lookup() method. The lookup() method takes a String representation of a URL that represents the host location of a running RMI registry instance and the service name of the remote object to retrieve. (Remember, in the server application the remote object instance was bound to the service name using the Naming.bind() method.) The reference fetched is cast to RemoteSystemMonitorInterface and assigned to the reference variable named remote_system_monitor. The reference variable is then used to call the remote method named getSystemSpecs() as if it were a local method call. However, the following caveats apply: First, things might go horribly wrong when we attempt to invoke the remote method. This applies to looking up the object in the registry as well. Therefore, these method calls must be placed in the body of a try/catch block and the resulting exceptions handled accordingly. (Not shown in my simple example.) Second, the remote method call may not return right away because of network latency and the overhead incurred by going through the RMI runtime layer. However, generally speaking, so long as the network is up and running, the server is up and running, and things are generally operating normally, remote methods will invoke and return rather quickly.
When you’ve finished coding the client compile the source file and make sure the ![]() RemoteSystemMonitorInterface.class and RemoteSystemMonitorImplementation_Stub.class is located in the working directory or in the class-path somewhere.
RemoteSystemMonitorInterface.class and RemoteSystemMonitorImplementation_Stub.class is located in the working directory or in the class-path somewhere.
You are now ready to test the RMI application.
Step 7: Start The RMI Registry
The approach I have taken in this example, which is to start the registry in the server application, renders this step unnecessary. However, if you write an RMI server application that does not programmatically start the registry then you need to issue the following command at the command prompt:
rmiregistry
This command will start the registry service running on port 1099 which is the default RMI registry service port.
Step 8: Run The Server Application
Start the SystemMonitorServer application on your computer of choice. You can test this RMI example on one machine if required. To start the server issue the following command at the command prompt:
java SystemMonitorServer
Figure 19-25 shows the results of running the SystemMonitorServer application.

Figure 19-25: SystemMonitorServer Running on Host Machine
Step 9: Run The Client Application
When the SystemMonitorServer application is up and running you can run the client application. To run the client application and connect to the registry started by the SystemMonitorServer application on the local machine open a separate command or terminal window and issue the following command:
java SystemMonitorClient 127.0.0.1
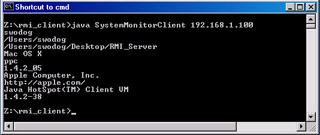
The results of running the SystemMonitorClient connected to the local machine is shown in figure 19-26. Figure 19-27 shows the SystemMonitorClient application being run on a remote PC.

Figure 19-26: Results of Running the SystemMonitorClient Application Connecting to the Locally Served Server Application

Figure 19-27: Results of the SystemMonitorClient Application after Running on a remote PC.
Referring to figure 19-27 —the SystemMonitorClient can run from any machine that’s also running Java and is connected to the network in such a way that it can reach the server where the registry and SystemMonitorServer is running. In this example I’m connecting from a PC to a Mac with an IP address of 192.168.1.100.
Likewise, if I run the SystemMonitorServer application on the PC I can run the SystemMonitorClient application on the Mac and invoke the remote method on the PC as figure 19-28 illustrates.

Figure 19-28: SystemMonitorClient Invoking the Remote Method on a PC Running the SystemMonitorServer Application
Creating & Running An RMI Application In Java 1.5
The steps required to create and run an RMI application using Java version 1.5 are exactly the same as those described for Java 1.4.2 with one important exception. You do not have to generate stub classes with the rmic tool if both the client and server applications are going to run in the Java 1.5 environment. The RMI runtime environment of Java 1.5 dynamically generates the stub classes for you when you invoke the remote method.
Considerations When Deploying RMI Applications In Mixed JVM Version Environments
As I write this chapter Java 1.5 is available only for the Linux, Solaris, and Windows environments. The latest version of Java available for the Macintosh is version 1.4.2. (Update: Java 1.5 for Mac OS X is here but requires an update to OS X 10.4 (Tiger))
In reality, you will find your Java applications being run by an assortment of JVM versions and you must consider the lowest common denominator JVM target when distributing your applications. The following guidelines will help:
Server JVM 1.5 - Client JVM 1.5
Stub classes are not required on the client or the server side as they will be dynamically generated by the Java RMI runtime.
Server JVM 1.5 - Client JVM 1.4.2
The lowest common denominator is JVM version 1.4.2 on the client side so you need to generate the stub classes with the rmic tool and deploy to both the client and server side.
Server JVM 1.4.2 - Client JVM 1.5
The lowest common denominator is JVM version 1.4.2 on the server side. You’ll need to generate the stub class with the rmic tool and deploy to the server side. The client side does not need the stub class.
Server JVM 1.4.2 - Client JVM 1.4.2
Both client and server sides need the stub class.
Quick Review
Java Remote Method Invocation (RMI) provides a way for programmers to access the power and flexibility of network applications while avoiding the chore of network programming. RMI allows programmers to invoke methods on remotely located objects across a network as if they were available locally. The networking details associated with making the remote method call is handled automatically by the Java RMI runtime environment.
EAN: 2147483647
Pages: 452