Labeling 101


You've packed the box. You've sealed the box. Now it's time for the label.

Buying the Right Kinds of Labels

For most purposes, you can't beat the standard 4-inchx6-inch blank white label. Anything smaller is tough to work with, and anything larger just leaves a lot of wasted space. Stick with 4-inchx6-inch and you'll be happy. You can purchase these labels at any office supply store, or even get free versions (for Priority Mail shipping) at your local post office.

Tip

If you're unsure what label to use, go with Avery; just about every software program out there supports Avery labels. Plus, Avery offers its own label-making software and templates, downloadable for free from www.avery.com.


If you want to splurge, you can even purchase labels with your name and return address preprinted at the top. This is a good idea if you do a lot of shipping (a dozen or more items a week); otherwise, it's probably not cost-efficient.

You can also purchase or create your own return address labels, to use in conjunction with your main shipping labels. It's easy enough to print a full page of smallish labels in Microsoft Word; most printing firms (such as FedEx Kinko's) can also do up a roll of address labels for a nominal charge.

If you use computer-generated labels, you can program your label-making program to include your return address when it prints the label. This is a good (and lower-cost) alternative to using preprinted labels.

Note

If you don't use a preprinted label, you'll want to hand-print your return address on the shipping container, or use some sort of return address label.


How to Create an Idiot-Proof Label

The best-packed box won't go anywhere if you get the label wrong. For fast and efficient delivery, keep these points in mind when addressing your package:

  • Write, type, or print the complete address neatly.

  • Always use complete address information, such as the suffixes Dr., Ave., St., and Blvd.

  • Include the recipient's apartment or suite number, if applicable.

  • Always use correct directions, such as N, S, E, W, or SW.

  • Use the correct ZIP codeand, when possible, use the four-digit add-on, ZIP+4 (example: 46032-1434). Be sure to hyphenate the ZIP+4.

  • Always use the proper two-letter state abbreviation.

  • When addressing to a P.O. Box or rural route destination, include the recipient's telephone number on the label.

  • When shipping outside the U.S., include a contact name, telephone number, and postal code on the labeland don't forget to include the country name!

  • Always include your return address information.

  • If you're using any special services of the U.S. Postal Service (Priority Mail, First Class Mail, insurance, and so on), note this above the destination address and below and to the right of the return address.

  • Place the delivery label on the top (not the side) of the box. To avoid confusion, place only one address label on the box. If using a packing slip, place it on the same surface of the box as the address label.

  • Do not place the label over a seam or closure or on top of sealing tape.

  • To avoid ink smudges and rain smears, place a strip of clear packing tape over the address label. (Notable exception: Do not tape over any bar codes on a label with pre-paid postage; bar code readers have trouble reading through tape.)

  • If you're reusing a box for shipping, remove or block out all old address labels or markings on a used box.

And here's one last tip. Make a duplicate of your shipping label and stick it inside the box, before you seal it. This way if the original shipping label gets torn off or destroyed, anyone opening the box can read the duplicate label and figure out where the box is supposed to go.

Tip

Don't know the ZIP code for the address you're shipping to? Then look it up at the U.S. Postal Service's ZIP Code Lookup at www.usps.com/zip4/.


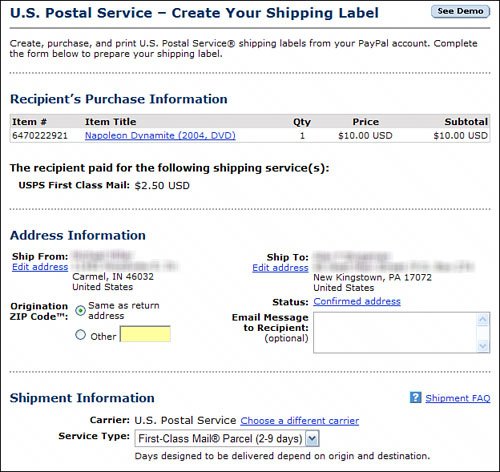
Printing Labels and Postage on Your Own Computer

Here's a real time-saver. If you're shipping via the U.S. Postal Service or UPS, you can print labels on your home printerincluding labels with prepaid postage. When you print your own prepaid postage, you don't have to make a trip to the post office. Just print the labelincluding postageon your own printer, attach the label to your package, and hand it to your postman. No more standing in line at the post office!

You can print these labels directly from eBay, and pay for them using your PayPal account. Here's how to do it:

1.

Go to your closed item listing page and click the Print Shipping Label button. (You can also find this option on your My eBay All Selling page.)

2.

You're now taken to the Select Shipping Carrier page on the PayPal site. Select either USPS or UPS shipping, then click the Continue button.

3.

When the Create Your Shipping Label page appears, as shown in Figure 23.2, scroll down to the Shipment Information section and select the desired shipping service.

Figure 23.2. Pay for postage from your PayPal account.


4.

Fill in the rest of the necessary information and click the Continue button.

5.

View the information on the confirmation page and authorize payment from your PayPal account.

6.

Follow the onscreen instructions to print the label on your own printer.

7.

The label prints on half of a sheet of paper. Cut off the label side of the paper and affix it to your package.

Once you've affixed the label, your work is done. You can drop your package in the mail, or hand it to your local postal worker when he makes his daily rounds. There's no need to visit the post officeor if you do, you can bypass the long lines and drop the pre-paid package off at the nearest counter.

Note

One plus to printing your own USPS labels is you get Delivery Confirmation included, at no charge.


Absolute Beginner's Guide to eBay
Absolute Beginners Guide to eBay (4th Edition)
ISBN: 078973561X
EAN: 2147483647
Year: 2004
Pages: 204

flylib.com © 2008-2017.
If you may any questions please contact us: flylib@qtcs.net