Texturing Our Objects
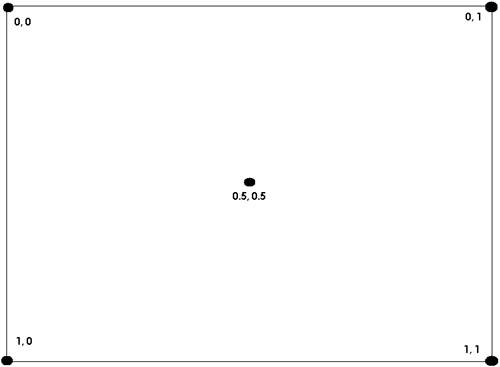
| While rendering with colors and lights is quite exciting, objects don't look realistic enough if this is all we are using. The term "texture" when describing non-3D applications is usually in reference to the roughness of an object. Textures in a 3D scene are essentially flat 2D bitmaps that can be used to simulate a texture on a primitive. You might want to take a bitmap of grass to make a nice looking hill, or perhaps clouds to make a sky. Direct3D can render up to eight textures at a time for each primitive, but for now, let's just deal with a single texture per primitive. Since Direct3D uses a generic bitmap as its texture format, any bitmap you load can be used to texture an object. How is the flat 2D bitmap converted into something that is drawn onto a 3D object, though? Each object that will be rendered in a scene requires texture coordinates, which are used to map each texel to a corresponding pixel on screen during rasterization. Texel is an abbreviation for texture element, or the corresponding color value for each address in a texture. The address can be thought of much like a row and column number, which are called "U" and "V" respectively. Normally, these values are scalar; that is the valid ranges for them go from 0.0 to 1.0. 0, 0 is located at the upper left corner of the texture, while 1, 1 would be located at the bottom right corner of the texture. The center of the texture would be located at 0.5, 0.5. See Figure 3.2. Figure 3.2. Visualizing texture coordinates.
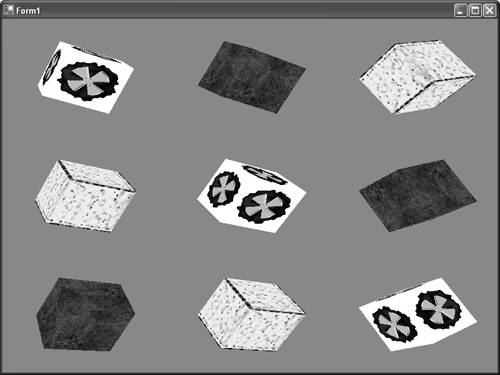
In order to render our boxes with a texture, we must change the vertex format we are using to render our box, as well as the data we are passing down to the graphics card. We will replace the "color" component of our vertex data with texture coordinate data. While it's perfectly valid to have our object both colored and textured, for this exercise, we will simply use the texture to define the color of each primitive. Modify your vertex creation code as in Listing 3.2: Listing 3.2 Textured Box DataCustomVertex.PositionTextured[] verts = new CustomVertex.PositionTextured[36]; // Front face verts[0] = new CustomVertex.PositionTextured(-1.0f, 1.0f, 1.0f, 0.0f, 0.0f); verts[1] = new CustomVertex.PositionTextured(-1.0f, -1.0f, 1.0f, 0.0f, 1.0f); verts[2] = new CustomVertex.PositionTextured(1.0f, 1.0f, 1.0f, 1.0f, 0.0f); verts[3] = new CustomVertex.PositionTextured(-1.0f, -1.0f, 1.0f, 0.0f, 1.0f); verts[4] = new CustomVertex.PositionTextured(1.0f, -1.0f, 1.0f, 1.0f, 1.0f); verts[5] = new CustomVertex.PositionTextured(1.0f, 1.0f, 1.0f, 1.0f, 0.0f); // Back face (remember this is facing *away* from the camera, so vertices should be clockwise order) verts[6] = new CustomVertex.PositionTextured(-1.0f, 1.0f, -1.0f, 0.0f, 0.0f); verts[7] = new CustomVertex.PositionTextured(1.0f, 1.0f, -1.0f, 1.0f, 0.0f); verts[8] = new CustomVertex.PositionTextured(-1.0f, -1.0f, -1.0f, 0.0f, 1.0f); verts[9] = new CustomVertex.PositionTextured(-1.0f, -1.0f, -1.0f, 0.0f, 1.0f); verts[10] = new CustomVertex.PositionTextured(1.0f, 1.0f, -1.0f, 1.0f, 0.0f); verts[11] = new CustomVertex.PositionTextured(1.0f, -1.0f, -1.0f, 1.0f, 1.0f); // Top face verts[12] = new CustomVertex.PositionTextured(-1.0f, 1.0f, 1.0f, 0.0f, 0.0f); verts[13] = new CustomVertex.PositionTextured(1.0f, 1.0f, -1.0f, 1.0f, 1.0f); verts[14] = new CustomVertex.PositionTextured(-1.0f, 1.0f, -1.0f, 0.0f, 1.0f); verts[15] = new CustomVertex.PositionTextured(-1.0f, 1.0f, 1.0f, 0.0f, 0.0f); verts[16] = new CustomVertex.PositionTextured(1.0f, 1.0f, 1.0f, 1.0f, 0.0f); verts[17] = new CustomVertex.PositionTextured(1.0f, 1.0f, -1.0f, 1.0f, 1.0f); // Bottom face (remember this is facing *away* from the camera, so vertices should be clockwise order) verts[18] = new CustomVertex.PositionTextured(-1.0f, -1.0f, 1.0f, 0.0f, 0.0f); verts[19] = new CustomVertex.PositionTextured(-1.0f, -1.0f, -1.0f, 0.0f, 1.0f); verts[20] = new CustomVertex.PositionTextured(1.0f, -1.0f, -1.0f, 1.0f, 1.0f); verts[21] = new CustomVertex.PositionTextured(-1.0f, -1.0f, 1.0f, 0.0f, 0.0f); verts[22] = new CustomVertex.PositionTextured(1.0f, -1.0f, -1.0f, 1.0f, 1.0f); verts[23] = new CustomVertex.PositionTextured(1.0f, -1.0f, 1.0f, 1.0f, 0.0f); // Left face verts[24] = new CustomVertex.PositionTextured(-1.0f, 1.0f, 1.0f, 0.0f, 0.0f); verts[25] = new CustomVertex.PositionTextured(-1.0f, -1.0f, -1.0f, 1.0f, 1.0f); verts[26] = new CustomVertex.PositionTextured(-1.0f, -1.0f, 1.0f, 1.0f, 0.0f); verts[27] = new CustomVertex.PositionTextured(-1.0f, 1.0f, -1.0f, 0.0f, 1.0f); verts[28] = new CustomVertex.PositionTextured(-1.0f, -1.0f, -1.0f, 1.0f, 1.0f); verts[29] = new CustomVertex.PositionTextured(-1.0f, 1.0f, 1.0f, 0.0f, 0.0f); // Right face (remember this is facing *away* from the camera, so vertices should be clockwise order) verts[30] = new CustomVertex.PositionTextured(1.0f, 1.0f, 1.0f, 0.0f, 0.0f); verts[31] = new CustomVertex.PositionTextured(1.0f, -1.0f, 1.0f, 1.0f, 0.0f); verts[32] = new CustomVertex.PositionTextured(1.0f, -1.0f, -1.0f, 1.0f, 1.0f); verts[33] = new CustomVertex.PositionTextured(1.0f, 1.0f, -1.0f, 0.0f, 1.0f); verts[34] = new CustomVertex.PositionTextured(1.0f, 1.0f, 1.0f, 0.0f, 0.0f); verts[35] = new CustomVertex.PositionTextured(1.0f, -1.0f, -1.0f, 1.0f, 1.0f); buffer.SetData(verts, 0, LockFlags.None); Obviously, the biggest change here is the data type being used to store the vertex list. The last two float values stored in each vertex are the u and v coordinates in a texture that will be used to render the primitive. Since each face of the box is a square, and the textures will be square as well, it makes good sense to map each square directly to the texture. You will notice that the vertex in the "upper left" corner of the primitive maps directly to 0, 0, the corresponding texel in the texture; just as the "bottom right" vertex maps directly to the 1, 1 texel. By doing this, each face of the square will hold the entire texture. The application isn't quite ready for prime time yet. Running it as it is will end up throwing an exception because our vertex buffer was created for a different type of data. Modify the vertex buffer creation like the following: vb = new VertexBuffer(typeof(CustomVertex.PositionTextured), 36, device, Usage.Dynamic | Usage.WriteOnly, CustomVertex.PositionTextured.Format, Pool.Default); I'm sure you guessed that would be the change needed. Let's make it a little easier to draw our boxes, though; all the lines of code there are just duplicated. Let's add a function to do the drawing for us: private void DrawBox(float yaw, float pitch, float roll, float x, float y, float z, Texture t) { angle += 0.01f; device.Transform.World = Matrix.RotationYawPitchRoll(yaw, pitch, roll) * Matrix.Translation(x, y, z); device.SetTexture(0, t); device.DrawPrimitives(PrimitiveType.TriangleList, 0, 12); } The first six parameters of this function are the same as we have been using to begin with. We pass in the yaw, pitch, and roll for our box rotation, plus the x, y, and z for our box translation. The last parameter is a new one, though; it will represent the texture we use when rendering this box. We will also call the SetTexture method on the device to tell Direct3D which texture we want to use when rendering this primitive. The first parameter of this method is the texture stage we are setting this texture on. You might remember a short while ago when I mentioned that you could render up to eight textures for a primitive; this first parameter is the index to those textures. Since we only have one set of texture coordinates, we will always use the first index, 0. Also notice that, since we are modifying our "angle" member variable and the world transform, you can remove those lines from the SetupCamera method. Before we change our rendering code to call our new function, we first need to define some textures we will be using. The demo code on the CD includes three textures in the source project attached as resources. They are puck.bmp, ground.bmp, and banana.bmp. In the project menu, click Add Existing Item and add the three images to your project. Once each image has been added, you will need to view the properties of each, and change the "Build Action" item to "Embedded Resource". Since we will be using three textures, add three texture member variables to the application. Add the following below the declaration for our vertex buffer: private Texture tex = null; private Texture tex1 = null; private Texture tex2 = null; These will be the three textures we use for drawing our box. However, we still need to actually set these up to use the three bitmaps we have as embedded resources. Add the following code directly after your vertex buffer creation and data-filling code: tex = new Texture(device, new Bitmap(this.GetType(), "puck.bmp"), 0, Pool.Managed); tex1 = new Texture(device, new Bitmap(this.GetType(), "banana.bmp"), 0, Pool.Managed); tex2 = new Texture(device, new Bitmap(this.GetType(), "ground.bmp"), 0, Pool.Managed); This constructor for our texture takes four parameters. The first is the device we will be using to render this texture. All resources (textures, vertex buffers, and so on) in a scene will be associated with a device. The next parameter is the System.Drawing.Bitmap we will be using to get the data for this texture. In this case, we use the bitmap constructor to load our file from the resources. The third parameter here is the usage parameter, which we discussed briefly when speaking about vertex buffers. For now, we will use zero, since we're not that interested in the usage. The last parameter is the memory pool to store the texture in. For convenience, we will use the managed pool for now. The other constructors available for textures are public Texture ( System.IntPtr lp , Microsoft.DirectX.Direct3D.Device device , Microsoft.DirectX.Direct3D.Pool pool ) public Texture ( Microsoft.DirectX.Direct3D.Device device , System.Int32 width , System.Int32 height , System.Int32 numLevels , Microsoft.DirectX.Direct3D.Usage usage , Microsoft.DirectX.Direct3D.Format format , Microsoft.DirectX.Direct3D.Pool pool ) public Texture ( Microsoft.DirectX.Direct3D.Device device , System.IO.Stream data , Microsoft.DirectX.Direct3D.Usage usage , Microsoft.DirectX.Direct3D.Pool pool ) The first constructor takes an IntPtr argument that is the unmanaged COM interface pointer for IDirect3DTexture9. This is used for interoperability with unmanaged code. The next constructor allows you to create a "blank" texture from scratch, specifying the height, width, and number of levels of detail, rather than reading these values from the file. The last constructor is very similar to the one we've used in our application, just using a stream rather than a bitmap object. This stream must be able to be loaded into a System.Drawing.Bitmap object for this constructor to work. There are other interesting functions for texture loading in the TextureLoader class, which we will get to in subsequent chapters. Now that we've got our three textures defined and loaded with the bitmaps stored in our resources, let's update our drawing code to show our boxes with the textures. We can get rid of all the drawing code for our rendering function, and replace it with the following: // Draw our boxes DrawBox(angle / (float)Math.PI, angle / (float)Math.PI * 2.0f, angle / (float)Math.PI / 4.0f, 0.0f, 0.0f, 0.0f, tex); DrawBox(angle / (float)Math.PI, angle / (float)Math.PI / 2.0f, angle / (float)Math.PI * 4.0f, 5.0f, 0.0f, 0.0f, tex1); DrawBox(angle / (float)Math.PI, angle / (float)Math.PI * 4.0f, angle / (float)Math.PI / 2.0f, -5.0f, 0.0f, 0.0f, tex2); This should render each of the three boxes we already had, although now instead of each face being colored with a different color, each box should be textured. The sample code included on the CD will render a total of nine boxes. See Figure 3.3. Figure 3.3. Textured cubes.
|
EAN: N/A
Pages: 180