Integrated Development Environments
|
| < Day Day Up > |
|
To create even the smallest C++ project you will need some kind of development environment. A minimal development environment contains a text editor, compiler, and linker. Some nice-to-have components include a debugger to help you troubleshoot your source code, and a project management program to help you manage large projects. If you go the minimalist route using only a text editor, compiler, and linker you will run into difficulty when it comes time to do any serious programming. You may not need the services of the debugger but the project management software comes in really handy. An integrated development environment (IDE) contains everything you need to develop, troubleshoot, and manage software projects. In this section I will show you how to use two popular IDEs, Metrowerks CodeWarrior® and Microsoft Visual C++® to create, compile, and execute a sample project named FirstClass. Before getting started let us look at the three source code files that comprise the FirstClass project presented in chapter 1. They are firstclass.h, firstclass.cpp, and main.cpp and are given in examples 2.1 through 2.3.
Listing 2.1: firstclass.h
#ifndef FIRSTCLASS_H #define FIRSTCLASS_H class FirstClass{ public: FirstClass(); virtual ~FirstClass(); private: static int object_count; }; #endif
Listing 2.2: firstclass.cpp
#include "firstclass.h" #include <iostream.h> int FirstClass::object_count = 0; FirstClass::FirstClass(){ cout<<"There are "<<++object_count<<" FirstClass objects!"<<endl; } FirstClass::~FirstClass(){ if(--object_count) cout<<"There are "<<object_count<<" FirstClass objects!"<<endl; else cout<<"There are no FirstClass objects!"<<endl; } Listing 2.3: main.cpp
#include "firstclass.h" int main(){ FirstClass f1, f2, f3, f4; return 0; }
Metrowerks CodeWarrior
Metrowerks CodeWarrior™ is an integrated development environment available in both Macintosh™ and Windows™ versions. The screenshots below are taken from CodeWarrior™ version 5 for the Macintosh™.
The central concept in any IDE is that of the project. Start your programming projects by creating a new project in the IDE. Figure 2-2 shows CodeWarrior’s New window with the Project tab selected.
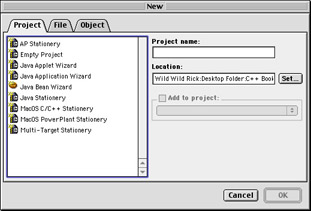
Figure 2-2: Creating a New Project in CodeWarrior
Select the project stationary you wish to use. In figure 2-3 MacOS C/C++ Stationery is selected. Type the name of the project in the Project name box.
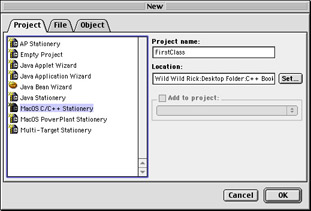
Figure 2-3: Selecting Stationery and Naming Project
Before clicking OK check to ensure you have set the proper location for your project. I recommend creating a new folder called CodeWarrior Projects and creating individual folders for each of your projects within that folder. Setting up your programming environment is a matter of personal taste. Figure 2-4 shows the window that pops up when you press the Set... button located to the right of the Location text box. (shown in figure 2-3)
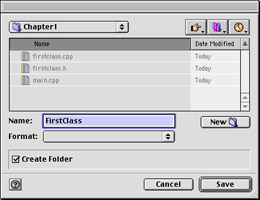
Figure 2-4: Setting a Project’s Location
Figure 2-4 also shows the project named FirstClass being saved to a folder called Chapter1. If you wish to save your project to a location other than the CodeWarrior default location make the necessary changes and click Save. Otherwise, click Cancel to return to the previous window. After you have named your project, and set its location, click OK ( see figure 2-3). You will now be presented with a window similar to figure 2-5 where you will select the type of project you want to create.
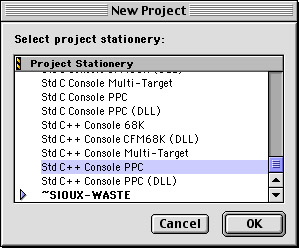
Figure 2-5: Select Project Type
There are a lot of choices but since we are creating a C++ project and are interested only in simple stream I/0 to a console, select the Std C++ Console PPC. PPC stands for PowerPC. As you can see you can create projects for 68K Macs as well. CodeWarrior for Windows has lots of different project types for Windows programmers too. Once the project type is highlighted click OK. This will create the project and present you with the CodeWarrior project window that looks like figure 2-6.
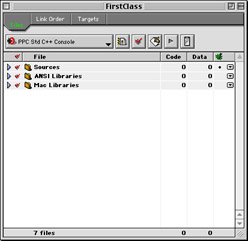
Figure 2-6: FirstClass Project Window
Folders called Groups are created automatically by CodeWarrior. The first group contains an automatically generated C++ source file called HelloWorld.cp. See figure 2-7. You can compile the project now and see the output generated by HelloWorld.cp just to make sure everything is working correctly.
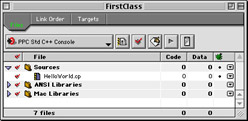
Figure 2-7: Sources Group Open Revealing HelloWorld.cp
Now it is time to create the three source files, firstclass.h, firstclass.cpp, and main.cpp. Select New Text File from the File menu as shown in figure 2-8 and enter the source code for firstclass.h as shown in figure 2-9.
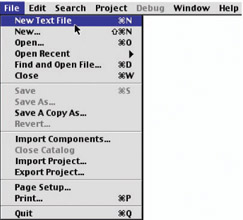
Figure 2-8: Creating New Text File

Figure 2-9: Editing firstclass.h
When you have finished with each file, save it to the project’s folder. When you have finished with all three you then need to add firstclass.cpp and main.cpp to the Sources Group in the FirstClass project window.
It is important to note here that in CodeWarrior you only add implementation files to the Sources Group, that is, files with the .cpp or .cp extension. Do not add header files. Simply save them to the project folder and the compiler will search for the header files there. If you organize your projects differently, as would be the case for complex projects, you will have to explicitly set project search paths.
To add files to the FirstClass project select the Sources group in the project window and then select Add Files... from the Project menu. If you have saved your files in the correct folder you will see them listed in a window similar to figure 2-10.
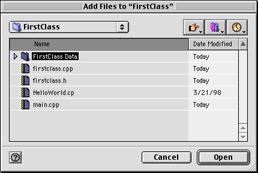
Figure 2-10: Adding Files to Project
Select the firstclass.cpp and main.cpp files and click Open. Next, remove HelloWorld.cp from the Sources group. When you have finished adding the files to the project your FirstClass project window will look like figure 2-11. Now you are ready to compile and run the project.
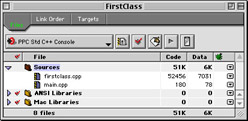
Figure 2-11: firstclass.cpp and main.cpp Added, HelloWorld.cp Removed
Select Run from the Project menu. CodeWarrior will then compile and link each file in the project automatically. When finished, it will launch the resulting executable file. The results of running the FirstClass project are shown in figure 2-12.
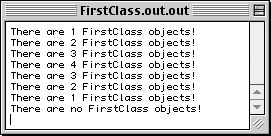
Figure 2-12: FirstClass Project Output
Microsoft Visual C++
Of all integrated development environments Microsoft Visual C++ is the most difficult for students to learn. I think the primary reason for this is due in part to its power and sheer number of features. However, if you are planning to do any serious Windows programming I recommend mastering this tool.
All IDEs are similar in that they are project oriented. Visual C++ uses the workspace metaphor. Begin your project by creating a new workspace and selecting the project type.
Figure 2-13 shows the Win32 Console Application project type highlighted. Enter a name for your project in the Project name text box as shown in figure 2-14. The Create new workspace radio button is automatically selected. I have named this project Project1.
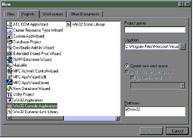
Figure 2-13: Creating New Visual C++ Project
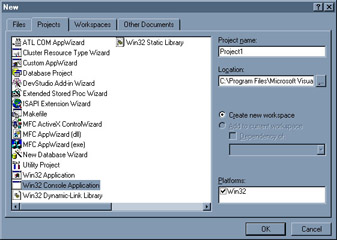
Figure 2-14: Naming the Project
Once you have named your project click OK. Next, choose what kind of Console Application you wish to create. (see figure 2-15) Click the “A simple application” radio button and then click Finish.
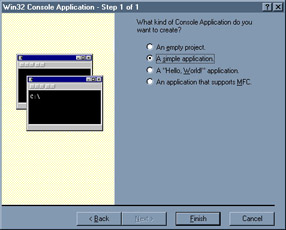
Figure 2-15: Selecting Console Application Type
After setting the Console Application type the New Project Information window will appear looking similar to figure 2-16. If you agree with the information it contains click OK.
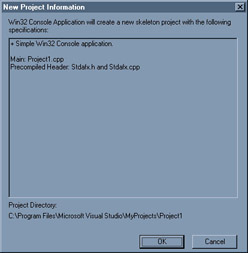
Figure 2-16: New Project Information Window
Now you are presented with the Workspace environment. Refer to figure 2-17.
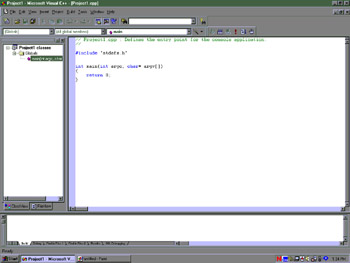
Figure 2-17: Workspace Environment with ClassView Selected
Visual C++ automatically creates a file with the same name as the project name you entered into the Project name text box. It puts the main() function in this file. Edit this file so that it looks like example 2.3 but leave in the line containing #include “StdAfx.h”. Figure 2-18 shows the edited file.
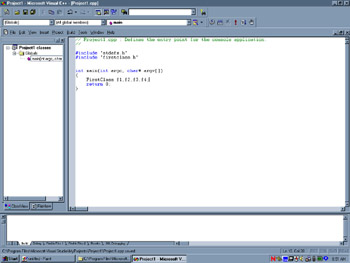
Figure 2-18: Edited Project1.cpp File
Visual C++ differs from CodeWarrior in that header files are contained in the workspace in a group called Header Files. Let us add the firstclass.h file. Select New... from the File menu. A window similar to figure 2-19 will appear.
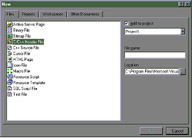
Figure 2-19: Adding New C++ Header File to Project 1
Enter the filename firstclass.h in the File name text box as shown in figure 2-20 and click OK.
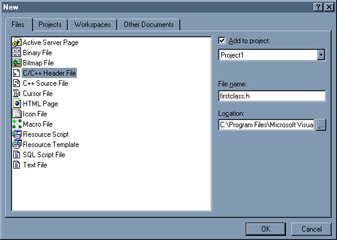
Figure 2-20: File Name Entered
Visual C++ will now open an empty text file ready for editing. Enter the code from firstclass.h given in example 2.1. Figure 2-21 shows the completed firstclass.h file. Visual C++ will automatically put new header files in the Header Files group.
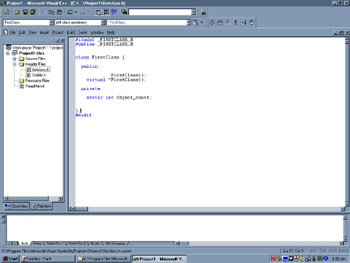
Figure 2-21: Editing firstclass.h
Now create the file firstclass.cpp. Select New... from the File menu and highlight C++ Source File. Refer to figure 2-22.
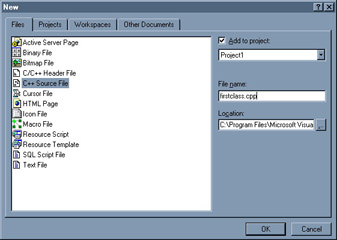
Figure 2-22: Creating a New C++ Source File
Enter the name in the File name text box and click OK. It will automatically be saved in the Source Files group. Enter the code for firstclass.cpp from example 2.2 and save.
One thing left to do. Open the StdAfx.h file and add the line #include “firstclass.h” underneath the comment “// TODO: reference additional headers your program requires here”. Figure 2-23 shows the StdAfx.h file being edited.
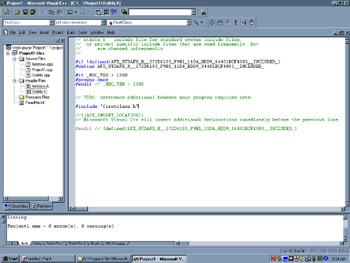
Figure 2-23: Linking...Message and Results of Building Project 1
When you have finished editing the StdAfx.h file save the changes. You are now ready to execute the project.
Select Execute from the Build menu and click OK to dismiss the dialog that pops up asking you if you would like to create Project1.exe. Referring again to figure 2-23, as Visual C++ performs each stage of the compilation and build process on the project it will write a series of messages to the Build window (refer to the series of tabbed windows along the bottom of the workspace). In figure 2-23 you see the last of the messages, Linking..., and the report that Project1.exe was built with 0 errors and 0 warnings. Figure 2-24 shows the results of running Project1.exe.
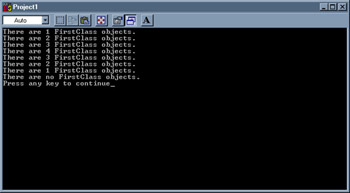
Figure 2-24: Running Project1.exe
Intermission
So far I have shown you how to create simple, multi-file projects with two popular IDEs. As you use your IDE of choice to create projects of increasing complexity you will dive deeper into its features. A word of advice: Read the documentation that comes with your IDE. The information in this chapter is helpful but it is not a compete treatment of all the cool things your IDE can do.
A large part of the power of an IDE comes from its ability to track changes to dependent project files. For example, if a change is made to firstclass.h, every file that depends on the contents of firstclass.h will have to be recompiled. This chore is handled automatically for you by CodeWarrior™ and Visual C++. If you choose not to use an IDE you will have to learn how to use a utility like make to handle project management tasks. Let us take a look at a UNIX development environment and see the make utility in action.
Tenon Intersystems MachTen CodeBuilder™
CodeBuilder™ is a UNIX programming environment that runs on Macintosh™ computers. It comes with C, C++, Ada, Objective-C, Fortran, and Java compilers. CodeBuilder can be used to develop code for Macintosh™ PowerPC machines as well as Silicon Graphics, SUN, NeXT, or HP workstations.
CodeBuilder is not an integrated development environment, meaning that although it comes with all kinds of powerful development tools they are not tightly integrated like CodeWarrior or Visual C++. You will have to choose an editor with which to create your source files, learn how to call the compiler from the command line, and learn to use the make utility to help you manage multi-file projects.
Attention Linux Users
If you have a PC running Linux the information in this section will help you too. Having said that, let’s get started.
Organizing Project Files
You can still apply the concept of a project to your UNIX development. In its simplest form a project is one or more related files located in one or more directories along with a makefile that defines the dependencies between the related files. Makefiles and the make utility will be covered below. Get into the habit of creating different directories for each project and work on that project from that directory.
Creating Source Files
Select your UNIX text editor of choice to create your source files. CodeBuilder™ ships with Emacs, a powerful text editor ported to many different versions of UNIX. Figure 2-25 shows Emacs running in an X-Windows session being used to create firstclass.h.
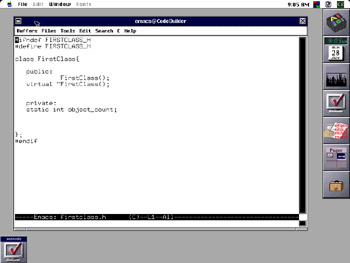
Figure 2-25: Creating firstclass.h with Emacs
Save firstclass.h in your designated project directory and create firstclass.cpp and main.cpp in similar fashion.
Creating makefile
The next file you need to create is a file called makefile. The makefile contains commands that tell the make utility how to build your project. Like an IDE, the make utility will detect when project files have been modified and recompile all project files that depend on those files. Figure 2-26 shows Emacs being used to create the makefile.
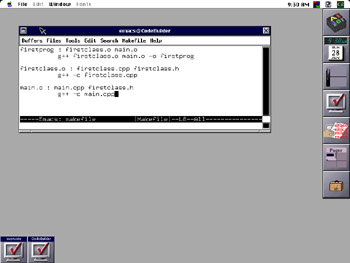
Figure 2-26: Creating makefile with Emacs
Let us take a closer look at the contents of makefile.
Example 2.4: makefile

The first line of makefile says that the program named firstprog depends on two object files named firstclass.o and main.o. The second line is a GNU C++ compiler command that will link the two files firstclass.o and main.o to produce an executable named firstprog.
Line 4 of makefile says that firstclass.o depends on firstclass.cpp and firstclass.h. Should either of these two files change, the make utility will have to recompile firstclass.cpp to produce a new version of firstclass.o. This will cause firstclass.o to change which will cause the linking process to be invoked again to create the new version of firstprog. On line 5 the C++ compiler command is called with the -c flag. This will result in compilation only and no linking, since linking is done on line 2.
Line 7 says that main.o depends on main.cpp and firstclass.h. Should either of these two files change main.o will change which will cause the same chain reaction as described in the paragraph above. Notice how a change to firstclass.h will cause both firstclass.o and main.o to change.
To run the make utility simply type make at the command line. Refer to figure 2-27. Notice too in figure 2-27 that the project files are located in a directory named Rick. A listing of that directory reveals the three project files firstclass.h, firstclass.cpp, main.cpp, and makefile, along with a few files left over from a g++ test run.
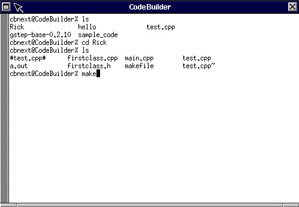
Figure 2-27: Running the make Utility
Figure 2-28 shows the results of running the make utility as well as running the resulting executable.

Figure 2-28: Results of Executing make Utility and firstprog
|
| < Day Day Up > |
|
EAN: 2147483647
Pages: 340