Adding and Removing Software
| Even though most new computers come with a decent selection of software installed, at some point in time you're going to want to add something new. When you need to add a new program or remove an old one you'll find that Windows XP works pretty much the same way Windows 9X/Me did. That means, of course, that if you already know how to add and remove software, you don't have much to learn. Installing New ProgramsAlmost all software programs have their own built-in installation utilities. Installing the software is as easy as running this built-in program. If the program you're installing comes on a CD-ROM or DVD, all you have to do is insert the program's main or installation disc in your computer's CD-ROM/DVD drive. The program's installation program should then start automatically, and all you have to do is follow the onscreen instructions. If the installation program doesn't start automatically, you have to launch it manually. To do this, click the Start button, click the Run icon, and then type x:setup into the Run dialog box. (Replace x with the letter of your CD-ROM/DVD drive.) Click OK to run the installation program. (If this doesn't work, know that some older programs name their installation programs "install" instead of "setup," so change the filename if necessary.) If the program you're installing doesn't have an automated setup program, or if you prefer to install a new program manually, you can run Windows XP's Add or Remove Programs utility. Follow these steps:
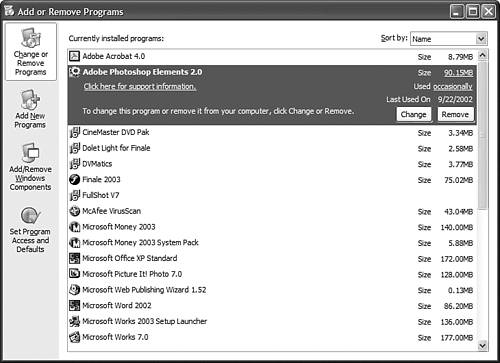
Removing Old ProgramsRemoving a software program from your system can be easy or it can be complicated. Most newer Windows programs include their own utilities to uninstall the program automatically. If you want to uninstall a program, you should use this publisher-supplied utility when it exists. You can generally find the program's uninstall utility in the folder where the program's other files reside. TIP A well-behaved uninstall program should not remove your personal files, even if they are stored in the application's folders. Just to be safe, however, you should move any personal files you want to keep to a new folder before removing the application. If you want to remove a Windows application that doesn't include its own uninstall utility, you should use Windows' Add or Remove Programs located in the Control Panel. This utility identifies every component of the application you want to remove, and automatically deletes them from your hard disk. To remove a software program from your PC, follow these steps:
If the program you want to remove does not have an automatic uninstall utility, you have to delete the program's files manually, using My Computer. The problem with trying to delete a program in this way is that miscellaneous files associated with the program are often scattered throughout various folders on your hard disk. You may want to purchase a third-party uninstall program (such as Norton Systemworks, which includes the Norton CleanSweep utility; learn more at www.symantec.com) to find and remove all program remnants from your system. |

EAN: 2147483647
Pages: 270