| Desktop icons, called shortcuts, are just that shortcuts for starting applications and opening documents. Placing a shortcut on your desktop is an alternative to launching items from the Start menu or a Windows folder. Changing Desktop Icons Tired of the default icons for My Computer, the Recycle Bin, and other basic desktop items? Then change them! Just follow these steps: 1. | From the Control Panel, click the Display icon.
| 2. | When the Display Properties utility opens, select the Desktop tab and click the Customize Desktop button.
| 3. | When the Desktop Items dialog box appears, select the General tab (shown in Figure 2.10).
Figure 2.10. Change your desktop icons or run the Desktop Cleanup Wizard. 
| 4. | Check those icons you want to display on your desktop; uncheck those items you don't want to display.
| 5. | To change an icon, select the icon and click the Change Icon button.
| 6. | When the Change Icon dialog box appears, select a new icon from those listed, or click the Browse button to select another file full of icons.
| 7. | Click OK when done.
|
You can return to the original icons by clicking the Restore Default button. Creating New Shortcuts on the Desktop TIP You can also create a shortcut by right-dragging a file icon directly to the desktop, or by right-clicking on the desktop and selecting New, Shortcut from the pop-up menu.
To put a new shortcut on your desktop, follow these steps: 1. | From within My Computer or any Windows folder, navigate to the application or document for which you want to create a shortcut.
| 2. | Right-click the file icon, and then select Send To, Desktop (Create Shortcut).
|
To remove a shortcut icon from the desktop, just drag it into the Recycle Bin. Changing the Name of a Shortcut NOTE Not all properties are available for all shortcuts.
When you create a new shortcut icon, its name is automatically prefixed with the words "Shortcut to…." To change the name of a shortcut, follow these steps: 1. | Right-click the shortcut on your desktop.
| 2. | When the pop-up menu appears, select Rename.
| 3. | The shortcut's name is now highlighted on your desktop. Use the Delete or Backspace keys to erase parts of the existing name, and then type a new name. Press Enter when you've finished entering the new name.
|
Changing Shortcut Properties You can change certain things about the way a shortcut behaves. To change the properties of a shortcut, follow these steps: 1. | Right-click the shortcut icon and select Properties from the pop-up menu.
| 2. | When the Shortcut Properties dialog box appears, click the Shortcut tab (see Figure 2.11).
Figure 2.11. Right-click a shortcut icon to change its properties. 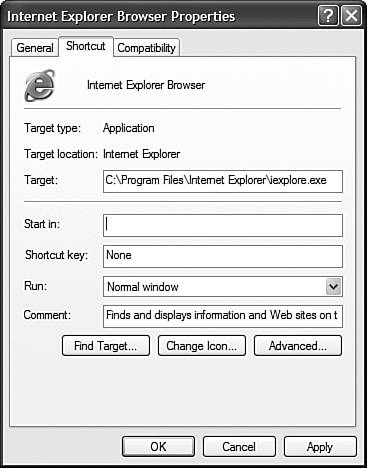
| 3. | Choose the property you want to change, as detailed in Table 2.2.
Table 2.2. Shortcut PropertiesProperty | Description |
|---|
Target | Identifies the file that the shortcut opens. | Run In | Determines whether an older program should run in XP's Compatibility Mode. | Start In | Identifies the specific folder from which the program starts. | Shortcut Key | Identifies the shortcut keys that activate the shortcut. | Run | Determines whether the program is launched in a normal, maximized, or minimized window. | Comment | Information about the file. | Find Target | Click this button to find the specific program file for this shortcut, if not correctly listed in the Target box. | Change Icon | Click this button to change the icon used for the shortcut. | Advanced | Click this button to run this shortcut as another user, or to run in separate memory space. |
| 4. | Click OK to accept the changes and close the dialog box, or click Apply to make the changes while keeping the dialog box open.
|
NOTE The Align to Grid command does nothing if the Auto Arrange option is toggled on because auto arranging keeps the icons aligned automatically. Turn Auto Arrange off if you want to spread your icons across the desktop, not crowded to the left side. Then use the Align to Grid command to line them up on the invisible grid in their same general vicinity.
Arranging Icons on the Desktop Desktop shortcut icons give you easy access to your programs, especially when you arrange them in a way that works best for you. To arrange your icons, right-click a blank area of the desktop and choose from the options presented in Table 2.3. Table 2.3. Options for Arranging Icons on Your DesktopCommand | Action |
|---|
Name | Sort items alphabetically by filename. | Size | Sort items by file size, from smallest to largest. | Type | Sort items by file type. Files with the same extension are grouped together. | Modified | Sort items by date, from oldest to the most recent. | Auto Arrange | When checked, this choice automatically arranges icons at the left side of the desktop. | Align to Grid | When checked, your icons automatically snap to an invisible grid. (This is a good option if you have lots of icons scattered around your desktop.) | Show Desktop | Displays the icons for My Computer, My Documents, items the Recycle Bin, and other essential desktop items. | Lock Web Items | Locks the items on your desktop, so you can't change them accidentally. |
Cleaning Up Your Desktop Shortcuts By default, Windows XP runs the Desktop Cleanup Wizard every 60 days. This wizard sweeps all your unused desktop icons into an Unused Desktop Icons folder, thus cleaning up a cluttered desktop. If you don't like this automated housecleaning, you can turn off the wizard, or choose to clean up your desktop manually. To clean up your desktop manually, follow these steps: 1. | From the Control Panel, click the Display icon.
| 2. | When the Display Properties utility opens, select the Desktop tab and click the Customize Desktop button.
| 3. | When the Desktop Items dialog box appears, select the General tab.
| 4. | To turn off the Desktop Cleanup Wizard, uncheck the Run Desktop Cleanup Wizard Every 60 Days option. You can't change how often it runs; you can only turn it on and off.
| 5. | Click the Clean Desktop Now button to run the Wizard now.
|
|