| Packing your merchandise is a lot of work. Let's look at what's involved in packing an item so that it arrives at its destination intact ”but doesn't cost you an arm and a leg to get there. Picking the Right Shipping Container It's important to choose the right type of shipping container for a particular item. First, you have to decide whether to use a box or an envelope. If you have a very large item to ship, the choice is easy. But what if you have something smaller and flatter, such as a baseball card or a coin? Your choice should be determined by the fragility of your item. If the item can bend or break, choose a box; if not, an envelope is probably a safe choice. Whichever you choose, pick a container that's large enough to hold your item without the need to force it in or bend it in an inappropriate fashion. Also, make sure that the box has enough extra room to insert cushioning material. On the other hand, the container shouldn't be so big as to leave room for the item to bounce around. Also, you pay for size and for weight; you don't want to pay to ship anything bigger or heavier than it needs to be. caution  | Use the combination box technique judiciously, as it can significantly increase the weight of the package ”and thus your shipping costs. |
If you're shipping a breakable or bendable item in an envelope, consider using a bubble-pack envelope or reinforcing the envelope with pieces of cardboard. This is especially vital if your item shouldn't be bent or folded. If you're shipping in a box, make sure it's made of heavy, corrugated cardboard and has its flaps intact. Thinner boxes ”such as shoe boxes or gift boxes ”simply aren't strong enough for shipping. When packing a box, never exceed the maximum gross weight for the box, which is usually printed on the bottom flap. Although there are a bunch of different- sized boxes available, sometimes you need something somewhere in between this size and that size box. When you face this situation, you have two choices. First, you can take a larger box and cut it down. That means cutting through each corner of the box to make it shorter, and then cutting off the ends of the flaps accordingly . Sometimes it's difficult to fold unscored flaps, so you may want to make your own scores by slicing a knife (shallowly) where you want to bend the box closed. (Also, many mailing centers have their own folding machines that you can use to create custom-sized boxes ”at a cost.) Second, you can combine two smaller boxes. If your box is 16" long and your item is 20", just take two boxes and insert the open end of one inside the open end of the other. You'll need to use sufficient packing tape to keep the boxes from sliding apart, but you'll have created a box custom-sized for the item you're shipping. How to Pack How do you pack your box? Don't just drop your item in an empty box; you need to position the item toward the center of the box, away from the bottom, sides, and top, and surround it with cushioning material. Professional shippers use Styrofoam peanuts, and lots of them; another option is to use crumpled up old newspapers. Know, however, that peanuts are much lighter than newspaper. Since weight is a factor in how much you'll pay for shipping, so anything you can do to lighten the weight of your package is important. Because peanuts cost well, peanuts , they're the cushioning material of choice. If you're shipping several items in the same box, be sure to wrap each one separately (in separate smaller boxes, if you can) and provide enough cushioning to prevent movement and to keep the items from rubbing against each other. Not only should items be separated from each other in the box, but they should also be separated from the corners and sides of the box to prevent damage if the box is bumped or dropped. caution | | Make sure you include the weight of the box and the cushioning material when you weigh your item for shipment. A big box with lots of crumpled paper can easily add a half- pound or more to your item's weight ”excess weight you'll have to pay for. |
The previous point argues for another technique ”double boxing especially fragile items such as glass or ceramic items. That means packing the item tightly in a smaller, form-fitting box, and then placing that box inside a slightly larger, shock - absorbing box ”with at least 3" of cushioning material between the boxes. If your item has any protruding parts , cover them with extra padding or cardboard. And be careful with the bubble wrap. Although it's great to wrap around objects with flat sides, it can actually damage more fragile figurines or items with lots of little pieces and parts sticking out. If the bubble wrap is too tight, it can snap off any appendages during rough handling. When you're packing an item, watch the weight. Have a postal scale at your packing counter, and weigh the item ”shipping container and all ”during the packing process. With Priority Mail, the difference between shipping a one-pound package and a one-pound, one-ounce package is as much as $1.90, depending on where it's going. Finding some way to cut that extra ounce of packing material can save almost two bucks in shipping costs! After you think you're done packing, gently shake the box. If nothing moves, it's ready to be sealed. If you can hear or feel things rattling around inside, however, it's time to add more cushioning material. (If you can shake it, they can break it!) One Size Doesn't Fit All As you might expect, packing needs vary for different types of items. Table 14.1 provides some item-specific packing tips you might find useful: Table 14.1. Packing Tips | Merchandise | Tips | | Books | Books are heavy to ship; use USPS Media Mail to reduce shipping rate. Wrap the book in bubble wrap or cardboard to cushion the corners against damage. Enclose in a plastic bag or shrink wrap to protect against water damage. Padded envelopes work well for single books; use traditional boxes for multiple-book shipments. | | CDs | Use padded or bubble wrap envelopes sized for CDs. Can ship via Media Mail, although First Class is often just as cheap for single units. | | Clothing | Standard Priority Mail boxes work great for most items. For single or smaller items, Tyvek envelopes are ideal. | | Coins | Avoid the temptation to ship in a standard envelope. Use a larger box that will travel easily. | | Computer parts | When shipping circuit boards , video cards, memory chips, and so on, pad the item well and pack it in an Electro Static Discharge (ESD) bag to prevent damaging static buildup. Don't use peanuts for filler ”all that Styrofoam can carry a damaging static charge. | | Consumer electronics | Remove the batteries before you ship; wrap and place the batteries next to the items in the shipping container. | | DVDs | Use padded or bubble wrap envelopes sized for DVDs. Can ship via Media Mail, although First Class is sometimes just as cheap. If shipping via Priority Mail, use free box number O-1096L. | | Framed artwork/pictures | Take the glass out of the frame and wrap it separately. Do not let artwork come in direct contact with paper or cardboard. Enclose photographs in plastic bag to protect against wetness. | | Glassware and vases | Stuff hollow items with newspaper, tissue paper, or other packing material; this provides an extra level of cushioning in case of rough handling. Wrap items in tissue paper, bubble wrap, or foam padding. Use masking tape to affix cut-off paper towel rolls to spouts and handles. Allow at least 3" of cushioning around the item in the box; consider double boxing. | | Jars and items with lids | Either separate the lid from the base with several layers of bubble wrap or tissue paper or (better still) pack the lid in a separate small box. | | Jewelry | Use a standard size box that won't draw attention to itself. Do not label the box as to its contents. Insure the package appropriately. | | Magazines and comics | Wrap in some sort of plastic bag or wrap to protect against wetness in shipment. Ship magazines First Class or Priority Mail ” not Media Rate. | | Stamps | Avoid the temptation to ship in a standard envelope. Use a larger box that will travel easily. | | Videotapes | Can ship via Media Mail. If you choose to ship Priority Mail, use free box number O-1096S (for single tape) or O-1096L (for multiple tapes). | How to Seal the Package After your box is packed, it's time to seal it. A strong seal is essential, so always use tape that is designed for shipping. Make sure you securely seal the center seams at both the top and the bottom of the box. Cover all other seams with tape, and be sure not to leave any loose tape or open areas that could snag on machinery. caution | | Don't use wrapping paper, string, masking tape, or cellophane tape to seal your package. |
You should use sealing tape designed for shipping, such as pressure-sensitive tape, nylon-reinforced Kraft paper tape, glass-reinforced pressure-sensitive tape, or water-activated paper tape. Whichever tape you use, the wider and heavier, the better. Reinforced is always better than non-reinforced. One last thing: If you plan to insure your package, leave an untaped area on the cardboard where your postal clerk can stamp "Insured." (Ink doesn't adhere well to tape.) How to Create the Perfect Label You've packed the box. You've sealed the box. Now it's time for the label. Addressing the Label The best-packed box won't go anywhere if you get the label wrong. For fast and efficient delivery, you need to create a label that can be both clearly read and clearly understood . And it goes without saying that the address information needs to be accurate and complete ”partial addresses just don't cut it. tip  | Don't know the ZIP code for the address you're shipping to? Then, look it up at the U.S. Postal Service's ZIP Code Finder at www.usps.com/zip4/. |
To create the perfect label, you need to write, type, or use your computer to print the address as neatly as possible. You should also use complete address information, including all street suffixes ”Dr., Ave., St., Blvd., and so on. And make sure to include the recipient's apartment or suite number (if applicable ). Naturally, you should use the proper two-letter state abbreviation, and the correct ZIP code ”and, when possible, the four-digit ZIP+4 add-on.  | You can also purchase or create your own return address labels, to use in conjunction with your main shipping labels. It's easy enough to print out a full page of smallish labels in Microsoft Word; most printing firms (such as Kinkos) can also do up a roll of addresses labels for a nominal charge. If you don't use a preprinted label, you'll want to hand-print your return address on the shipping container or use some sort of return address label. |
Now for some things you might not know. When you're shipping to a P.O. Box or rural route destination, it helps to include the recipient's telephone number on the label; sometimes the carrier has to call to notify the recipient of a delivery. Including a telephone number is also useful when shipping outside the U.S. ”and don't forget to include the country name as part of the address, either. After you've created the delivery label, place it on the top (not the side) of the box. To avoid confusion, place only one address label on the box. If using a packing slip, place it on the same surface of the box as the address label. Do not place the label over a seam or closure or on top of sealing tape. To avoid ink smudges and rain smears, place a strip of clear packing tape over the address label. And if you're reusing a box for shipping, remove or cross out all old address labels or markings on the box. And here's one last tip. Make a duplicate of your shipping label and stick it inside the box, before you seal it. This way if the original shipping label gets torn off or destroyed , anyone opening the box can read the duplicate label and figure out where the box is supposed to go. tip | | If you're unsure what label to use, go with Avery; just about every software program out there supports Avery labels. |
Choosing the Right Label For most purposes, you can't beat the standard 4 " x6 " blank white label. There's a reason it's such a great workhorse; anything smaller is tough to work with, and anything larger just leaves a lot of wasted space. You can purchase these labels at any office supply store, or even get free versions (for Priority Mail shipping) at your local post office. And if you want to splurge, you can have labels preprinted with your business name and return address. tip | | Some auction management tools also have label printing functions ”although many of these services print extremely generic labels that might not suit your tastes. |
If you use computer-generated labels, you can program your label-making program (or Microsoft Word) to include your return address when it prints the label. This is a good (and lower-cost) alternative to using preprinted labels. There are several dedicated label-printing programs on the market. These programs work with just about any standard-issue major-manufacturer blank labels. The most popular label-making programs include -
Avery Wizard and DesignPro (www.avery.com) -
NiceLabel Express, Pro, and Suite (www.nicelabel.com) -
PrimaSoft Label Printer (www.primasoft.com/lb.htm) -
Visual Labels (www.rkssoftware.com/visuallabels/overview.html) Printing Priority Mail Labels If you're shipping via Priority Mail, you can print labels on your home printer directly from the USPS Web site. To use the Click-N-Ship service (www.usps.com/shipping/label.htm), all you have to do is pre-register (no charge) and fill in the shipping information. As you can see in Figure 14.4, you can print either plain labels or labels with prepaid postage ”as discussed next. Figure 14.4. Printing Priority Mail labels with the Postal Service's Click-N-Save service. 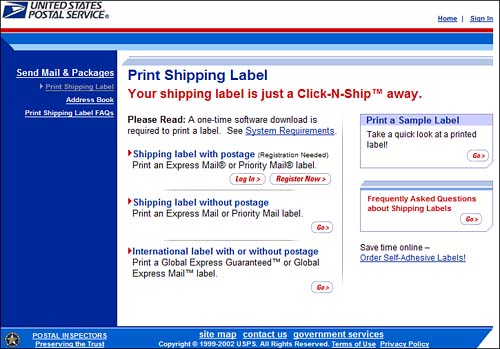 Automating Postage If you do a lot of shipping with the U.S. Postal Service, you'll pay a lot of postage ”and stand in a lot of lines waiting to pay. Fortunately, you can cut out all this line-waiting by purchasing your postage electronically and printing out your "stamps" on your printer, without ever leaving home. (If you put your own postage on your packages, your mail carrier can pick up your packages along with your regular mail.) tip | | One plus to printing your own Priority Mail labels is you get Delivery Confirmation included, at no charge. A minus is that you can't add insurance with this method. |
The Postal Service's Click-N-Save service, in addition to printing labels, also lets you purchase and print your own Priority Mail postage. After you've registered, entered the address information, and advanced to the Service Options page, choose the type of service you want, then select the Purchase and Print Label with Postage option at the bottom of the page. Your account will be charged for the amount of the postage, and the label your print out will include necessary postage information. Just affix the label to your package and drop it in the mail; no need to visit the post office! If you want to purchase other types of postage online, you can use Stamps.com (www.stamps.com). Using Stamps.com is fairly simple. Just install the site's e-postage software on your computer and prepay for specified amount of postage. Enter the appropriate information (package size and weight, destination ZIP code, and so on) into the e-postage program, which then uses that information to calculate exact postage and print that postage to an envelope or "stamp," via your printer. Shipping Insurance If you're shipping a moderately expensive item (over $50, let's say), it might be worth the trouble to offer insurance to the buyer. It's relatively easy (on the Sell Your Item page) to give the buyer the option of buying insurance ”or just do it yourself and include the costs in your normal shipping/handling fee. The U.S. Postal Service charges $1.30 to insure items up to $50, or $2.20 for items between $50 and $100. UPS includes $100 worth of insurance in its basic rates; additional insurance can be purchased for additional cost. You can also arrange shipping insurance via a third-party firm. Universal Parcel Insurance Coverage (www.u-pic.com) provides insurance for packages shipped via the USPS, UPS, FedEx, and other carriers . There are two advantages to using U-PIC for your shipping insurance ”it's cheaper than carrier-provided insurance, and you can do it all from your home computer. (The big disadvantage is that it doesn't integrate into your auction checkout or automated end-of-auction emails.) As to pricing, U-PIC charges $1 per $100 of insurance for USPS orders, considerably less than what the Postal Service charges. (U-PIC's rates vary by carrier.) If you insure a lot of items, it's worth checking out. Tracking and Confirmation If you think the package might be lost in transit, you can always avail yourself of the tracking services provided by UPS, FedEx, and other major carriers. These services typically provide tracking numbers for all packages shipped. In most cases, you can track your package by entering the package's tracking number into the carrier's Web site. The one major shipping service that doesn't offer tracking (by default) is the U.S. Postal Service. What you can get from the postal service (at a cost of from $0.45 to $0.55) is their Delivery Confirmation service. USPS confirmation, however, does not confirm that an actual person received the package; it only confirms that the mail carrier delivered it. (Stuck it in the mailbox, that is ”or in many instances, left it on the porch.) You can opt for Delivery Confirmation when you ship your item from your local post office, or have it included free if you print your own labels with the Click-N-Save service. You can also purchase USPS delivery confirmation forms in bulk from ShipperTools.com (www.shippertools.com). ShipperTools.com uses the official USPS delivery confirmation system, and lets you print an unlimited number of confirmation forms for just $6.95 a month. If you want a signature confirmation on a USPS shipment, you need to send your item with the certified mail option. Certified mail requires the recipient to sign on delivery, and costs $2.30. This is a preferred option if you're shipping something extremely valuable . |