| Assuming you've worked through the Before You List Checklist, you're ready to take the next step ”creating an item listing. There are a number of ways to create an item listing, the easiest of which is to use eBay's standard Sell Your Item pages. If you've ever sold anything before, this is probably how you did it. You typically use the Sell Your Item pages to create basic one-off item listings ”which is fine if you only have a few items to sell. If you have a lot of items for sale, however, you need to think about bulk listing your auctions; we'll cover that in the "Listing in Bulk" section, later in this chapter. By the way, if you're already familiar with eBay's basic listing process, feel free to skip this section. But if this is truly your first time around, read on to learn how to do what you need to do to create basic one-off listings ”step by step. Step 1: Get Ready to Sell This is the easiest thing you'll do in the whole process. All you have to do is click the Sell button in the eBay Navigation Bar. Step 2: Choose the Type of Auction eBay now displays the Choose Selling Format page. You can choose from three different types of selling formats: -
Sell Item at Online Auction. This is the option you want for a traditional eBay auction. (You also choose this option if you want to run a reserve or Dutch auction, or utilize the Buy It Now option.) -
Sell at a Fixed Price. This option isn't for auctions, but rather for strictly fixed-price sales. (If you want to run a regular auction with the Buy It Now option, choose the Sell Item at Online Auction option, instead.) -
Advertise Your Real Estate. Select this option if you want to create a real estate listing. Assuming you want to create a normal auction listing, choose the Sell Item at Online Auction option, then click Continue. Step 3: Choose Your Category If this is your first time selling, you'll see a Select Category page that asks you to select a top-level category for your item. Select a category and you're shown a more detailed Select Category page, as shown in Figure 11.1, where you can drill down and choose the specific subcategory for your item. (If you're a seasoned seller, you go directly to the second Select Category page.) Figure 11.1. Select the category ” subcategories ”for your item. 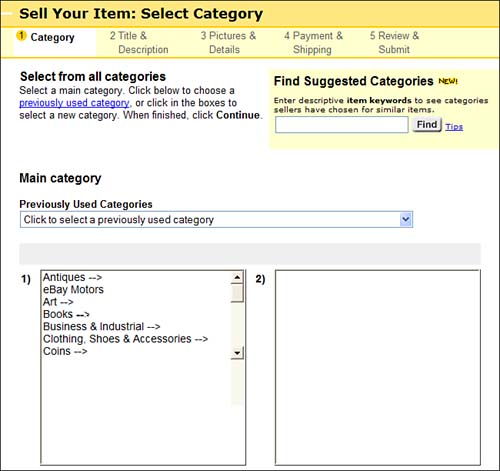 Start by selecting a major category in the 1) list; when you select a category, eBay displays available subcategories in the 2) list. Select a subcategory and eBay displays more subcategories (if available) in the 3) list, and so forth. Make your selections in each list, then click Continue. If you're not sure what category is best for your particular item, take advantage of eBay's Find Suggested Categories feature. Click this link and you can look up what category other sellers have used for similar items. It's a great way to find the right category without doing a lot of reinventing the wheel on your end. tip  | If you know the specific number for a category, you can enter it in the Main Category # box instead of making selections in the lists. You can also choose a category you've previously used by making a selection from the Previously Used Categories list. |
If you want to list your item in more than one category, scroll down to the Choose a Second Category section and repeat this whole procedure. Remember that you'll pay a double listing fee to list in two different categories ”although you'll still pay a single final value fee when the item sells. (Since you can't sell the item twice, eBay can't charge you twice! ) Step 4: Describe Your Item When the Describe Your Item page appears, as shown in Figure 11.2, it's time to draw on all your writing skills and get ready to create some sell-oriented copy. You start with the item's title, which you enter into the Item Title box. (The title must be 45 characters or less.) You can then enter a description ”of any length ”into the Item Description box. Figure 11.2. Provide a description for your item. 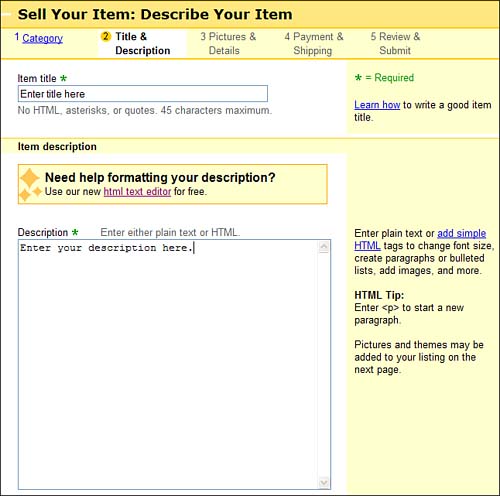  | Not sure what to write? Then turn to Chapter 18, "Making Your Auctions More Effective," to learn how to write more powerful item titles and descriptions. |
Your item title can only contain plain text, although your item description can include HTML code. You'll learn more about HTML in Chapter 18, but for now know that this is how you add fancy text effects and colors to your listing. You can either add HTML codes manually, or click the HTML Text Editor link to display eBay's easy-to-use HTML editor, which works a little like the WYSIWYG text formatting buttons in a word processor. Click Continue to proceed. Step 5: Fill in the Details When the Provide Pictures & Item Details page appears, shown in Figure 11.3, you have a lot of entering to do. This is the page that determines all the mechanical details of your auction, as well as which listing enhancements you want to pay for. You'll need to provide the following information: -
Duration -
Start Time -
Quantity -
Starting Price -
Reserve Price -
Buy It Now Price -
Private Auction -
City, State -
Region -
Country -
Add Pictures -
Listing Designer -
Gallery Picture -
Listing Upgrades -
Gift Services -
Free Page Counter Figure 11.3. Select all manner of listing options. 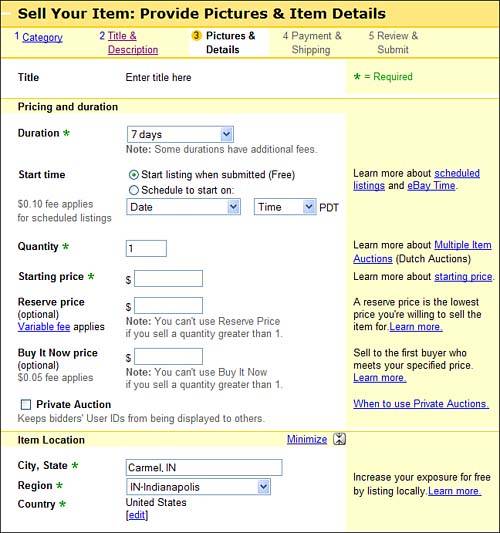 | | The Describe Your Item page may look slightly different from this, depending on the category and subcategory you've selected. Some categories have additional fields specific to the type of item for sale that you'll need to deal with. For example, if you're selling a CD, you'll need to select the Album Type, Genre, Condition, and so on. If you're prompted to enter specifics of this type, do so. |
Click Continue when you're done making your selections. Step 6: Enter Payment and Shipping Info When the Enter Payment & Shipping Page appears, as shown in Figure 11.4, you have to select how you want to get paid. This should be fairly cut and dried , assuming that you've already determined which payment methods you'll accept. You can opt for payment by PayPal, Money Order or Cashiers Check, Personal Check, COD, or Other Online Payment Services. You can also leave all the other options unchecked and select See Item Description instead; if you choose this option, make sure you describe your payment options in the description section of your item listing. Figure 11.4. Choose your payment and shipping options. 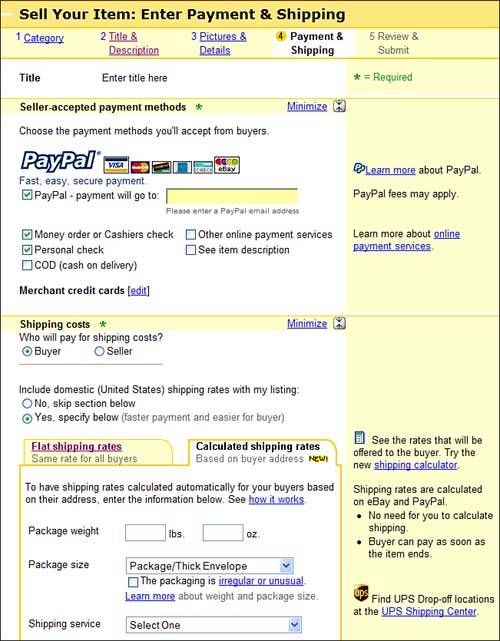 By the way, you can choose to accept payment via PayPal even if you don't currently have a PayPal account. Just enter your email address in the Payment Will Go To box, and PayPal will contact you if the buyer chooses to pay via PayPal. At that point PayPal will walk you through creating a PayPal Premier account, so you can receive your funds. If you already have a PayPal account, enter the email address you use for that account into the Payment Will Go To box. (PayPal identifies members by their email addresses.) With this information entered, eBay can route any credit card payments to the correct PayPal account ” yours . | | Learn more about PayPal and other payment methods in Chapter 13, "Managing Customer Payments." |
Next up on the page is the Shipping Costs section. Start by selecting who will pay shipping costs ”which should be the Buyer. Next up are the shipping costs themselves . If you plan to charge a flat shipping rate (and know what it is), click Flat Shipping Rates and then enter the numbers for Shipping & Handling, Shipping Insurance (if you offer it), and Sales Tax (if you charge it). If your shipping costs depend on where the buyer lives, you can use eBay's Shipping Calculator in your listing. Just click Calculated Shipping Rates and then enter the package weight and size , what shipping service you plan to use, and your ZIP code. Also add any handling fee you want to charge over and above the actual shipping rate (a buck is good), and your buyers will be able to figure their own shipping charges right on the item listing page. If you don't want to include any up-front shipping rates, select the No, Skip Section Below option. Now you can enter any specific payment instructions into the Payment Instructions box. If your Checkout preferences did not include your payment address, you'll also see a Payment Address section; enter your address here. If your Checkout preferences did include your payment address, there won't be a Payment Address section on this page. Next, you need to select whether you'll ship to the U.S. only, worldwide, or to the U.S. and specific countries . Finally, select whether you'll accept escrow payments for this item, and then click Continue. Step 7: Preview Your Listing The next page provides a preview of your listing page and the options you've selected. If you see something that needs to be changed, click the Edit link next to that item. (For example, to edit the title you'd click the Edit Title link.) If everything looks right, click the Submit Listing button. You're Done! When you're all done, eBay displays the Congratulations page. This page confirms your listing and presents you with important details about your auction ”including your item listing's URL, in case you want to publicize your auction elsewhere on the Internet. (eBay will also send you a confirming email containing this same information.) |