| Taking an effective product photo takes a bit of effort; it's not quite as easy as snapping off a quick Polaroid. To take quality photos of the items you intend to sell, you'll need a decent digital camera and a variety of photographic accessories, as detailed in the following checklist: Product Photograph Checklist  Digital camera Digital camera Tripod Lighting Clean space with plain black or white background Graphics or photo editing software |
Let's take a detailed look at what's involved. Shopping for a Digital Camera Although you can take pictures with a normal film camera, develop the film, and have a film processing lab transfer your photos to graphics files on a photo CD, that's a lot of work. Much better to start with digital photos at the source by using a digital camera to take all your product photos. You can pick up a low-end digital camera for well under $200 these days, and going direct from camera to computer to eBay is a lot easier than any other method. What type of digital camera should you buy? The good news is that you don't need a really high-end model. In fact, if you buy a super-expensive camera with multi-megapixel resolution, you'll just be wasting a lot of the camera's picture-taking power. When it comes to putting pictures on eBay, you actually need to take relatively low-resolution picturesso all those megapixels are pretty much photographic overkill. That doesn't mean you can get by with the cheapest camera available, however. To take good product photos, you want a camera with a quality lens, preferably with some type of optical zoom capability, and with a macro mode. (You use the macro mode to take close-up photos of those very small items you have for sale.) Make sure you can easily configure the camera for low-resolution mode, and that there's a quick and simple way to get your photographs from your camera to your computer's hard disk. Don't Forget the Accessories When you're spending $200 or more for a decent digital camera, keep a few bucks back for those accessories that will help you take better photos every time. In particular, you'll want to invest in a tripod and auxiliary lighting. A tripod is invaluable for steadying your camera when you're taking photographs. A tripod will help you avoid camera shake, and corresponding blurry pictures. It's also useful in low-light situations, where you need to hold your camera especially still for long exposures. And it's not expensive; you can pick up a decent tripod for less than $20. Of course, you can avoid the low-light problem by using auxiliary lighting. While you might think you have enough natural light to take good photos, you probably don't. A set of low-cost photo floodlights will provide the lighting necessary to take the ultra -sharp photos your customers expect. You can find two-piece lighting kits for under $150. While we're talking about lights, consider investing a few more bucks for diffuser screens. You get better results when your subject is lit by diffused lighting; direct lighting is a little harsh and can cause glare. Look for a diffuser you can attach directly to your light reflectors. "Mike Sez"  | A good lighting kit to consider is the KT500 from Smith- Victor (www.smithvictor.com). It includes two 250-watt lamps with 10-inch reflectors and stands, for about $135good enough for most eBay product photography. |
Finally, think about where you'll be taking your photos. You'll need some sort of flat surface, and some sort of simple backgroundeither flat black or white. That might necessitate buying a small table and an appropriate expanse of colored cardboard or cloth. How to Take a Good Photograph Once you have the proper equipment, taking a good product photo is as simple as following these steps: -
Prepare the photo area. Clear off a good- sized flat surface, and cover the surface and background with a plain white or black material. (Use a white background for dark objects, and a black background for lighter objects.) -
Position the product in the middle of the photo area, at an angle that best shows off the product's visual attributes. -
Position your floodlights to the sides and slightly in front of the item, as shown in Figure 19.1. (If you have a third light, position it to the back and below the object, to provide a slight amount of backlighting.) Figure 19.1. Position auxiliary lighting to best effect.  -
Mount your camera to the tripod and position it directly in front of the object to be photographed. -
Start shooting! tip Depending on the item you're selling, you might want to jazz up your photos with a few props. For example, you might want to display clothing on a mannequin , or jewelry on a display stand.
The result should be a focused, well-lit, centered photograph, like the one in Figure 19.2. Figure 19.2. A good product photoit's easy to see what you're selling. 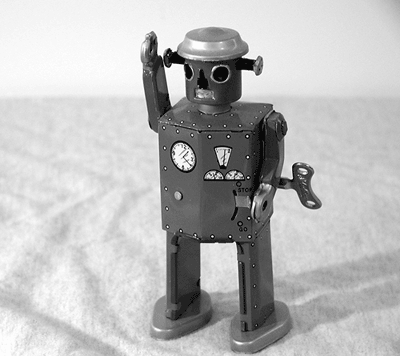 It's important that you don't just snap off a quick picture and move on. You need to shoot your item from several different angles and distancesand remember to get a close-up of any important area of the item, such as a serial number or a damaged area. You may want to include multiple photos in your listing, or just have a good selection of photos to choose from for that one best picture. Remember, it's always good to have a backup photo, just in case you messed up the first one! Five Types of Pictures Not to Take Okay, you're saying. You know how to take a good picture. Let's just get on with it! Not so fast, pal. I've seen enough eBay listings to realize that most people who say they know how to take good photos don't. Let's look at five cardinal sins of product photography, and how you can avoid them. Blurry Picture See the photo in Figure 19.3? See how blurry it is? That's because the picture was taken without a tripod . The camera wasn't held steady, and it moved slightly while the photograph was being taken. The result is a blurry photograph where it's hard to see what the product islet alone make out fine details. Figure 19.3. A blurry picturethe result of moving the camera when shooting. 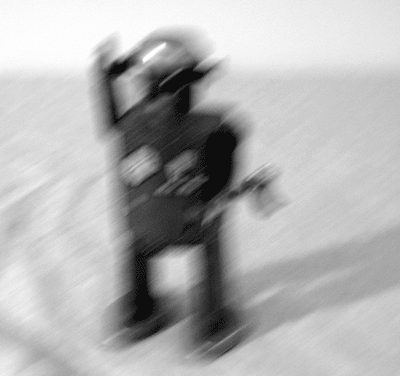 A better approach is to mount your camera to a tripod. The results will be clear and crispjust what you want for your item listing. caution  | Blurry photos can also result from not focusing the camera lens properly. If your camera has autofocus , make sure that its aimed at the product, and not at the background or another object. If you're focusing manually, do a better job! |
Picture Too Dark Another common mistake amateur photographers make is to shoot the picture without enough light. Figure 19.4 shows the result of inadequate lighting; see how the picture is just too dark, with the details almost completely obscured? Figure 19.4. The picture's too darkyou didn't use enough lighting! 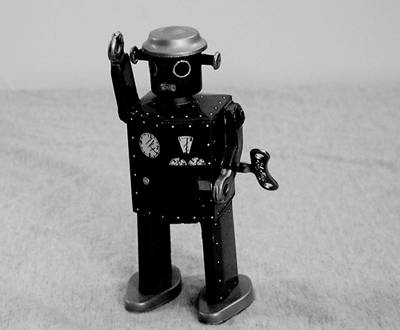 How can you ensure that you have enough light for your picture? Here are your options: -
Buy a set of auxiliary lights. One light helps, but can still result in unwanted shadows. Two lights are better, as they'll fill out any unlit areas. -
Shoot outdoors. This is the poor man's lighting solution, but it works. Try to shoot in early morning or late afternoon, when you get a softer, less severe light; avoid shooting in the harsh overhead light of midday. -
Use a flash. Most cameras include a built-in flash, which can shine a ton of light directly onto the front surface of the item being photographed. Watch out for glare and washout, howeveras discussed in the next section.  | Inadequate lightingor shooting under fluorescent lightscan also affect the color of your photos. More light generally results in more accurate colors. |
Too Much Flash Casual photographers are tempted to use the flash whenever they shoot indoors. Used properly, flash can be a good thing. Too much flash, however, can cause the object to wash out. Flash is also bad when you're shooting a glossy object or a product that's encased in plastic or shrink wrap. Figure 19.5 shows the type of glare you can get from a flash photo. Figure 19.5. Flash photography can produce glare on shrink-wrapped products.  Subject Too Small Look at the object in Figure 19.6. It's so far away it seems as if the photographer was afraid to get any closer! You need to get that product up front and center, close enough to the camera so that your customers can see what you're selling. You want the object to fill up the entire picture. That means getting close with your cameraor cropping the photo in the editing process. Figure 19.6. Bad compositionthe object's way too small! 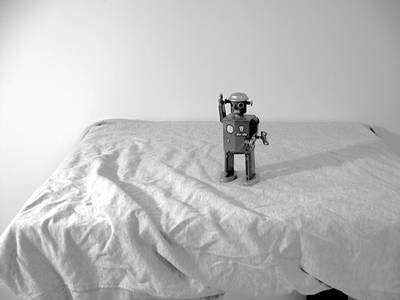 Subject Doesn't Stand Out You'd think you'd know better. If you shoot your object against a busy background, as shown in Figure 19.7, it detracts from the main point of the photograph. The background competes with the object you're trying to sell, which is less than ideal. Figure 19.7. There's too much happening herewhat are you trying to sell? 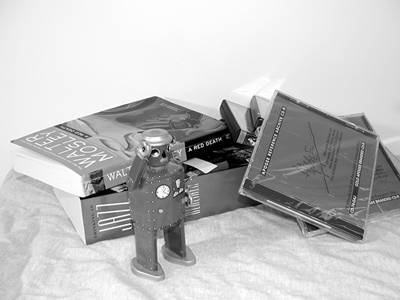 It's far better to remove all competing objects from the picture and hang a white or black sheet (or t-shirt) behind the item. This makes the main object stand out a lot betterand increases the sex appeal of your product. |