| Not all the pictures you take are perfect. Sometimes the image might be a little out of focus or off center, or maybe your subject caught the glare of a flash for a "red eye" effect. The nice thing about digital pictures is that you can easily edit them to correct for these and other types of flaws. Let's look at how you can use Adobe Photoshop Elements for these simple picture-editing tasks. Opening a Picture for Editing When you first launch Photoshop Elements, you're presented with a choice of several different tasks. The fastest and easiest way to fix your photos is with Elements' Quick Fix feature, so select the Quickly Fix Photos option. Once Elements fully launches, you can open a photo for editing by clicking the Open button on the toolbar and selecting a specific photo. note  | Photoshop Elements has two different editing modes. The Quick Fix mode lets you make quick and easy fixes; the Standard Edit mode lets you make more difficult changes to your photos. Switch modes by clicking the buttons in the top-right corner of the screen. |
When you open a photo for editing, it's displayed in a window within the work area, which you can see in Figure 37.2. In addition to the standard menus and toolbars, Elements provides a selection of editing tools along the left side of the window, and a variety of Quick Fix options along the right side. Figure 37.2. The Photoshop Elements work area. 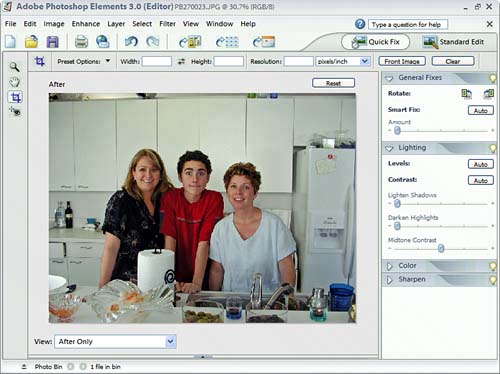
Touching Up a Picture Most basic touchup operations can be performed from the Elements Quick Fix mode. Here's just a sampling of what you can do: To perform a one-step "smart fix" of the entire picture, click the Smart Fix Auto button. tip  | To enlarge your picture to fit on your computer screen, click the Zoom button and then click Fit on Screen. To view the picture at its actual size, click Actual Pixels. |
To automatically adjust the brightness, contrast, and color levels, click the Levels Auto button. To automatically adjust only brightness and contrast, click the Contrast Auto button. To manually adjust the brightness and contrast, adjust the Lighten Shadows, Darken Highlights, and Midtone Contrast sliders. To automatically adjust the picture's color and tint levels, click the Color Auto button. note | Learn more about using Elements to fix your digital photos from my companion book, Bad Pics Fixed Quick (Que, 2004). |
To manually adjust the color and tint levels, adjust the Saturation, Hue, Temperature, and Tint sliders. To slightly sharpen the overall picture, click the Sharpen Auto button. To manually sharpen the picture, drag the Amount slider in the Sharpen section.
Removing Red Eye If you use flash photography, sooner or later you're going to run into the problem of red eye, which can make ordinary people look like the spawn of the devil himself. Elements includes a special red eye removal tool, which is really easy to use. Follow these steps: 1. | With the picture open in Photoshop Elements, click the Zoom button.
tip | If clicking on the eye area doesn't remove the red eye, click and drag the cursor to surround the eye area. When you release the mouse button, the red eye should be gone. |
| 2. | Click one or more times on the subject's face to enlarge this area of the photo.
| 3. | Click the Red Eye Removal Tool button, shown in Figure 37.3.
Figure 37.3. Removing red eye with Photoshop Elements' red eye removal tool. 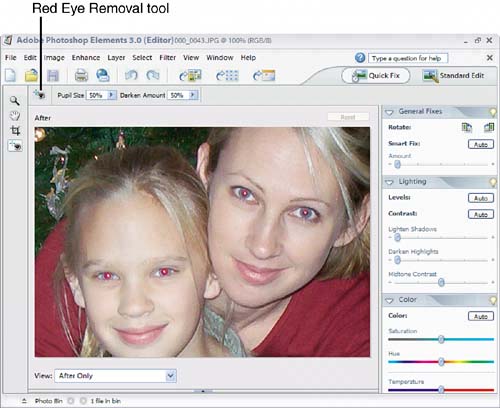
| 4. | Click the red area of the eye.
| 5. | The red eye is now removed.
|
That's all there is to ityou've essentially "painted out" the red eye! Cropping a Picture One of the more common picture flaws comes when the subject of the picture isn't ideally positioned. You can fix this type of flaw by cropping the picture to eliminate unwanted areas of the image. To crop a picture with Photoshop Elements, follow these steps: 1. | With the picture open in Photoshop Elements, click the Crop Tool button.
| 2. | Click and drag the cursor over the part of the area you want to keep, as shown in Figure 37.4.
Figure 37.4. Cropping a picture in Photoshop Elements. 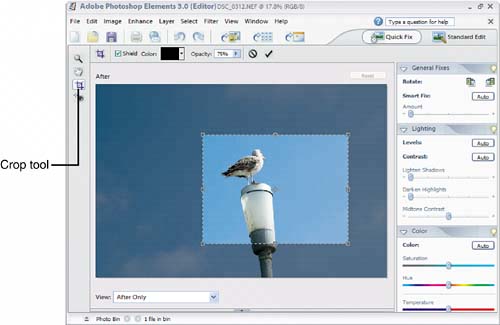
| 3. | Click the OK button in the options bar to crop the image.
|
Resizing a File for the Internet If you use the entire multi-megapixel capacity of your digital camera, you'll end up creating some really big digital picturesboth physically and in terms of file size. Big files are good when you want high-quality pictures for printing, but when it comes to putting a picture on a web page or sending it via email, you need to work with something a lot smaller. Fortunately, Elements makes it easy to resize your pictures for Internet use. Just follow these steps: 1. | Select File, Save for Web to display the Save for Web dialog box, shown in Figure 37.5.
Figure 37.5. Resizing a picture for the Internet. 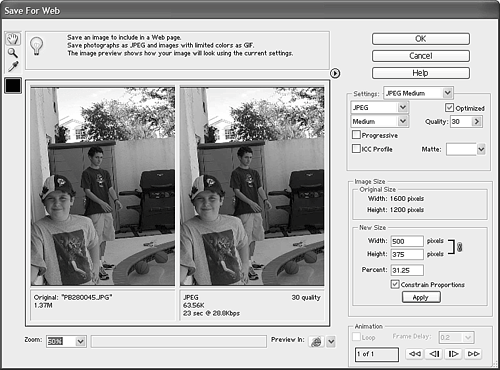
| 2. | In the New Size section, make sure that the Constrain Proportions option is selected, and then enter either a new Width and Height for the picture or enter a Percent of the original picture. Click Apply to apply your changes.
| 3. | Pull down the Settings list and select either JPEG Low (smallest files, lowest picture quality) or JPEG Medium (slightly larger files, better picture quality).
| 4. | Click OK, and when the Save Optimized As dialog box appears, enter a new filename.
|
That's ityou've created a new, smaller file, and your original picture file remains untouched. |