Editing Your Photos with Adobe Photoshop Elements


Not all the pictures you take are perfect. Sometimes the image might be a little out of focus or off center, or maybe your subject caught the glare of a flash for a "red eye" effect. The nice thing about digital pictures is that you can easily edit them to correct for these and other types of flaws.

Let's look at how you can use Adobe Photoshop Elements for these simple picture-editing tasks.

Opening a Picture for Editing

Photoshop Elements offers two ways to open a picture for editing. You select File, Open to use the standard Open dialog box, or select File, Browse to use Elements' File Browser. The File Browser is perhaps an easier approach, as you can see thumbnails of all the pictures available for editing.

When you open a specific picture, it's displayed in a window within the work area, which you can see in Figure 38.2. Along the top of the work area are the typical menus and toolbars, along with the following unique elements:

  • Options bar Which provides options for using a particular tool.

    tip

    graphics/tipdude_icon.gif

    View the names of the Toolbox tools by hovering your cursor over each button.


  • Palette well Which provides tabbed access to different editing palettes you can also pull palettes out of the well to display in separate windows.

  • Toolbox A free-floating collection of editing tools.

Figure 38.2. The Photoshop Elements work area.
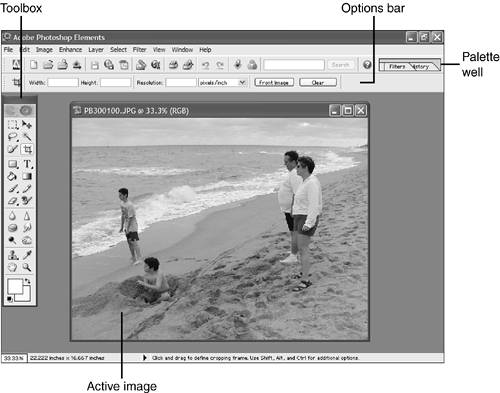
graphics/38fig02.jpg


Touching Up a Picture

Most basic touchup operations can be performed from Elements' Quick Fix utility. Select Enhance, Quick Fix to display the Quick Fix dialog box, shown in Figure 38.3.

Figure 38.3. Use the Quick Fix tool for most basic touchups.

graphics/38fig03.jpg


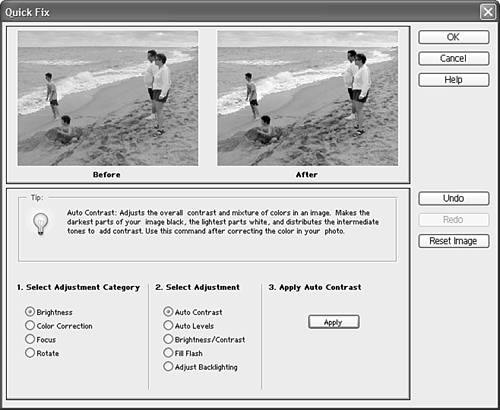
Table 38.1 shows some of the things you can do with the Quick Fix utility.

Table 38.1. Quick Fix Operations

Operation

Steps

Automatically adjusts overall contrast

Brightness, Auto Contrast, Apply

Automatically adds contrast to a flat picture

Brightness, Auto Levels, Apply

Manually adjusts brightness and contrast

Brightness, Brightness/Contrast, adjust Brightness and Contrast sliders

Lightens a dark photo

Brightness, Fill Flash, adjust Lighter and Saturation sliders

Brings out lost detail in the background

Brightness, Adjust Backlighting, adjust Darker slider

Automatically fixes color problems

Color Correction, Auto Color, Apply

Manually adjusts color and tint

Color Correction, Hue/Saturation, adjust Hue, Saturation, and Lightness sliders

Automatically sharpens a blurry photo

Focus, Auto Focus, Apply

Automatically softens the focus

Focus, Blur, Apply

Rotates a picture

Rotate, select adjustment, Apply


Removing Red Eye

If you use flash photography, sooner or later you're going to run into the problem of red eye, which can make ordinary people look like the spawn of the devil himself. Elements includes a special red eye removal tool, which is really easy to use. Follow these steps:

  1. Select the Zoom tool from the Toolbox, and then zoom in closer by clicking on the eyes you want to fix.

  2. Select the Red Eye Brush tool from the Toolbox.

  3. In the Options bar, click the Default Colors button.

  4. Position the cursor over one of the red eyes; then click the mouse button and drag the cursor over the eye until all the red color is removed.

  5. Repeat step 4 for the other eye.

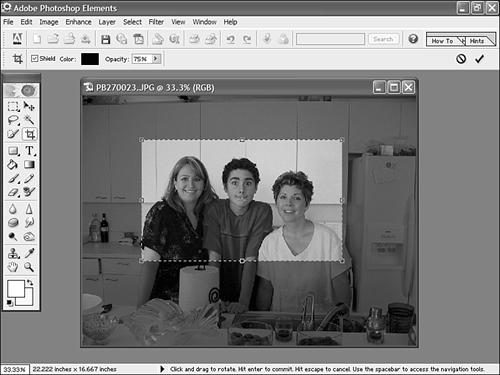
That's all there is to it you've essentially "painted out" the red eye!

Cropping a Picture

One of the more common picture flaws comes when the subject of the picture isn't ideally positioned. You can fix this type of flaw by cropping the picture to eliminate unwanted areas of the image.

To crop a picture with Photoshop Elements, follow these steps:
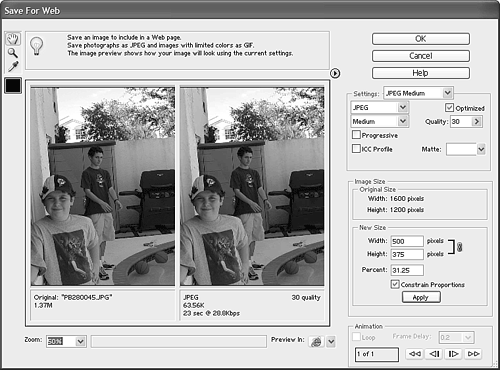
  1. Select the Crop tool from the Toolbox.

  2. Position the cursor at where you want the top left corner of your image to be.

  3. Click and drag your mouse down and to the right until you've selected the entire final image area.

  4. Release the mouse button; the area you want to crop to is now highlighted, and the area outside this image is dimmed, as shown in Figure 38.4.

    Figure 38.4. Cropping a picture.

    graphics/38fig04.gif


  5. Double-click within the final image area to complete the crop.

Resizing a File for the Internet

If you use the entire multi-megapixel capacity of your digital camera, you'll end up creating some really digital pictures both physically and in terms of file size. Big files are good when you want high-quality pictures for printing, but when it comes to putting a picture on a Web page or sending it via email, you need to work with something a lot smaller.

Fortunately, Elements makes it easy to resize your pictures for Internet use. Just follow these steps:

  1. Select File, Save for Web to display the Save for Web dialog box, shown in Figure 38.5.

    Figure 38.5. Resizing a picture for the Internet.

    graphics/38fig05.gif


  2. In the New Size section, make sure that the Constrain Proportions option is selected, and then enter either a new Width and Height for the picture or enter a Percent of the original picture. Click Apply to apply your changes.

  3. Pull down the Settings list and select either JPEG Low (smallest files, lowest picture quality) or JPEG Medium (slightly larger files, better picture quality).

  4. Click OK, and when the Save Optimized As dialog box appears, enter a new filename.

That's it you've created a new, smaller file, and your original picture file remains untouched.


Absolute Beginner's Guide to Computer Basics
Absolute Beginners Guide to Computer Basics (2nd Edition)
ISBN: 0789731754
EAN: 2147483647
Year: 2003
Pages: 253

flylib.com © 2008-2017.
If you may any questions please contact us: flylib@qtcs.net