Software and hardware issues can affect the way that your system functions. Severe problems might prevent you from starting Windows XP Professional normally.
Software problems
Installing incompatible software, incorrectly changing system configuration settings, or installing faulty device drivers can cause system instability or a Stop error.
Hardware problems
Hardware that is defective, malfunctioning, incorrectly installed, or incorrectly configured can also cause instability or a Stop error.
Other problems
Deleted or corrupted system files caused by problems such as user error or virus activity can cause data loss or prevent you from starting the operating system.
Any of the preceding types of problems can prevent you from starting Windows XP Professional in normal mode, causing certain applications or data to become inaccessible. Windows XP Professional provides several tools that enable you to troubleshoot startup and stability problems, and restore system and data files.
Table D-2 lists these tools according to the preferred order of use, from tools that present little or no risk to data, to those that might cause data loss. With the exception of the Automated System Recovery (ASR) restore phase, Last Known Good Configuration, and Recovery Console, the features in the table are available in safe and normal startup modes. If the following tools and features do not resolve the problem, and you upgraded your system from an earlier version of Windows, you might have the option to uninstall Windows XP Professional. For more information, see Uninstall Windows XP Professional in this appendix.
Table D-2: Comparison of Windows XP Professional Recovery Tools and Features
Recovery Feature
Function
Tool Type, Interface
Last Known Good Configuration
A startup option to use when the system cannot start in normal or safe mode following a driver or application installation that causes a problem. By using the Last Known Good Configuration, you can recover by reversing the most recent driver and registry changes made since you last started Windows XP Professional.
Built-in, startup option
Device Driver Roll Back
A Device Manager feature that allows you to replace an individual device driver with the previously installed version if the driver was updated after you installed Windows XP Professional. Device Driver Roll Back is available in normal or safe mode.
Built-in, GUI
System Restore
A service for x86-based computers that actively monitors your system and records changes to the registry, to system files, and to certain application files. System Restore allows you to undo recent registry and file changes by using information previously saved in restore points. Use to restore the system to a previous state. System Restore is available in normal or safe mode.
Built-in, GUI
Add or Remove Programs in Control Panel
A Control Panel feature you can use to uninstall programs. Use to temporarily uninstall software that you suspect is causing a problem. You can uninstall an application in normal or safe mode.
Built-in, GUI
Recovery Console
A command-line environment that you can use to perform advanced troubleshooting operations.
In addition to Last Known Good Configuration and safe mode, advanced users can use Recovery Console to attempt manual recovery operations.
Built-in, command-line environment
Backup
A tool for saving data, such as the system state, before you troubleshoot problems, attempt workarounds, or apply updates. Backup (Ntbackup.exe) enables you to restore system settings and data if your troubleshooting attempts worsen the problem.
Use in conjunction with a parallel installation to restore a system that cannot start in normal or safe modes. Backup is available in safe or normal mode. For more information about parallel installations, see Troubleshooting Startup in this book.
Built-in, GUI
Automated System Recovery (ASR)
A Backup (Ntbackup.exe) option to use when boot and system files become corrupt, preventing your system from starting in normal or safe modes, or using Recovery Console. This option is more desirable than formatting disks and reinstalling Windows because ASR restores system settings and critical files on the system and boot partitions.
The user interface to ASR backup is the ASR wizard in Backup, which steps you through the process of creating an ASR backup set and an ASR floppy. Windows XP Professional Setup provides the user interface to ASR restore.
Because the ASR process formats disks, consider this a last resort when using Last Known Good Configuration, Device Driver Roll Back, System Restore, or Recovery Console does not solve the problem. ASR is available in safe or normal mode.
Built-in, GUI (ASR Backup), and text-mode Setup option (ASR Restore)
Last Known Good Configuration
The Last Known Good Configuration startup option allows you to recover from a problem by reversing driver and registry changes made since you last started Windows XP Professional. Windows XP Professional does not update Last Known Good Configuration information in the registry until the operating system successfully restarts in normal mode and a user logs on and is authenticated.
Using Last Known Good Configuration restores information for the registry subkey HKEY_LOCAL_MACHINE\SYSTEM\CurrentControlSet. Additionally, if you updated any device drivers, choosing Last Known Good Configuration restores the previous drivers.
Using Last Known Good Configuration might enable you to resolve startup or stability problems. For example, if a Stop error occurs immediately after installing a new application or device driver, you can restart the computer and use Last Known Good Configuration to recover from the problem.
When you are troubleshooting, it is recommended that you use Last Known Good Configuration before you try other options, such as safe mode. However, even if you decide to use safe mode first, logging on to the computer in safe mode does not update the Last Known Good Configuration. Therefore, using Last Known Good Configuration remains an option if you cannot resolve your problem by using safe mode.
To use Last Known Good Configuration from the Windows Advanced Options Menu
Remove any floppy disks or CDs from your computer and restart your computer.
When prompted, press F8. If Windows XP Professional starts without displaying the Please select the operating system to start menu, restart your computer. Press F8 after the firmware POST process completes, but before Windows XP Professional displays graphical output.
On the Windows Advanced OptionsMenu, select Last Known Good Configuration
For more information about other options available on the Windows Advanced Options Menu, see Using Safe Mode later in this appendix.
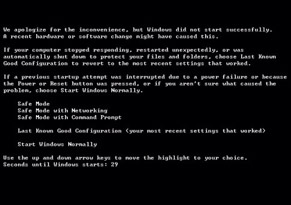
You can also use Last Known Good Configuration by selecting it from the startup recovery menu. Windows XP Professional detects when the last startup attempt was not successful and displays a message that includes a menu of startup options, as shown in Figure D-1.
Figure D-1: Startup recovery menu
The startup recovery menu is separate from the Windows Advanced Options Menu. A user manually invokes the Windows Advanced Options Menu by pressing F8, while the operating system automatically displays the startup recovery menu after an unsuccessful startup.
To Use Last Known Good Configuration from the startup recovery menu after an unsuccessful startup
Restart your computer. The startup recovery menu appears shortly after Windows XP Professional starts.
On the startup recovery menu, select Last Known Good Configuration (your most recent settings that worked).
In some cases, other troubleshooting options might be preferable to choosing Last Known Good Configuration. If you know the specific driver causing the problem, you have the option of using Device Driver Roll Back in safe mode. This might be preferable because Device Driver Roll Back changes are limited to a single device. Also, consider using System Restore because it enables you to revert system registry settings by date. For more information about Device Driver Roll Back and System Restore, see Device Driver Roll Back and System Restore later in this appendix.
Using Safe Mode
If you are unable to start your system by using Last Known Good Configuration, Windows XP Professional provides safe mode, a startup option that disables startup programs and nonessential services to create an environment useful for troubleshooting and diagnosing problems. In safe mode, Windows XP Professional starts a minimal set of drivers that the operating system needs to function. Support for devices such as audio devices, most USB devices, and IEEE 1394 devices is disabled to reduce the variables that you need to account for when diagnosing the cause of startup problems, Stop messages, or system instability.
Logging on to the computer in safe mode does not update Last Known Good Configuration information. Therefore, if you log on to your computer in safe mode and then decide you want to try Last Known Good Configuration, the option to do so is still available.
Safe Mode Enables Only Essential Drivers and Services
Essential drivers and system services enabled in safe mode include the following:
Drivers for serial or PS/2 mouse devices, standard keyboards, hard disks, CD ROM drives, and standard VGA devices. Your system firmware must support universal serial bus (USB) mouse and USB keyboard devices in order for you to use these input devices in safe mode.
System services for the Event Log, Plug and Play, remote procedure calls (RPCs), and Logical Disk Manager.
The following registry keys list the driver and service groups enabled in safe mode.
Enabling only components needed for basic functionality allows the operating system to start in the following situations.
The computer consistently stops responding
You can restart the operating system in safe mode and use the tools described in this appendix to diagnose and resolve problems.
The computer starts with a blank or distorted video display
You can start your computer in safe mode and then use Control Panel to select video adapter settings that are compatible with your monitor. New settings take effect when you restart the computer.
The computer does not start normally after you install new hardware or software
If recently installed hardware or software prevents you from starting Windows XP Professional in normal mode, you can use safe mode to uninstall software, or to remove or roll back device drivers.
If you can start the computer in safe mode but not in normal mode, the problem is caused by a driver or service that runs in normal mode.
Safe Mode Bypasses Startup Programs
Bypassing startup programs reduces system complexity and enables you to see whether a startup program is the source of the problem. Safe mode bypasses startup programs in the following locations or of the following types.
Current User, All Users, and Administrator profiles
In safe mode, the operating system does not run startup programs called by shortcuts stored in the Start Menu\Programs\Startup folder in the following directories:
USERPROFILE
ALLUSERSPROFILE
SystemDrive\Documents and Settings\Administrator
Run and RunOnce registry subkeys
In safe mode, Windows XP Professional does not run startup programs specified in registry Run and RunOnce subkeys. For more information about startup programs specified in the registry, see Troubleshooting Startup in this book.
Advertised applications and network logon scripts
In safe mode, the operating system does not run network-based startup programs. To enable network logon scripts in safe mode, select Safe Mode with Networking on the Windows Advanced Options Menu.
For more information about startup programs, startup program registry subkeys, and disabling startup programs for diagnostic purposes, see Troubleshooting Startup in this book.
Note
Your computer might take longer to start and shut down when it is running in safe mode because Windows XP Professional disables disk caching in safe mode.
To start your computer in safe mode
Remove all floppy disks and CDs from your computer, and then restart your computer.
When prompted, press F8. If Windows XP Professional starts without displaying the Please select the operating system to start menu, restart your computer. Press F8 after the firmware POST process completes, but before Windows XP Professional displays graphical output.
From the Windows Advanced OptionsMenu, select a safe mode option listed in Table D-3. Table D-3 also lists other options available on the Windows Advanced Options Menu.
Table D-3: Options on the Windows Advanced Options Menu
Startup Option
Description
Safe Mode
Loads the minimum set of device drivers and system services required to start Windows XP Professional. User specific startup programs do not run.
Safe Mode with Networking
Includes the services and drivers needed for network connectivity. Safe mode with networking enables logging on to the network, logon scripts, security, and Group Policy settings. Nonessential services and startup programs not related to networking do not run.
Safe Mode with Command Prompt
Starts the computer in safe mode, but displays the command prompt rather than the Windows GUI interface.
Enable Boot Logging
Creates a log file (Ntbtlog.txt) in the systemroot folder, which contains the file names and status of all drivers loaded into memory. Systemroot is an environment variable that can vary from one system running Windows XP Professional to another. For more information about environment variables, see Troubleshooting Startup in this book.
Enable VGA Mode
Starts the computer in standard VGA mode by using the current video driver. This option helps you recover from distorted video displays caused by using incorrect settings for the display adapter or monitor.
Last Known Good Configuration
Restores the registry and driver configuration in use the last time the computer started successfully.
Debugging Mode
Starts Windows XP Professional in kernel debugging mode, which allows you to use a kernel debugger for troubleshooting and system analysis.
Start Windows Normally
Starts Windows XP Professional in normal mode.
Reboot
Restart the computer.
You can also select a safe mode option to use from the startup recovery menu that appears when Windows XP Professional detects that the most recent startup attempt was unsuccessful. For more information about the startup recovery menu, see Last Known Good Configuration earlier in this appendix.
For more information about safe mode, see Windows XP Professional Help and Support Center.
Device Driver Roll Back
Updating one or more device drivers might cause problems, such as resource conflicts that prevent devices from functioning, Stop errors, and startup problems. To prevent problems after upgrading a device driver, avoid using beta or unsigned drivers, because these drivers might not be fully tested for Windows XP Professional compatibility.
If a problem does occur immediately after you update a driver, you can revert to the previous version by using a Device Manager feature called Device Driver Roll Back. If the problem prevents you from starting Windows XP Professional in normal mode, you can roll back device drivers in safe mode. You must be logged on as an administrator or a member of the Administrators group to roll back a driver.
To roll back a driver
In the Run dialog box, type devmgmt.msc.
Expand a category, such as Standard floppy disk controller, and then double-click a device name.
On the Driver tab, click Roll Back Driver.
At the prompt, click Yes to confirm that you want to roll back to the previous driver.
The driver roll back process checks for a previous driver, and if one is not found, the following message appears:
No driver files have been backed up for this device.
If you are having problems with this device you should view the Troubleshooter
information. Would you like to launch the Troubleshooter?
If rolling back drivers does not resolve the problem, you have the option of using the Last Known Good Configuration or System Restore. For more information about System Restore and Last Known Good Configuration, see Last Known Good Configuration and System Restore in this appendix.
Driver roll back limitations
When using Device Driver Roll Back, be aware of the following limitations:
You cannot roll back beyond one driver version. For example, you cannot revert to the second to the last version of a driver.
You cannot roll back printer drivers.
You cannot roll back drivers for all functions of a multifunction device simultaneously. You must roll back each driver separately. For example, if you have a multifunction device that provides audio and modem functionality, you must roll back the modem driver and the audio driver separately.
You cannot uninstall a driver by using Device Driver Roll Back (you must use the Uninstall feature in Device Manager to do this).
For more information about Device Manager and rolling back drivers, see Windows XP Professional Help and Support Center or Managing Devices in this book.
System Restore
Using System Restore, you can restore your x86-based system to a state prior to the occurrence of a problem. System Restore monitors changes to certain system and application files. System Restore functions like an undo feature for Windows XP Professional configuration changes, allowing you to recover from problems caused by such things as incorrect system settings, faulty drivers, incompatible applications and so on, without risk to personal files, such as documents or e-mail.
System Restore enables you to restore your system by automatically creating restore points based on a preset schedule or in response to system events (such as installing a new application or driver). You can also manually create restore points as needed. You must be logged on as an administrator or a member of the Administrators group to use System Restore.
System Restore consists of two parts, file monitoring and restore point management.
File Monitoring
System Restore monitors file operations for a core set of system and application files specified in systemroot\System32\Restore\Filelist.xml. System Restore records changes to the original file and sometimes copies it to a hidden archive before Windows XP Professional overwrites, deletes, or changes, the monitored file. System Restore does not monitor the following files and folders:
The virtual memory paging file.
Personal user data, such as files in My Documents, Favorites, Recycle Bin, Temporary Internet Files, History, and Temp folders.
Image and graphics files, such as those with .bmp, .jpg, and .eps extensions.
Application data files with extensions not listed in systemroot\System32\ Restore\Filelist.xml such as .doc, .xls, .mdb, and .pst.
Restore Points and Restore Point Management
Restore points contain the following two types of information:
A snapshot of the registry.
Certain dynamic system files.
System Restore creates restore points according to the following system events, user actions, or time intervals.
Installing an unsigned device driver
Installing an unsigned driver causes System Restore to create a restore point.
Installing System Restore compliant applications
Installing an application that uses Windows Installer, or Install Shield Pro version 7.0 or later, causes System Restore to create a restore point.
Installing an update by using Automatic Updates
Installing an update by using Automatic Updates or installing an update directly by using Windows Update causes System Restore to create a restore point. For more information about the Automatic Updates feature in Windows XP Professional, see Windows Update later in this appendix.
Performing a System Restore operation
System Restore creates a new restore point when you revert your system to a previous state by using a restore point. System Restore implements this safeguard in the event that you use the wrong restore point. You can undo the last restore, rerun System Restore, and select another restore point.
Restoring data from backup media
When you use the Backup tool to restore files, System Restore creates a restore point to use before restoring from backup media. If problems occur with the Backup application, and your system is left in an undetermined state, you can restore your system. System Restore does not revert personal data files copied to the computer by using the Backup tool.
Creating a restore point manually
Creating a restore point manually is an action that you initiate by using the System Restore wizard. For example, before you add new hardware or software, manually create a restore point to record the current system state. If a problem occurs after installation, you can undo the changes.
Creating daily restore points
System Restore creates a restore point every 24 hours if the computer is turned on, or if it has been 24 hours since the last restore point was created. Scheduled restore-point creation occurs when the computer is idle, when there is no mouse, keyboard, or disk activity.
Creating restore points at preset intervals
Restore-point creation at specified intervals is disabled by default but can be enabled by using the registry editor, Regedit.exe. See Table D-4 later in this appendix for a description of the System Restore registry entries RPSessionInterval and RPGlobalInterval.
For systems using the NTFS file system, System Restore compresses archive information during idle time when there is no mouse, keyboard, or disk activity.
Archiving and Purging of Restore Points
System Restore archives expand to include multiple restore points, each representing unique system states. System state refers to the components that define the current state of the operating system and includes the following:
User account information stored in the registry.
Application, hardware, and software settings stored in the registry.
Files that Windows XP Professional requires for startup, including those in the systemroot directory and boot files on the system partition, such as Ntldr or IA64ldr.efi.
Archived restore point information is saved to a hidden systemdrive folder or an archive on the volume where a monitored file is located. The archive collects multiple restore points, each representing individual system states. The files, registry snapshots, and logs associated with older restore points are purged on a first in, first out (FIFO) basis, optimizing System Restore disk space and making room for new restore points. System Restore uses the following algorithms and conditions to determine whether it is time to purge restore point data.
When System Restore consumes at least 90 percent of allotted space
System Restore purges restore points to reduce the amount of allotted space used from 90 percent to 75 percent. System Restore is limited to 12 percent of available disk space, which is not pre-allocated. Windows XP Professional and applications can use the free portion of this space.
When you reduce the amount of disk space allotted to System Restore
By using Control Panel or Disk Cleanup to reduce the amount of System Restore space you can cause System Restore to purge all but the most recent restore points. For more information about Disk Cleanup, see Disk Cleanup in this appendix.
When you disable System Restore
Disabling System Restore deletes all restore points.
When a specified period of time has elapsed
You can configure System Restore to purge restore points by elapsed time. For example, you can specify deletion of restore points older than two months. See Table D-4 for a description of the System Restore registry entry RPLifeInterval. By default, System Restore purges restore points older than 90 days.
Using System Restore
Before changing system settings during troubleshooting, create a restore point. If a problem occurs, you can undo the negative effects of diagnostic and troubleshooting changes by reverting to a previous state. The following illustrate situations where System Restore can help you recover from problems that might occur.
Uninstalling incompatible software does not resolve the problem
If the problem persists after uninstalling an application, you can use System Restore to return the system to a state before you installed the new software.
Updating a device driver causes system instability
During the week, you decide to update drivers for five devices. At the end of the week, you find that your system is unstable. If you are not sure which driver is causing conflicts, you can revert your system configuration by using a restore point created the previous week.
Downloading content causes a problem
You visit a Web site and download a program or control that causes problems. By using System Restore, you can undo the negative effects of downloaded software.
Identifying a problem is not possible
If you are unable to diagnose a problem, but know approximately when the problem started, you can use System Restore to restore your system to a state when it was performing normally.
Undoing a System Restore operation that does not solve the problem
You can undo the effects of the last restore point used, by selecting Undo my last restore at the System Restore screen that appears after a restore operation. You can optionally rerun System Restore and select another restore point.
To restore the system by using a restore point
Click Help and Support Center, and under Pick a task, click Undo changes to your computer with System Restore.
On the Welcome to System Restore screen, click Restore my computer to an earlier time, and then click Next.
Select a restore point on the Select a Restore Point screen, and then click Next.
At the Confirm Restore Point screen, click Next.
When you choose a specific restore point, System Restore examines the System Restore change logs. These logs contain information that enables System Restore to create a restore map, which outlines how to revert the system to the selected system state. System Restore processes the restore map, reverses file and registry changes (by using information stored in the restore point), and then restarts the computer. If you are not satisfied with the results, you can rerun System Restore and select another restore point, or you can select the Undo my last restoration option available on the Welcome to System Restore screen.
Note
If you know the specific driver causing the problem, rolling back drivers might be a preferred troubleshooting option because it limits changes to reverting a driver for one device. For more information about rolling back drivers, see Device Driver Roll Back earlier in this appendix.
To create a restore point manually
Start System Restore.
Click Create a restore point, and then click Next.
At the Create a Restore Point screen, type a description for the restore point in the Restore point description line.
Click the Create button.
Using Control Panel to Configure System Restore
To configure System Restore settings by using Control Panel
In Control Panel, open System.
In the System Properties dialog box, click the System Restore tab.
System Restore is enabled by default. If you have disabled System Restore, you can enable it by clearing the Turn off System Restore check box.
You can also specify the amount of hard disk space that System Restore uses for data archives by adjusting the Disk space to use slider for each volume.
Be aware of the following before using System Restore:
System Restore requires a minimum of 200 MB of disk space when you install Windows XP Professional. If your computer does not have enough disk space available after you install Windows XP Professional, you must first free sufficient disk space and then enable System Restore by using the preceding steps.
System Restore can consume up to 12 percent of available disk space for systems with hard drives over 4 gigabytes (GB), and up to 400 megabytes (MB) for hard drives under 4 GB. If you require more disk space for applications and data, you can reduce the amount of space dedicated to System Restore archives.
By default, System Restore monitors all volumes, but you can exclude hard disks (with the exception of the system hard disk) from monitoring. If you exclude a volume, System Restore clears all restore points on the volume. System Restore does not revert changes on excluded volumes. For more information about excluding volumes from System Restore monitoring, see Windows XP Professional Help and Support Center.
After System Restore is enabled, System Restore can function below the 200 MB disk free space installation requirement. System Restore can continue to monitor and copy files on a volume until the amount of free disk space falls to approximately 50MB.
Using the Group Policy Snap-in to Configure System Restore
You can use the Group Policy snap-in, Gpedit.msc, to modify System Restore Group Policy settings. The following settings affect how System Restore functions.
Turn off System Restore
Enabling this setting disables System Restore. In addition, a user is unable to access the System Restore Wizard and cannot configure System Restore by using the System Restore tab in the System Properties dialog box in Control Panel.
Disabling this setting enables System Restore and blocks a user from disabling System Restore by selecting the Turn off System Restore check box on the System Restore tab in the System Properties dialog box in Control Panel. A user might still be able to configure System Restore settings, depending on the value of the Turn off Configuration Group Policy setting.
Turn off Configuration
Enabling this setting removes the System Restore configuration tab in the System Properties dialog box in Control Panel.
If this setting is not configured, the System Restore configuration tab remains, and the user retains the ability to configure System Restore.
To configure System Restore settings by using the Group Policy snap-in
In the Run dialog box, type gpedit.msc.
In the console tree, expand Local Computer Policy, and then expand Computer Configuration, Administrative Templates, and then System.
Click System Restore, and then double-click Turn off System Restore or Turn off Configuration.
On the Setting tab, click Not Configured, Enabled, or Disabled, and then click OK.
For more information about Group Policy, see Authorization and Access Control, Planning Deployments, and Managing Desktops in this book. Also, see the Distributed Systems Guide of the Microsoft Windows 2000 Server Resource Kit and the Change and Configuration Management Deployment Guide link on the Web Resources page at http://www.microsoft.com/windows/reskits/webresources
Tip
You can also open System Properties from the Start menu by clicking Run and typing sysdm.cpl in the Run dialog box. Many such Control Panel tools are stored in the systemroot\System32 folder and use a .cpl extension. You can start frequently used Control Panel tools from the Run dialog box or by creating shortcuts.
Other frequently used tools include Appwiz.cpl (Add or Remove Programs), Hdwwiz.cpl (Add Hardware Wizard), Mmsys.cpl (Sounds and Audio Devices Properties), Nusrmgr.cpl (User Accounts), and Powercfg.cpl (Power Options Properties).
Using the Registry Editor to Configure System Restore
You can use the registry editor, Regedit.exe, to change entries in the HKEY_ LOCAL_MACHINE\SOFTWARE\Microsoft\WindowsNT\CurrentVersion\SystemRestore subkey that are not configurable by using Control Panel. Table D-4 lists some of these settings.
Table D-4: Selected System Restore Registry Settings
Registry Value
Description
RPSessionInterval
Specifies the intervals, in seconds, between scheduled restore-point creation during an active user session. The default value is 0 seconds (disabled).
RPGlobalInterval
Specifies the time interval, in seconds, at which scheduled restore points are created (regardless of whether or not there is an active user session). The default value is 86,400 seconds (24 hours).
RPLifeInterval
Specifies the time interval, in seconds, for which restore points are kept. System Restore deletes restore points older than the specified value. The default value is 7,776,000 seconds (90 days).
DiskPercent
Specifies the maximum amount of disk space on each drive that System Restore can use. This value is specified as a percentage of the total drive space. The default value is 12 percent.
Caution
Do not edit the registry unless you have no alternative. The registry editor bypasses standard safeguards, allowing settings that can damage your system, or even require you to reinstall Windows. If you must edit the registry, back it up first and see the Registry Reference in the Microsoft Windows 2000 Server Resource Kit at http://www.microsoft.com/reskit
Using Custom Scripts to Configure System Restore
By using custom scripts that use Windows Management Instrumentation (WMI), you can change System Restore parameters by declaring the WMI class RegSR and changing specific object properties. By using WMI classes that are documented in the Software Development Kit (SDK), you can create custom scripts to perform the following tasks:
Create restore points
Enumerate restore points
Restore the system
Enable System Restore
Disable System Restore
Retrieve status about the last System Restore operation
For more information about WMI, see the Driver Development Kits link on the Web Resources page at http://www.microsoft.com/windows/reskits/webresources On the Microsoft Windows Driver Development Kits Web page, expand Technology Areas, and then click WMI (Windows Management Instrumentation). For more information about System Restore scripting, see the Software Development Kit (SDK) information in the MSDN Library link and the Windows Script Technologies link on the Web Resources page at http://www.microsoft.com/windows/reskits/webresources
How System Restore Works with Other Windows XP Professional Features
Windows XP Professional features, options, and troubleshooting tools can affect the behavior of System Restore. Table D-5 describes how System Restore works with these features.
Table D-5: How System Restore Works with Windows XP Tools and Features
Tool or Feature
Interaction with System Restore
Add or Remove Programs
System Restore does not uninstall applications. To properly remove all files installed by an application s setup program, run the uninstall program provided with the application.
Automated System Recovery (ASR)
A successful ASR restore operation resets restore points. All restore points created prior to the ASR restore operation are lost, with the restored data serving as the basis for subsequent monitoring and restore point management.
Backup
System Restore creates a restore point before you perform a restore operation by using Backup (Ntbackup.exe). If the Backup restore operation fails, or if the user cancels, System Restore reverts the operating system state but does not restore personal data files. If the Backup restore operation succeeds, you cannot use restore points created before the successful Backup restore operation.
Device Driver Roll Back
System Restore reverts drivers and the Device Driver Roll Back state to match the information in the restore point. Use Device Driver Roll Back instead of System Restore if you are certain that a specific driver (for example a video card driver) is the source of a problem. If you already performed a System Restore and want to roll back a specific driver without affecting other system changes, you can undo the last System Restore restore operation and then roll back the problem driver.
Folder Redirection
System Restore does not restore files in redirected folders.
Last Known Good Configuration
System Restore applies settings stored in the selected restore point. System Restore reverts the Last Known Good Configuration to match the information in the selected restore point. This guarantees that the restored registry and Last Known Good state are consistent.
Operating System Upgrades
Upgrading from Windows Millennium Edition to Windows XP Professional or upgrading from one Windows XP Professional version to another causes all System Restore restore points to be reset. All restore points created prior to the operating system upgrade are lost.
Plug and Play
System Restore does not alter Plug and Play routines. For example, if you use a restore point created before a device was installed, that device is redetected and Windows XP Professional attempts to initialize new hardware and install drivers after System Restore completes.
Recovery Console
System Restore does not monitor changes made within Recovery Console. You cannot apply restore points in Recovery Console.
Roaming User Profiles
System Restore does not restore roaming user profile information.
Safe mode
You cannot create restore points in safe mode. You can use System Restore to apply restore points in safe mode.
Windows File Protection
System Restore synchronizes Windows File Protection (WFP) data to agree with restored information. For more information about Windows File Protection, see Windows File Protection later in this appendix.
Windows Update
Using a restore point might revert recent updates such as a new video card driver or updates downloaded by using Windows Update. By using Automatic Updates, you can help ensure that your system is up-to-date. For example, after you apply a restore point, Automatic Updates can download updates to your system and you can then decide whether to reinstall them. For more information about Automatic Updates, see Windows Update in this appendix.
Warning
System Restore is not a backup feature and does not replace Backup. System Restore saves registry information and incremental changes to monitored files. System Restore does not save personal data. In addition, System Restore requires that you be able to start Windows XP Professional in safe or normal mode. You must use Backup or ASR to recover from data loss due to hard disk-related damage that prevents you from starting the operating system in safe mode, normal mode, or Recovery Console.
Add or Remove Programs
If problems occur soon after you install an application, you can use Add or Remove Programs in Control Panel to remove the application. You can then focus your efforts on searching for an update or workaround that might permanently resolve the problem.
Software conflicts can cause problems with other software or cause hardware to behave unpredictably or stop responding. For example, after installing an incompatible CD ROM mastering application, you cannot shut down your system properly. You observe that the problem is consistent, and you decide to uninstall the application. After removing the CD-mastering software, you can successfully shut down the computer. You search for a Windows XP Professional specific update on the manufacturer s Web site and find that reinstalling the application and applying the update resolves the problem.
To uninstall an application
Do one of the following:
In Control Panel, click Add or Remove Programs.
In the Run dialog box, type appwiz.cpl, and then click OK.
Under Currently installed programs, click an application to uninstall.
Click Change/Remove and confirm or cancel the uninstall process.
Uninstalling software might not always resolve the problem. However, it does eliminate a possible cause, and it reduces the number of variables to consider while troubleshooting. For more information about adding or removing programs, see Windows XP Professional Help and Support Center.
Recovery Console
Recovery Console is a character-mode environment that you can run directly from the Windows XP Professional operating system CD or, for x86-based systems, install as a startup option. Unlike normal or safe mode, the Windows graphical user interface (GUI) is not available within Recovery Console. Recovery Console provides a set of commands for advanced users who are comfortable working outside the Windows GUI environment.
If you cannot start Windows XP Professional in safe mode or normal mode, Recovery Console allows you to perform many troubleshooting and maintenance tasks, such as disabling problem drivers and services that you suspect are causing startup problems. Recovery Console is separate from the command-line Cmd.exe shell and grants limited access to local NTFS and file allocation table (FAT) formatted volumes.
For more information about using Recovery Console to troubleshoot startup and disk problems, see Troubleshooting Startup and Troubleshooting Disks and File Systems in this book.
Installing and Using Recovery Console
Before you install Recovery Console, you need to be aware of the following disk and file system limitations.
Recovery Console is sensitive to file-system changes
If you install Recovery Console to a hard disk that uses the FAT file system, converting to NTFS causes Recovery Console to stop functioning. You must reinstall Recovery Console after converting to NTFS.
Recovery Console limitations on dynamic disks
Certain Recovery Console limitations exist for dynamic disks. For more information, see article Q227364, Dynamic Volumes Are Not Displayed Accurately in Text-Mode Setup or Recovery Console, in the Microsoft Knowledge Base. To find this article, see the Microsoft Knowledge Base link on the Web Resources page at http://www.microsoft.com/windows/reskits/webresources
Installing Recovery Console
You can start Recovery Console directly from the Windows XP Professional operating system CD or, for x86-based systems, install it on the hard disk as a startup option.
Warning
To enable your system to start from the Windows XP Professional operating system CD you might need to change the device boot order settings stored in firmware. For more information about changing boot order settings, see Troubleshooting Startup in this book.
To start Recovery Console from the Windows XP Professional operating system CD
Restart the computer by using the Windows XP Professional operating system CD.
Wait for the Windows XP Professional Setup program to display the Welcome to Setup screen (this might take a few moments). Choose Torepair a Windows XP Professional installation by pressing R.
Type the number corresponding to the Windows XP Professional installation that you want to use, and then press ENTER. You must type a number when prompted, even if only a single Windows XP Professional installation exists. If you press ENTER without typing a number, Windows XP Professional restarts the computer.
At the prompt, enter the password for the local Administrator account so that you can access the contents of the local hard disk. Recovery Console accepts only the password for the local Administrator account. If you do not enter the correct password within three attempts, Windows XP Professional denies access and restarts the computer.
For more information about the password requirements for Recovery Console, see article Q258585, Recovery Console Prompts for Administrator Password Even If Administrator Account Has Been Renamed, in the Microsoft Knowledge Base. To find this article, see the Microsoft Knowledge Base link on the Web Resources page at http://www.microsoft.com/windows/reskits/webresources
To install Recovery Console as a hard disk startup option for x86-based systems
With Windows running, insert the Windows XP Professional operating system CD into your CD ROM drive.
Click No when prompted to upgrade to Windows XP Professional.
At the command prompt, type a command using the following syntax:
drive :\i386\winnt32.exe /cmdcons
In the preceding syntax, drive represents the letter of the CD ROM. For network-based installations, or if you do not have access to a Windows XP Professional operating system CD, you can install Recovery Console from a network distribution share by typing:
\\server\share\i386\winnt32.exe /cmdcons
After you enter this command and restart your computer, Recovery Console appears as a menu item in the operating system startup menu.
Directory and Folder Access
If you successfully log on, you can access the following directories and folders by using Recovery Console:
The root directory of any volume.
The systemroot folder and subfolders of the selected Windows XP Professional installation.
The Recovery Console Cmdcons folder and any subfolders (if you installed Recovery Console as a startup option).
Files and directories on removable disks.
Recovery Console Restrictions
By default, Recovery Console enforces the following four restrictions:
You cannot access certain folders, such as Program Files, Documents and Settings, and disks or folders containing other Windows XP Professional installations.
You cannot copy files to removable disks because floppy-disk write access is disabled by default. When you attempt to copy files to removable disks, an error message similar to the following appears: Access is denied.
You cannot change the local Administrator account password from Recovery Console.
You do not have access to a text-editing tool in Recovery Console.
You can customize Recovery Console to bypass the first and second restrictions, by using the SET command to modify environment variables. Windows XP Professional uses environment variables to associate string values, such as folder or file paths, to variables that applications and the operating system can use. For example, by using environment variables, scripts can run without modification on computers that have different configurations. For more information about environment variables, see To add or change the values of environment variables in Windows XP Professional Help and Support Center.
Customizing Recovery Console
You can use the Recovery Console set command to display or modify the following four Recovery Console environment variables.
AllowWildCards
Setting the value of this variable to TRUE allows you to use wildcard characters (* and ?) with some commands. For example, typing dir *.txt lists all files in the current directory with the .txt file name extension to the screen.
AllowAllPaths
Setting the value of this variable to TRUE allows you to expand the scope of the change directory cd command to include all folders on all disks.
AllowRemovableMedia
Setting the value of this variable to TRUE allows you to copy files from the hard disk to removable disk media.
NoCopyPrompt
Setting the value of this variable to TRUE allows you to copy files without being prompted to continue when overwriting an existing file.
To change the value of the preceding variables from the default value of FALSE to TRUE, use the following syntax:
setvariable = [TRUE|FALSE]
When you first attempt to use the set command to change the value of environment variables from FALSE to TRUE, an error message similar to the following appears:
The SET command is currently disabled. The SET command is an optional Recovery Consol e command that can only be enabled by using the Security Configuration and Analysis s nap-in.
To enable the set command, enable the Allow floppy copy and access to all drives and all folders Group Policy setting by using the Group Policy snap-in.
To enable use of the set command by using the Group Policy snap-in
Restart Windows XP Professional in normal mode.
In the Run dialog box, type gpedit.msc.
In the console tree, expand Local Computer Policy, and then expand Computer Configuration, Windows Settings, Security Settings, and Local Policies.
Click Security Options.
Double-click Recovery Console: Allow floppy copy and access to all drives and all folders, click Enabled, and then click OK.
In a Microsoft Windows 2000 Server based network, to enable set command functionality for all computers, set Group Policy on a domain controller. Setting up policy from a central location is more efficient than applying settings for each computer.
You can also use the Group Policy snap-in to enable the policy Recovery Console: Allow automatic administrative logon, which allows you to bypass the logon process when Recovery Console starts. Activating this policy eliminates a security barrier intended to protect your computer against unauthorized users. Therefore, it is important that you enable this policy only on systems that have secure consoles, such as those in locked rooms. You can also make Group Policy changes by using the Security Configuration and Analysis snap-in.
For more information about Group Policy, see Authorization and Access Control, Planning Deployments, and Managing Desktops in this book. Also, see the Distributed Systems Guide of the Microsoft Windows 2000 Server Resource Kit and the Change and Configuration Management Deployment Guide link on the Web Resources page at http://www.microsoft.com/windows/reskits/webresources
Using Recovery Console to Recover from Startup Problems
Using Recovery Console enables you to recover from the following problems:
Corrupted or deleted startup files caused by incompatible software, user error, or virus activity.
Disk problems related to damage to the master boot record (MBR), partition table, or boot sector on x86-based systems.
A partition boot sector overwritten by another operating system s setup program.
If critical system files, such as Ntldr or Ntoskrnl.exe, are missing or corrupted, you can restore them by starting Recovery Console and copying fresh files from the Windows XP Professional operating system CD or other removable disk media. For more information about using Recovery Console to recover from startup problems, see Troubleshooting Startup in this book.
Boot sector damage can be caused by incompatible software, hardware problems, virus activity, or when you attempt to configure your computer as a multiple-boot system. For example, setup programs for other operating systems might not be compatible with Windows XP Professional, and might attempt to overwrite the boot sector or startup files.
When configuring a multiple-boot system on x86-based systems, you must install other operating systems, such as Microsoft Windows 95 and Microsoft Windows 98, before installing Windows XP Professional. To avoid boot sector problems, install Windows operating systems on different partitions in the following order:
Windows 95, Windows 98, or Microsoft Windows Millennium Edition (Windows Me)
Microsoft Windows NT Workstation version 4.0 with Service Pack 4 or later
Microsoft Windows NT Server version 4.0 with Service Pack 4 or later
Microsoft Windows 2000 Professional
Windows XP Professional
If you do not follow the preceding order, you might lose the ability to start Windows XP Professional. To restore the ability to start your system, use Recovery Console fixboot command as described in Troubleshooting Disks and File Systems in this book.
Note
For a multiple-boot computer that participates in a Windows 2000 domain, use a different computer name for each operating system installation to avoid security identifier (SID) issues.
Leave partitions with Windows 95, Windows 98, or Windows Me installed as FAT16 or FAT32, because these operating systems are not compatible with NTFS. In addition, be aware of the following limitations when running Windows NT 4.0:
Computers running Windows NT 4.0 cannot access FAT32 partitions. For a multiple-boot computer running Windows NT 4.0 and Windows 95, Windows 98, or Windows Me, you must use a FAT16 formatted system partition.
Computers running Windows NT 4.0 require Service Pack 4 or later to access NTFS volumes previously mounted by Windows 2000 or Windows XP Professional.
Computers running Windows NT 4.0 cannot access files stored by using the Encrypting File System.
For more information about file system interoperability, see File Systems in this book. For more information about the Encrypting File System, see Encrypting File System in this book.
For x86-based systems, Microsoft Windows 2000 Setup might overwrite the Windows XP Professional versions of system files, Ntldr and Ntdetect.com, if you install Windows 2000 after Windows XP Professional. You cannot use Windows 2000 versions of Ntldr and Ntdetect.com to start Windows XP Professional. To restore these system files, use the procedure that follows.
To restore Windows XP Professional versions of Ntldr and Ntdetect.com on x86-based systems
Start Recovery Console by using the Windows XP Professional operating system CD.
Navigate to the system partition root and type the following commands from the Recovery Console prompt:
copydrive:\i386\ntldr
copydrive:\i386\ntdetect.com
In the preceding two commands, drive represents the letter of the CD ROM that holds the Windows XP Professional installation files.
Answer the Overwrite system? (Yes/No/All): prompts by pressing Y.
Restart the computer.
Using Recovery Console Commands
Recovery Console provides a list of commands that you can use for troubleshooting. When using Recovery Console, you can view and reuse previous commands by pressing the UP ARROW and DOWN ARROW keys, which move you forward or backward through your command history.
For the list of Recovery Console commands that follow, brackets ([]) enclose optional parameters and a pipe (|) separates mutually exclusive choices. Recovery Console commands and parameters are not case sensitive.
Attrib
Use the attrib command to change the file attributes for a single file or folder. Use the following syntax:
attrib-|+[c][h][r][s] [drive:][path]filename>
Parameter
Description
+
Sets an attribute.
-
Clears an attribute.
c
Sets or clears a compressed file attribute.
h
Sets or clears a hidden file attribute.
r
Sets or clears a read-only file attribute.
s
Sets or clears a system file attribute.
drive:
Specifies the drive letter to use.
path:
Specifies the directory path to use.
Follow these guidelines for using the attrib command:
You must set or clear at least one attribute.
You can change attributes for only one file or directory at a time.
You can view attributes by using the dir command.
Do not separate attribute parameters with spaces.
You can set multiple attributes simultaneously:
To change multiple attributes in the same way, use either the set or clear parameter (+ or -). Include all the attribute options to be changed, and do not separate them with spaces. For example, to set the compressed, hidden, and read-only attributes for a single file, use the following syntax:
attrib +chr filename
To change multiple attributes in different ways, use the set parameter (+) and include all the attribute letters to be set, followed without a space by the clear parameter (-) and all the attribute letters to be cleared. For example, to set the compressed and hidden file attributes and to clear the read-only file attribute, use the following syntax:
attrib +ch-r filename
Batch
Use the batch command to run the commands specified in a text file. Use the following syntax:
batchinputfile [outputfile]
Parameter
Description
inputfile
Specifies the text file (by using [drive:][path][filename] format) that contains the list of commands you want to carry out.
outputfile
If specified, stores the output of the Batch command in the specified file. If you do not specify a value for outputfile, the Batch command displays its output on the screen. Specify outputfile by using [drive:][path][filename] format.
The batch command cannot call itself recursively. Do not include the batch command in the file specified by the inputfile parameter.
Bootcfg
For x86-based systems, use the bootcfg command to scan your hard disks and use the information to modify the contents of the Boot.ini file or rebuild a new copy. Use the following syntax:
Adds a Windows installation to the operating system boot menu list.
/default
Sets the default boot menu.
/list
Lists the entries already in the boot menu list.
/rebuild
Scans hard disks for Windows installations and to select which to add.
/scan
Scans all disks for Windows installations and display the results.
Always back up the Boot.ini file before modifying it. For more information about the Boot.ini file, see Troubleshooting Startup in this book.
Cd or Chdir
Use the cd or chdir command to display the name of the current volume or directory, or to change to the folder specified. Use the following syntax:
cd [path]|[..]|[drive:]
or
chdir [path]|[..]|[drive:]
Parameter
Description
path
Specifies the directory that you want to change to.
..
Displays the parent folder.
drive:
Specifies the drive that you want to change to.
If you want to display the current volume and folder, use the cd or chdir command without parameters.
Cd and Chdir treat spaces as delimiters, requiring that a space precede all arguments, including double periods. Use quotation marks to enclose a path or file name that contains a space.
Chkdsk
Use the chkdsk command to check a volume, and if needed, to repair the volume. Also, use Chkdsk to recover and move readable information before marking bad sectors as unusable. Use the following syntax:
chkdsk [drive:] [/p]|[/r]
You can use Chkdsk without parameters. When you do not specify a volume, Chkdsk runs on the current volume.
Parameter
Description
drive:
Specifies the volume that you want Chkdsk to check.
/p
Performs an exhaustive volume check. This parameter does not make any changes to the volume.
/r
Locates bad sectors and recovers readable information before marking them as unusable. Implies /p.
Chkdsk requires the file Autochk.exe. If Chkdsk cannot find Autochk in the systemroot\System32 directory, it attempts to locate Autochk on the Windows XP Professional installation CD. If you are using a multiple boot configuration, verify that you are issuing this command from the volume containing Windows XP Professional.
Cls
Use the cls command to clear the screen and redisplay the command prompt. Use the following syntax:
cls
Copy
Use the copy command to copy a single file to a specified location. Use the following syntax:
copysourcedestination>
Parameter
Description
source
Specifies the file (by using [drive:][path][filename] format) that you want copied.
destination
Specifies the destination (by using [drive:][path][filename] format) where you want to copy the source file.
The following also applies to the copy command:
You cannot use wildcard characters (* and ?) with the copy command.
If you do not specify a destination directory, the copy command uses the current folder by default.
If you do not specify a destination file name, the copy command uses the existing file name by default.
If the destination file name already exists, you are warned before overwriting it.
Compressed files from the Windows XP Professional operating system CD are automatically expanded as they are copied.
Del or Delete
Use the del or delete command to delete a file or folder. Use the following syntax:
del [drive:][path]filename
or
delete [drive:][path]filename>
Parameter
Description
drive:
Specifies the volume of the file you want to delete.
path
Specifies the directory of the file you want to delete.
filename
Specifies the file you want to delete.
You cannot use wildcard characters with this command.
Dir
Use the dir command to display a list of the files and folders in a directory. Use the following syntax:
dir [drive:][path][filename]
Parameter
Description
drive:
Specifies the volume of the directory for which you want a listing.
path
Specifies the directory for which you want a listing.
filename
Specifies the file for which you want a listing.
In Recovery Console, the dir command functions differently, listing all folders and files, including those with hidden and system attributes set. For each file and subdirectory, the dir command lists its attributes (if they apply) by using the following abbreviations.
a
Archive
c
Compressed
d
Directory
e
Encrypted
h
Hidden
p
Reparse point
r
Read-only
s
System file
You cannot use wildcard characters with this command.
Disable
Use the disable command to disable a service or driver. Use the following syntax:
disableservicename>
Parameter
Description
servicename
Specifies the service or driver that you want to disable.
Use the related command listsvc to view a list of service and driver names for your system. The disable command displays the previous start type of a service before changing it to SERVICE_DISABLED. Record this value so that you can restore the original state of a service after troubleshooting a problem.
Diskpart
Use the diskpart command to manage the partitions on your hard disk. For example, to create or delete disk partitions, use the following syntax:
Specifies the name of the device for which you want to create or delete a partition, for example, \Device\HardDisk0. To obtain the name of a device, view the output of the map command.
drive-name
Specifies the drive letter of the partition that you want to delete, for example, D:. Use only with /delete.
partition-name
Specifies the partition that you want to delete; can be used in place of the drive-name parameter. For example, \Device\HardDisk0. Use only with /delete.
size
Specifies the size, in megabytes, of the partition you want to create. Use only with /add.
If you do not use a parameter, a user interface for managing your partitions appears.
Caution
This command can damage your partition table if the disk has been upgraded to dynamic disk. Do not modify the structure of dynamic disks unless you are using the Disk Management snap-in.
Enable
Use the enable command to enable or change the startup type of a service or driver. Use the following syntax:
enableservicename[start_type]
Parameter
Description
servicename
Specifies the service or driver that you want to enable.
start_type
Specifies the startup type for a service or driver. Valid values are:
SERVICE_BOOT_START
SERVICE_SYSTEM_START
SERVICE_AUTO_START
SERVICE_DEMAND_START
Use the related command listsvc to view a list of service and driver names for your system. The enable command displays the previous start type of the service before changing it. Record this value so that you can restore the original state of the service after troubleshooting a problem.
If you do not specify a new start type, the enable command displays the previous start type.
For more information about enabling or disabling services for troubleshooting, see Troubleshooting Startup in this book.
Exit
Use the exit command to close Recovery Console and restart your computer. Use the following syntax:
exit
Expand
Use the expand command to expand a compressed file stored on the Windows XP Professional operating system CD or in a cabinet (.cab) file, and copy it to a specified destination. Use the following syntax:
Specifies the file you want to expand (by using [drive:][path][filename] format). You cannot use wildcard characters (* and ?).
target
Specifies the destination folder and/or file name for the new file using [drive:][path][filename] format.
/f:filespec
Specifies the specific file(s) you want to expand if the source contains more than one file. Wildcards are optional.
/y
Specifies that the confirmation prompt that appears when attempting to overwrite an existing file is not required.
/d
Specifies that files display, but does not expand the files in the cabinet file.
Fixboot
Use the fixboot command to rewrite the boot sector code to the system volume. This is useful for repairing a corrupted boot sector on x86-based systems. If you need to replace the boot sector of a volume that is not the system volume, then you must specify the appropriate drive letter. Use the following syntax:
fixboot [drive:]
Parameter
Description
drive:
Specifies the volume drive letter on which to rewrite a new boot sector.
If you do not specify a drive, the default is the system boot volume.
Fixmbr
Use the fixmbr command to rewrite the master boot code of the master boot record (MBR) of the startup hard disk. This command is useful for repairing corrupted MBRs. Use the following syntax:
fixboot [device-name]
Parameter
Description
device-name
Specifies the name of the device that needs a new MBR, for example, \Device\HardDisk1.
If you do not specify a device, the default is disk 0. If disk 0 is not the device that needs repairing, you can obtain the device name of other disks by using the map command.
If the fixmbr command detects an invalid or nonstandard partition table signature, it prompts you for permission before rewriting the MBR.
Use this command with care because it can damage your partition table if any one or more of the following applies:
A virus is present and a third-party operating system is installed on the same computer.
A nonstandard MBR is installed by a third-party disk utility.
A hardware problem exists.
Always run antivirus software before using this command.
Running the fixmbr command overwrites only the master boot code, leaving the existing partition table intact. If corruption in the MBR affects the partition table, running the fixmbr command is unlikely to resolve the problem. For more information, see Troubleshooting Disks and File Systems in this book.
Format
Use the format command to format the specified volume to the specified file system. Use the following syntax:
format [drive:] [/q] [/fs:file_system]
Parameter
Description
drive:
Specifies the drive letter for the volume you want to format.
/q
Specifies a quick format (clears only the table of contents).
/fs:file-system
Specifies the file system you want to use. Valid values for file-system include FAT, FAT32, and NTFS.
Consider the following points before using the Format command:
If a file system is not specified, the format command defaults to the NTFS file system.
Choosing FAT formats a volume as FAT16. FAT16 volumes cannot be larger than 4 GB. Limit FAT16 partitions to 2 GB to increase storage efficiency, and to maintain compatibility with Microsoft MS DOS, Windows 95, Windows 98, and Windows Me.
Windows XP Professional can format FAT32 volumes up to 32 GB in size. For larger volumes, use NTFS.
For more information about these file systems, see File Systems in this book.
Help
Use the help command to view Help information for Recovery Console commands. Use the following syntax:
help [command]
Parameter
Description
command
Specifies the command for which you want to view Help information.
Use the command parameter to specify a name of any Recovery Console command.
If you do not specify a parameter, Help lists information about all the supported commands.
Listsvc
Use the listsvc command to view details about the services and drivers on your system, including service start types. Use the following syntax:
listsvc
Use the listsvc command together with the disable and enable commands. The information displayed is extracted from the System registry file that is located in the systemroot\System32\Config folder. If the file System is damaged or missing, the information displayed might be inaccurate. For more information about enabling or disabling services for troubleshooting, see Troubleshooting Startup in this book.
Logon
Use the logon command to detect and log on to Windows installations. Use the following syntax:
logon
You must correctly enter the local Administrator password within three attempts or the computer restarts.
Map
Use the map command to list all drive letters, file system types, volume sizes, and mappings to physical devices that are currently active. Use the following syntax:
map [arc]
Parameter
Description
arc
Use the arc parameter to force the use of the Advanced RISC Computing (ARC) specification format to describe paths instead of using device paths. You can use this information to create or repair the Boot.ini file.
The map command might not work correctly with systems using dynamic disk features.
Md or Mkdir
Use the md or mkdir command to create a new directory or subdirectory. Use the following syntax:
md[drive:]path mkdir[drive:]path>
Parameter
Description
drive:
Specifies the volume on which to create a folder.
path
Specifies the name of the folder to create.
You cannot use wildcard characters with this command.
This command might not display all the volumes on a disk or the correct volume sizes on dynamic disks.
More or Type
Use the more or type command to display the contents of a text file. Use the following syntax:
more [path\]filename
 type [path\]filename>
Parameter
Description
filename
Specifies the file name to view.
path
Specifies the folder where the file is located.
If a text file is too large to fit on one screen, use the following page viewing options:
ENTER to scroll down one line at a time
SPACEBAR to scroll down one page at a time
ESC to quit viewing the text file
Rd or Rmdir
Use the rd or rmdir command to delete a directory or subdirectory. Use the following syntax:
rm[drive:]path rmdir[drive:]path>
Parameter
Description
drive:
Specifies the volume on which to delete a folder.
path
Specifies the name of the folder to delete.
You cannot use wildcard characters with this command.
Ren or Rename
Use the ren or rename command to rename a file or directory. Use the following syntax:
Specifies the volume drive letter on which the file to be renamed resides.
path
Specifies the path to the file or folder to be renamed.
name1
Specific the file or folder to be renamed.
name2
Specifies the new name for the file or folder.
You cannot use wildcard characters with this command.
Set
Use the set command to set Recovery Console environment variables. Use the following syntax:
set [variable = value]
Recovery Console disables the set command by default and you must use the Group Policy snap-in to enable the set command. For more information about enabling the set command, see Customizing Recovery Console earlier in this appendix.
Environment Variable
Description
AllowWildCards
Set to TRUE to enable wildcard character (* and ?) support for some commands, such as DEL, that do not otherwise support them.
AllowAllPaths
Set to TRUE to allow access to all files and folders on the computer.
AllowRemovableMedia
Set to TRUE to allow files to be copied to removable media, such as floppy disks.
NoCopyPrompt
Set to TRUE to suppress the confirmation prompt that appears when overwriting a file.
To display the list of current environment variables, use the set command without specifying a parameter.
Systemroot
Sets the current directory to the systemroot directory of the Windows XP Professional installation with which you are currently working. Use the following syntax:
systemroot
Backup
Troubleshooting a problem eventually requires that you test one or more possible solutions and observe the results. Therefore, you must be able to restore system settings if the changes you make have negative effects. The Backup tool (Ntbackup.exe) allows you to save system files, application files, and data files that might be at risk. Backups enable you to undo sweeping changes and recover data if troubleshooting does not proceed as expected.
For example, you find and apply several changes suggested in Microsoft Knowledge Base articles. Although the problem disappears, you are unable to identify the change or combination of changes responsible. Using a backup set created before you applied the changes, you can restore the problem configuration and re-test possible solutions individually until you identify the exact steps required to resolve the problem. Identifying the exact steps required avoids applying unnecessary changes that might lead to other problems.
Whether you use Backup or an equivalent backup program with similar functionality, enable the Verify data and Save system state options if available. Enabling data verification causes Backup to check that files on disk are identical to those stored on the backup media immediately after a backup or restore operation. Enabling the Save system state option causes Backup to include system state information in the list of items to save to backup media. Always follow the backup media manufacturer s recommendations, especially when reusing tape cartridges.
To save system state information in Backup
In the Run dialog box, type ntbackup.
In the Backup Utility wizard, click Advanced Mode, click the Backup tab, and then select System State.
In the Backup destination box, select File or a backup device installed on your computer.
In the Backup media or file name box, type the destination file name.
Click Start Backup.
If you want to include other files, such as application or personal data files, select the files to save before clicking Start Backup.
There are two points that you need to consider when performing backup and restore operations.
Backups might not contain the latest data
If data on backup media is not current, a restore operation might replace application files, drivers, service packs, or hotfixes by copying older files to your system. Always maintain a record of recent driver or service pack changes in case you need to reapply these changes after restoring files.
Plug and Play redetects hardware and might re-install drivers
Windows XP Professional redetects any hardware that you installed since the last backup and, after restoring the system state from a backup, might request drivers from the Windows XP Professional operating system or from removable disks.
For more information about using Backup to save and restore files, see Windows XP Professional Help and Support Center and Backup and Restore in this book.
Automated System Recovery
Automated System Recovery (ASR) is a Backup (Ntbackup.exe) and Windows XP Professional Setup option that enables you to restore the ability to start Windows XP Professional when other recovery methods are ineffective or not available. For example, if a hardware problem or virus activity causes disk corruption problems that prevent you from starting in safe mode, using Recovery Console, or using the Last Known Good Configuration.
The ASR user interface consists of the following two parts:
The ASR wizard provided by Backup
The ASR restore option provided by Windows XP Professional Setup
ASR automates the process of saving and restoring system state information.
For more information about Automated System Recovery, see Windows XP Professional Help and Support Center and Backup and Restore in this book.