Chapter 11 -- Designing Menus and Toolbars
Menus and toolbars provide a structured and accessible route for users to leverage the commands and tools contained in your applications. Proper planning and design of menus and toolbars will ensure that the key functionality of your applications is exposed, and that users will not become frustrated as they try to use your applications.
For information about customizing Visual FoxPro toolbars, see Chapter 3, Configuring Visual FoxPro, in the Installation Guide.
This chapter discusses:
- Using Menus in Your Applications
- Creating Custom Toolbars
- Testing and Debugging a Menu System
- Customizing a Menu System
Using Menus in Your Applications
Users often browse menus before looking elsewhere for information about your application. If your menus are well designed, users can organize their understanding of the application by developing a mental model based on the menu organization and content alone. With the Visual FoxPro Menu Designer, you can create menus that enhance the quality of your applications.
Each part of a Visual FoxPro application can have its own menu system, or set of menus. The following sections describe how to create a menu system, but don't explain how to incorporate the menu system into your application. For details about adding menus to an application, see Chapter 13, Compiling an Application.
The following sections describe:
- Creating a Menu System
- Planning a Menu System
- Creating Menus, Shortcut Menus, Menu Items, and Submenus
- Assigning Tasks to a Menu System
Creating a Menu System
Much of the work involved in creating a menu system is done in the Menu Designer, where you create the actual menus, submenus, and menu options.
Menu Designer

Creating a menu system involves several steps. Regardless of the size of your application and the complexities of the menus you plan to use, you should:
- Plan and design the system.
Decide what menus you need, where they appear in the interface, which ones need submenus, and so on. For more information about planning menu systems, see Planning a Menu System later in this chapter.
- Create the menus and submenus.
Define the menu titles, menu items, and submenus using the Menu Designer.
- Assign tasks to the system so that it does what you want.
Specify tasks for the menus to perform, such as displaying forms and dialog boxes. Additionally, include setup code and cleanup code if appropriate. Setup code executes before the menu system is defined and can include code for opening files, declaring variables, or placing the menu system on a stack so that it can be retrieved later. Cleanup code contains code to be executed after the menu definition code, and makes menus and menu items available or unavailable for selection.
- Generate the menu program.
- Run the program to test the system.
Planning a Menu System
The usefulness of an application can depend on the quality of its menu systems. If you invest planning time in your menus, users will accept them readily and learn them quickly.
While designing your menu system, consider the following guidelines:
- Organize the system according to the tasks users will perform, not according to the hierarchy of programs in the application.
Users can form a mental model of how the application is organized by looking at the menus and menu items. To design these menus and menu items effectively, you should know how your users will think about and accomplish their work.
- Give each menu a meaningful title.
- Organize menu items according to their expected frequency of use, their logical sequence, or their alphabetical order.
If you can t predict the frequency and can t determine a logical order, then organize menu items alphabetically. Alphabetical ordering is particularly effective when a menu contains more than eight items. With so many items, the user spends time scanning them; alphabetical ordering facilitates scanning.
- Put separator lines between logical groups of menu items.
- Limit the number of items on a menu to one screen.
- If the number exceeds the length of a screen, create submenus for appropriate menu items.
- Choose access keys and keyboard shortcuts for menus and menu items.
For example, ALT+F could be an access key for a File menu.
- Use words that clearly describe the menu items.
Use common words rather than computer jargon, and use simple, active verbs to indicate what actions will result from choosing each menu item. Don t use nouns as verbs. Additionally, describe the menu items using parallel construction. For example, if you use single words for all the items, then use the same part of speech for all of them.
- Use mixed upper and lowercase letters in menu items.
Tip To see an example of a menu system, run the Tasmanian Traders application, Tastrade.app, located in the Visual Studio \Samples\Vfp98\Tastrade directory.
Creating Menus, Shortcut Menus, Menu Items, and Submenus
After planning your menu system, you can create it with the Menu Designer. You can create menus, shortcut menus, menu items, submenus of menu items, lines that separate groups of related menu items, and so on. The following sections provide the details.
Creating Menus
You can create menus by customizing the existing Visual FoxPro menu system or by developing your own menu system. To start with the existing Visual FoxPro menu system, use the Quick Menu feature.
To create a menu system with Quick Menu
- From the Project Manager, select the Other tab, select Menus, and then select New.
- Select Menu.
The Menu Designer appears.
- From the Menu menu, choose Quick Menu.
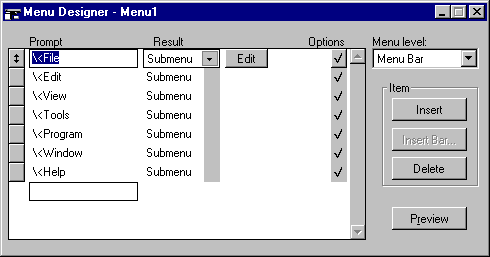
The Menu Designer now contains information about the main Visual FoxPro menus.
A menu system created with the Quick Menu feature
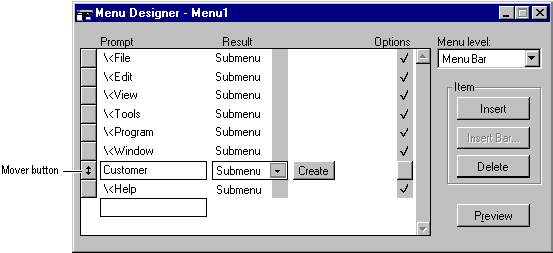
- Customize the menu system by adding or changing menu items.
For example, insert a Customer menu before the Help menu by choosing the mover button associated with the Help menu, choosing the Insert button, and then typing Customer in the Prompt column. The result looks like this:
A customized menu system
Tip Drag mover buttons to change the location of menus on the menu bar.
If you need a Help menu, make it the last menu on the menu bar so that users can find it quickly.
Before you can use your menu in an application, you must generate it.
To generate a menu
- From the Menu menu, choose Generate.
Visual FoxPro prompts you to save the menu system in a file with an .mnx extension. This file is a table that will store all the information about the menu system. After you save the menu system, Visual FoxPro prompts for an output file with an .mpr extension. This file will contain the generated menu program.
Creating Shortcut Menus
Shortcut menus appear when you click the right mouse button on a control or object, and provide a quick way to expose all of the functions that apply to just that object. You can use Visual FoxPro to create shortcut menus, then attach these menus to controls. For example, you can create a shortcut menu containing the commands Cut, Copy, and Paste that will appear when a user right-clicks on data contained in a Grid control.
To create a shortcut menu
- From the Project Manager, select the Other tab, select Menus, and then choose New.
- Choose Shortcut.
The Shortcut Designer appears.
Once you are in the Shortcut Menu designer, the process for adding menu items is the same as it is for creating menus.
For an example of shortcut menus, run Solution.app in the Visual Studio \Samples\Solution\Vfp98\Solution directory.
Creating SDI Menus
SDI menus are menus that appear in single-document interface (SDI) windows. To create an SDI menu you must indicate that the menu will be used on an SDI form while you're designing the menu. Other than that, the process of creating an SDI menu is the same as that for creating a normal menu.
To create an SDI menu
- While the Menu Designer is open, choose General Options from the View menu, and select Top-Level Form.
Creating Menu Items
After creating menus, you can place menu items on the menus. Menu items can represent Visual FoxPro commands or procedures that you want the user to execute, or menu items can contain submenus that offer additional menu items.
To add menu items to a menu
- In the Prompt column, select the menu title to which you want to add menu items.
- In the Result box, select Submenu.
A Create button appears to the right of the list.
- Choose the Create button.
An empty design window appears. In this window, you enter the menu items.
- In the Prompt column, type the names of the new menu items.
Creating Submenus
For each menu item, you can create a submenu containing additional menu items.
To create a submenu
- In the Prompt column, select the menu item to which you want to add a submenu.
- In the Result box, select Submenu.
A Create button appears to the right of the list. If a submenu already exists, an Edit button appears instead.
- Select Create or Edit.
- In the Prompt column, type the names of the new menu items.
Adding Menus Programmatically
Though you typically create menus and menu items using the Menu Designer, you can also create them using Visual FoxPro commands. For example, you can create a menu using DEFINE PAD, a submenu using DEFINE POPUP, and items on the submenu using a series of DEFINE BAR commands.
Grouping Menu Items
For readability, separate groups of similar menu items with dividing lines. For example, in Visual FoxPro, the Edit menu has a line separating the Undo and Redo commands from the Cut, Copy, Paste, Paste Special, and Clear commands.
Grouped menu items

To group menu items
- In the Prompt column, type \-. This creates a dividing line.
- Drag the button to the left of the \- prompt to move the dividing line until it appears where you want it.
Saving a Menu as HTML
You can use the Save As HTML option on the File menu when you're creating a menu to save the contents of a menu as an HTML (Hypertext Markup Language) file.
To save a form as HTML
- Open the menu.
- Choose Save As HTML on the File menu. (You will be asked to save the menu if it has been modified.)
- Enter the name of the HTML file to create and choose Save.
Including Menus in an Application
Once you create a menu system, you can include it in your application.
To include a menu system in your application
- Add the .mnx file to your project, then build the application from the project. For more information about building your application, see Chapter 13, Compiling an Application.
Attaching Shortcut Menus to Controls
Once you create and generate a shortcut menu, you can attach it to a control. Shortcut menus typically appear when a user right-clicks on a control. You can attach a shortcut menu to a particular control by entering a small amount of code in the right-click event of the control.
- Select the control to which you want to attach the shortcut menu.
- In the Properties window, choose the Methods tab and select Right Click Event.
- In the code window, type DO menu.MPR, where menu is the name of the shortcut menu.
Note Be sure to use the .mpr extension when referencing shortcut menus.
Attaching SDI Menus to Forms
Once you create an SDI menu, you can attach it to an SDI form. In addition, you must:
- Set the form s ShowWindow property.
- Add a DO statement to the form s Init event.
To attach an SDI menu to a form
- In the Form Designer, set the form s ShowWindow property to 2 As Top Level Form.
- In the Init event of the form, call the menu.
For example, if your menu is called
SDIMENU.MPR, add this code:DO SDIMENU.MPR WITH THIS,.T.
Assigning Tasks to a Menu System
As you create a menu system, you should consider ease of access to the system, and you must assign tasks to the system. You must give menus and menu items tasks to perform, such as displaying forms, toolbars, and other menu systems. You should define access keys to permit entry to the menu system. You can also add keyboard shortcuts and enable or disable menu items for more control.
Assigning Access Keys
Well-designed menus have access keys for quick keyboard access to the menu functionality. The access key is represented by the underlined letter in the menu title or menu item. For instance, the Visual FoxPro File menu uses F as its access key.
If you don t assign an access key to a menu title or menu item, Visual FoxPro automatically assigns the first letter as the access key. For example, the Customer menu created previously didn t have a defined access key. Accordingly, Visual FoxPro assigned the first letter (C) as the access key.
Menus with access keys

To specify the access key for a menu or menu item
- Type \< to the left of the letter you want as the access key.
For example, to set the access key to u in the Customer menu title, replace Customer with C\<ustomer in the Prompt column.
Troubleshooting If an access key for your menu system doesn t work, look for duplicate access keys.
Assigning Keyboard Shortcuts
In addition to assigning access keys, you can specify keyboard shortcuts for menus or menu items. As with access keys, keyboard shortcuts let you choose a menu or menu item by holding down one key while pressing another. The difference between access keys and keyboard shortcuts is that you can use a keyboard shortcut to choose a menu item without first displaying its menu.
Keyboard shortcuts for Visual FoxPro menu items are combinations of the CTRL or ALT key and another key. For instance, you can create a new file in Visual FoxPro by pressing CTRL+N.
To specify a keyboard shortcut for a menu or menu item
- In the Prompt column, select the appropriate menu title or menu item.
- Choose the button in the Options column to display the Prompt Options dialog box.
- In the Key Label box, press a key combination to create a keyboard shortcut.
If a menu item doesn t have a keyboard shortcut, Visual FoxPro displays (press the key) in the Key Label box.
- In the Key Text box, add the text you want to appear beside the menu item.
By default, Visual FoxPro repeats the keyboard shortcut from the Key Label box in the Key Text box. However, you can change the text in the Key Text box if you want your application to display different text. For example, if both the Key Label and Key Text were CTRL+R, you could change the Key Text value to ^R.
Note CTRL+J is an invalid keyboard shortcut because it is used to close certain dialog boxes in Visual FoxPro.
Enabling and Disabling Menu Items
You can enable or disable a menu or menu item based on a logical condition.
To enable or disable a menu or menu item
- In the Prompt column, select the appropriate menu title or menu item.
- Choose the button in the Options column to display the Prompt Options dialog box.
- Select Skip For.
The Expression Builder appears.
Expression Builder Dialog Box
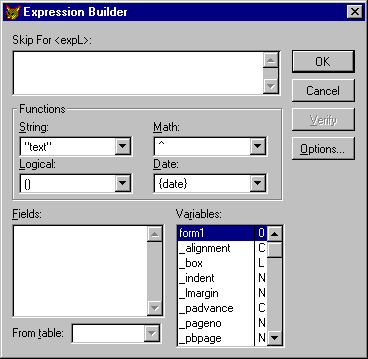
- In the Skip For box, type the expression that determines whether the menu or menu item is enabled or disabled.
If the expression evaluates to false (.F.), the menu or menu item is enabled. If the expression evaluates to true (.T.), the menu or menu item is disabled and cannot be selected or chosen. For details, see DEFINE BAR and DEFINE PAD.
Note After the menu system has been displayed, you can enable and disable menus and menu items by using the SET SKIP OF command..
Marking the State of a Menu Item
On a menu, a check mark next to a menu item indicates that it is in effect. For example, if you put a check mark next to the Credit item on the Customer menu created earlier, Credit is in effect.
At run time, you can place a check mark next to a menu item by using the SET MARK OF command.
For an example of disabling and marking the state of menu items, run Solution.app in the Visual Studio \Samples\Vfp98\Solution directory.
Assigning Tasks to Menus or Menu Items
When a menu or menu item is selected, it performs a task, such as displaying a form, a toolbar, or another menu system. To perform a task, a menu or menu item must execute a Visual FoxPro command. The command can be contained in one line, or it can be a procedure call.
Tip If you expect to use a set of commands in several places, write a procedure. The procedure should be explicitly named and written in the menu cleanup code, or somewhere where it can be referenced by any menu or object.
Performing Tasks with Commands
To perform a task, you can assign a command to a menu or menu item. A command can be any valid Visual FoxPro command, including a call to a program that exists on your path or a procedure defined in the Cleanup option of the General Options dialog box. For more information, see Creating a Default Procedure for a Menu System later in this chapter.
To assign a command to a menu or menu item
- In the Prompt column, select the appropriate menu title or menu item.
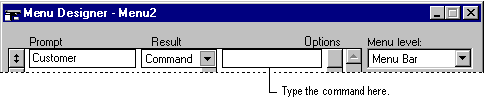
- In the Result box, select Command.
- In the box to the right of the Result box, type the appropriate command:
Assigning a command to a menu
If the command calls a procedure in the menu s cleanup code, use the DO command with the following syntax:
DO procname IN menuname
In this syntax, menuname specifies the location of the procedure. This is the name of the menu file and must have the .mpr extension. If you don t specify the location in menuname, you must specify it with SET PROCEDURE TO menuname.mpr, if the procedure is in the menu cleanup code.
Displaying Forms and Dialog Boxes
From a menu or menu item, you can display a compiled form or dialog box by calling it with a command or procedure. For example, to display a form named Orders, use the following command:
DO FORM Orders Tip When you create a menu or menu item that displays a form or dialog box, put three dots at the end of the prompt to indicate that more user input is required.
Dots after a menu item show that user input is required.

Displaying Toolbars
If you create a custom toolbar for an application, you can display it by calling it from a menu or menu item. For details, see Creating Custom Toolbars later in this chapter.
Performing Tasks with Procedures
You can assign a procedure to a menu or menu item. The way you assign a procedure depends on whether the menu or menu item has submenus.
To assign a procedure to a menu or menu item without submenus
- In the Prompt column, select the appropriate menu title or menu item.
- In the Result box, select Procedure.
A Create button appears to the right of the list. If a procedure has been defined previously, an Edit button appears instead.
- Select Create or Edit.
Assigning a procedure to a menu with submenus
- Type the appropriate code in the window.
Note You don t need to type the PROCEDURE command in the procedure editing window because Visual FoxPro generates this statement for you. The only place you need the PROCEDURE statement is in the cleanup code.
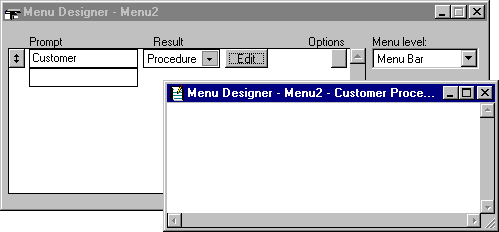
To assign a procedure to a menu or menu item with submenus
- In the Menu level box, select the level that includes the appropriate menu or menu item. For example, suppose your menu system includes the Customer menu created earlier. To assign a procedure to the Customer menu, select the Menu Bar level in the Menu Level box. Similarly, to assign a procedure to an item on the Customer menu, select the Customer level in the list.
- From the View menu, choose Menu Options.
Visual FoxPro displays the Menu Options dialog box.
Assigning a procedure to a menu with submenus
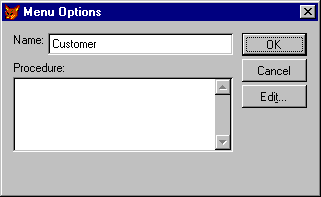
- Assign the procedure by doing one of the following:
- Write or call a procedure in the Procedure box.
-or-
- Choose Edit and then OK to open a separate editing window and write or call a procedure.
- Write or call a procedure in the Procedure box.
Adding Setup Code to a Menu System
You can customize a menu system by adding setup code to it. Setup code can include code for creating the environment, defining variables, opening necessary files, and saving or restoring menu systems with the PUSH MENU and POP MENU commands.
To add setup code to a menu system
- From the View menu, choose General Options.
- In the Menu Code area, select Setup and then choose OK.
- In the setup code window, type the appropriate setup code.
Your changes are saved when you close the Menu Designer.
Adding Cleanup Code to a Menu System
You can tailor your menu system by adding cleanup code to it. Cleanup code typically contains code that initially enables or disables menus and menu items. When you generate and run the menu program, setup code and menu definition code is processed before cleanup code.
To add cleanup code to a menu system
- From the View menu, choose General Options.
- In the Menu Code area, select Cleanup and then choose OK.
- In the code window, type the appropriate cleanup code.
Your changes are saved when you close the Menu Designer.
Tip If your menu is the main program in an application, include a READ EVENTS command in the cleanup code and assign a CLEAR EVENTS command to the menu command used to exit the menu system. This prevents your run-time applications from terminating prematurely.
Controlling Menus at Run Time
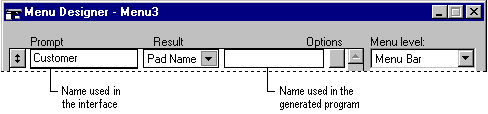
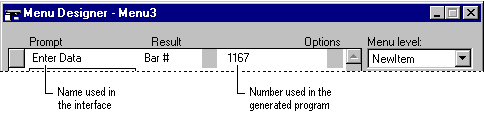
Each Visual FoxPro menu has two names, and each menu item has a name and a number. Visual FoxPro uses one name in the user interface and the other name or number in the generated menu program (.mpr). You can use these names or numbers to reference and control menus and menu items at run time. If you don't provide a name or number when creating menus and menu items, Visual FoxPro creates one when you generate the menu program.
For an example of adding and removing menu items at run time, see Solution.app in the Visual Studio \Samples\Vfp98\Solution directory.
Caution Avoid using Visual FoxPro-generated names and numbers in code, because they change each time you generate the menu program. If you refer to a generated name or number, your code might fail.
In the Menu Designer, the Prompt column shows what appears in the user interface, and the column to the right of the Result box shows what appears in the generated program.
Using Pad Name to reference a menu pad in the generated menu program
Using Bar # to reference a menu item in the generated menu program
To specify a name for a menu pad
- In the Prompt column, select the appropriate menu title.
Note The Result column must show Command, Submenu, or Procedure not Pad Name.
- Choose the button in the Options column to display the Prompt Options dialog box.
- In the Pad Name box, type the name of your choice.
- Choose OK to return to the Menu Designer.
To specify a number for a menu item
- In the Prompt column, select the appropriate menu item.
Note The Result column must show Command, Submenu, or Procedure not Bar #.
- Choose the button in the Options column to display the Prompt Options dialog box.
- In the Bar # box, type the number of your choice.
- Choose OK to return to the Menu Designer.
Tip If you use the Quick Menu feature, don t change the names or numbers that Visual FoxPro provides for system menus or menu items; otherwise, you might get unpredictable results when you run the generated menu program.
Creating Custom Toolbars
If your application includes repetitive tasks that users perform frequently, you can add custom toolbars to simplify or speed up the tasks. For example, if users typically print a report by choosing a menu command, you can simplify the task by providing a toolbar with a print button.
The following sections describe how to create custom toolbars for your applications. For details about customizing the toolbars that come with Visual FoxPro, see Customize Toolbar Dialog Box.
The following sections discuss:
- Defining a Toolbar Class
- Adding Objects to a Custom Toolbar Class
- Adding Custom Toolbars to Form Sets
Defining a Toolbar Class
If you want to create a toolbar that contains buttons not already found on existing toolbars, you can do so by defining a custom toolbar class. Visual FoxPro provides a Toolbar base class from which you can create the class you need.
After defining a toolbar class, you can add objects to the toolbar class, then define the properties, events, and methods for the custom toolbar. Finally, you can add the toolbar to a form set.
To define a custom toolbar class
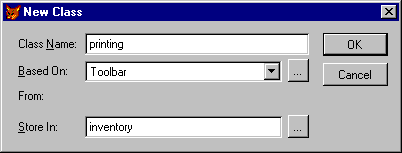
- From the Project Manager, select Classes and then choose New.
- In the Class Name box, type the name of your class.
- From the Based On box, select Toolbar to use the Toolbar base class.
-or-
Choose the dialog button to choose another toolbar class.
- In the Store In box, type the name of the library in which you want to save the new class.
-or-
Choose the dialog button to select an existing library.
- Add objects to the new toolbar class.
For example, you could store a printing class based on the Toolbar base class in an inventory library.
Creating a new class in the New Class dialog box
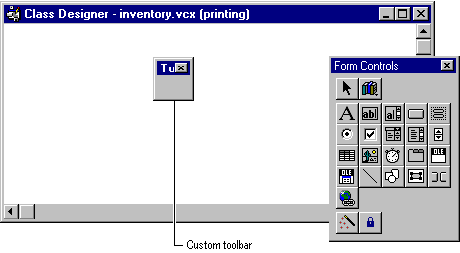
When you complete the New Class dialog box, the Class Designer appears.
A new custom toolbar in the Class Designer
You can also define a toolbar class by doing one of the following:
- Choosing New from the File menu and then choosing Class.
- Using the CREATE CLASS or MODIFY CLASS command.
- Defining the class programmatically with the DEFINE CLASS command.
Adding Objects to a Custom Toolbar Class
After creating a custom toolbar class, you can add objects to it, including any objects supported by Visual FoxPro. For example, you can add objects from the Controls toolbar.
To add objects to your custom toolbar class
- Open the class library containing the custom toolbar class, and then open the class.
- On the Form Controls toolbar, choose an object you want to add.
- Place the object on the custom toolbar by selecting the custom toolbar.
- Repeat steps 2 and 3 until the custom toolbar is complete.
- Reorganize the objects on the custom toolbar, if appropriate.
For example, you can size objects, move them by dragging them, delete them by pressing the DELETE key, or add extra space between them by inserting Separator objects from the Form Controls toolbar.
Note You can move only one object at a time.
- Set properties of the toolbar in the Properties window.
- Save the custom toolbar class.
Tip You can add a bitmap or icon to a toolbar button by setting its Picture property.
Adding Custom Toolbars to Form Sets
After defining a toolbar class, you can create a toolbar from it. You can coordinate toolbars and forms by using the Form Designer or writing code.
Coordinating Toolbars and Forms in the Form Designer
You can add a toolbar to a form set so that the toolbar opens along with the forms in the form set. You cannot add the toolbar directly to the form.
To add a toolbar to a form set using the Form Designer
- Register and select the library containing the toolbar class.
- Open the form set with which you want to use the toolbar class, click the View Classes button on the Form Controls toolbar, and then select the toolbar class from the list displayed.
- From the Form Controls toolbar, choose the toolbar class.
- Click in the Form Designer to add the toolbar, and then drag the toolbar to its appropriate location.
Visual FoxPro adds the toolbar to the form set. If a form set isn t open, Visual FoxPro prompts you for one.
- Define the actions of the toolbar and its buttons (see Defining Toolbar Actions later in this chapter).
Tip To determine an object s class, look at its ToolTip in the Form Controls toolbar.
For more information on how to register and select the library containing the toolbar class, see Adding Classes to Forms, Form Sets, and Toolbars in Chapter 3, Object-Oriented Programming.
Coordinating Toolbars and Forms Using Code
In addition to using the Form Designer, you can add toolbars to form sets by using code.
To add a toolbar to a form set using code
- In the form set s Init event, use the SET CLASSLIB command to specify the library containing the toolbar class, and then create a toolbar from that class in the form set.
For example, to add and display the toolbar tbrPrint, which is based on the printing class in the inventory class library, add the following code to the form set s Init event:
SET CLASSLIB TO inventory THIS.AddObject("tbrPrint","printing") THIS.tbrPrint.Show Note If the toolbar class does not define the actions of the toolbar and its buttons, you must define the actions in the event procedures associated with the toolbar and its buttons. For more information, see Defining Toolbar Actions later in this chapter.
Example: Creating a Custom Toolbar
You can define all aspects of a toolbar in code. For example, if you add the following code to a form set s Init event, when the form set is loaded Visual FoxPro creates and displays the toolbar defined in the code. This toolbar contains two buttons.
Toolbar with two buttons
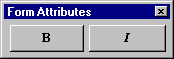
When chosen, these buttons change the font attributes of the form frmForm1 in the form set.
Form Set Init Event Code
| Code | Comments |
| Adds a toolbar of the class mytoolbar to the current form set and makes the toolbar visible. This code is in the form set s Init event. |
Class definition code
| Code | Comments |
| Start of the class definition: one toolbar with a command button, a separator, and another command button. |
| Sets properties of the toolbar object. |
| Sets properties of the controls. Notice that there are no Top or Left property settings for controls on a toolbar. Controls on a toolbar are automatically positioned in the order they are added. The FontBold property of cmdItalic is set to false (.F.) because FontBold is true (.T.) by default. |
| When the toolbar is activated, the font attributes of the two command buttons are set to reflect the Bold and Italic font settings of frmForm1. |
| When the user clicks cmdBold, the FontBold setting of frmForm1 is reversed, and the FontBold setting of cmdBold is set to match it. |
| When the user clicks cmdItalic, the FontItalic setting of frmForm1 is reversed, and the FontItalic setting of cmdItalic is set to match it. |
| End of the class definition. |
Setting Properties of Custom Toolbars
While designing a custom toolbar, you can set its properties. For example, you can set the Movable property to allow the user to move the toolbar.
Additionally, you can use methods and events to control custom toolbars. For example, you can use the Dock method to dock or float a toolbar, and you can use the BeforeDock event and AfterDock event to control what happens before and after a toolbar is docked.
Defining Toolbar Actions
After creating a toolbar, you must define the actions associated with the toolbar and its objects. For example, you must define what happens when the user clicks the toolbar or one of its buttons.
To define a toolbar action
- Select the object for which you want to define an action: the toolbar or one of its buttons.
- In the Properties window, choose the Methods tab.
- Edit the appropriate event.
- Add the code that specifies the action.
Additionally, you can set properties and methods of the toolbar and its objects.
Coordinating Menus and Custom Toolbars
If you create a toolbar, you should synchronize menu commands with their corresponding toolbar buttons. For example, if you enable a toolbar button, you should enable its corresponding menu command.
You should design and create your application to:
- Perform the same actions when the user chooses associated toolbar buttons and menu items.
- Coordinate the enabling and disabling of associated toolbar buttons and menu items.
Follow these general steps when coordinating menu items and toolbar buttons:
- Create a toolbar by defining a toolbar class, add command buttons, and include the operational code in the methods associated with the Click events of the command buttons.
- Create the coordinated menu.
- Add the coordinated toolbar and menu to a form set.
Creating the Coordinated Menu
When you coordinate a menu with a toolbar, the menu items accomplish the same tasks as the associated toolbar buttons, and the menu items are automatically disabled when the associated toolbar button is disabled.
To create a menu that is coordinated with a toolbar
- In the Menu Designer, create a submenu with a descriptive prompt for every button on the toolbar.
- In the result column for each submenu item, choose Command.
- For each submenu item, call the code associated with the Click event of the appropriate toolbar command button.
For example, if the name of the button on the toolbar is
cmdA, add the following line of code in the edit box for the submenu item command:Formset.toolbar.cmdA.Click - Choose the button in the Options column to open the Prompt Options dialog box and choose Skip For.
- In the Expression Builder, enter an expression that indicates that the menu option should be skipped when the toolbar command button is not enabled.
For example, if the name of the button on the toolbar is
cmdA, enter the following expression in the Skip For box:NOT formset.toolbar.cmdA.Enabled - Generate the menu.
- Add the menu to the form set with the toolbar and run the form set.
When the user opens the menu, Visual FoxPro evaluates the Skip For condition, disabling the menu item if the associated toolbar command button is disabled. When the user chooses an item on the menu, the code in the Click event of the associated toolbar command button is executed.
Adding a Coordinated Toolbar and Menu to a Form Set
Once you have created a toolbar class and a menu that are designed to work together, it is easy to incorporate them in a form set.
To incorporate a coordinated toolbar and menu in a form set
- Add the toolbar to the form set in one of three ways:
- Drag the toolbar class from the Project Manager into the Form Designer.
- Register the toolbar class library and add the toolbar to the form set from the Controls toolbar.
- In the Init event of the form set, include code with the AddObject method to add the toolbar.
- Drag the toolbar class from the Project Manager into the Form Designer.
- In the Load event of the form set, save the existing menu and run your menu program.
For example, if your menu name is
mymenu, include the following lines of code using the PUSH MENU and DO commands:PUSH MENU _MSYSMENU DO mymenu.mpr - In the Unload event of the form set, restore the original menu with the POP MENU command:
POP MENU _MSYSMENU
If some menu commands are used more than others, you can create custom toolbars containing buttons for those commands. Then, users can simply press the buttons whenever they need the commands. However, if you create a toolbar, you should synchronize the menu commands with their corresponding buttons. For example, if you enable a button, you should enable its corresponding menu command.
Testing and Debugging a Menu System
You can preview a menu system as you design it or you can test and debug it after generating the menu program.
To preview a menu system as you design it
- In the Menu Designer, choose Preview.
When you choose Preview, the menu system you ve defined appears at the top of the screen. Additionally, the Preview dialog box displays the file name (or a temporary file name) of the menu system.
Previewing a menu system
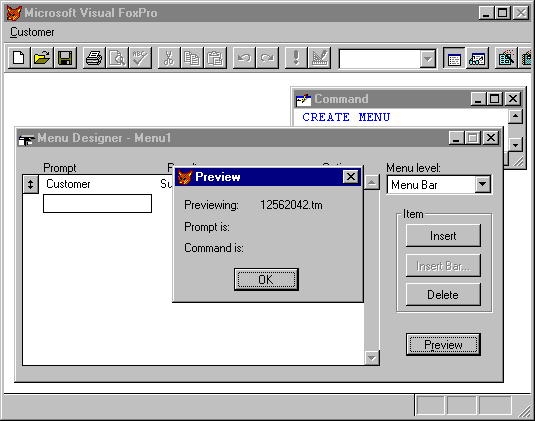
If you select a menu title or menu item, it also appears in the Preview dialog box, along with the command assigned to it, if there is one.
To test a menu system
- From the Menu menu, choose Generate.
If you ve changed the menu, Visual FoxPro prompts you to save the changes.
- In the Generate Menu dialog box, enter a name for the generated menu program by typing the name in the Output File box or by choosing the dialog button.
- Choose Generate to produce a menu program file with an .mpr extension.
- From the Program menu, choose Do to run the program.
Caution If you modify the generated menu program (the .mpr file), you ll lose the changes when you modify the menu using the Menu Designer and then regenerate the menu program.
If the menu program doesn t work as intended, use the diagnostic tools provided with Visual FoxPro. For more information, see Chapter 14, Testing and Debugging Applications.
Troubleshooting If you run an application (.exe file) in which the main program is a menu and the application terminates as soon as the menu is displayed, include the READ EVENTS command in the cleanup code. You must also assign a CLEAR EVENTS command to the menu command that allows the user to exit the menu system.
Customizing a Menu System
After creating a basic menu system, you can customize it. For example, you can create status bar messages, define menu locations, or define default procedures.
Displaying Status Bar Messages
When a menu or menu item is selected, you can display a status bar message describing the choice. Such a message helps the user by adding information about the menu choice.
To display a message when a menu or menu item is selected
- In the Prompt column, select the appropriate menu title or menu item.
- Choose the button in the Options column to display the Prompt Options dialog box.
- Select Message.
The Expression Builder dialog box appears.
- In the Message box, type the appropriate message.
Tip Enclose character strings in quotation marks.
Defining the Location of Menu Titles
You can customize the location of user-defined menu titles in your applications. You can customize the location relative to the active menu system by choosing options in the General Options dialog box. Additionally, you can specify the location of menu titles when the user edits an object visually.
To specify a relative location for user defined menu titles
- From the View menu, choose General Options.
- Choose the appropriate Location option: Replace, Append, Before, or After.
Visual FoxPro relocates all of the menu titles you ve defined. If you want to relocate some but not all of them, drag the mover buttons next to the appropriate menu titles in the Menu Designer.
Additionally, you can specify the location of menu titles when the user edits an object in your application. If you include an object and the user activates it, your menu titles will not appear on the resulting menu bar unless you indicate that you want them there.
To control menu title location during object visual editing
- In the Prompt column, select the appropriate menu title.
- Choose the button in the Options column to display the Prompt Options dialog box.
- Set the Negotiate check box.
- Choose one of the following option buttons:
- None does not place the menu title on the menu bar. Choosing None is the same as not choosing any option.
- Left places the menu title in the left group of menu titles on the menu bar.
- Middle places the menu title in the middle group of menu titles on the menu bar.
- Right places the menu title in the right group of menu titles on the menu bar.
- None does not place the menu title on the menu bar. Choosing None is the same as not choosing any option.
If you don t choose Left, Middle, or Right, the menu title will not appear on the menu bar when the user edits an object. For more information about editing objects visually, see Chapter 16, Adding OLE.
Saving and Restoring Menus
You can save and restore menus on the stack with the PUSH MENU and POP MENU commands. Pushing and popping is useful when you want to remove a menu temporarily, replace it with another, and then restore the original later on.
The number of menus you save in memory is limited only by the amount of available memory.
Tip Check the available memory with the SYS(1016) function. For example, to check how much memory your menu system uses, call SYS(1016), push the menu on the stack, then call SYS(1016) again.
Creating a Default Procedure for a Menu System
You can create a global procedure that applies to your entire menu system. Such a procedure runs whenever a menu without an assigned procedure is chosen.
For example, suppose you re developing an application for which some menus do not yet have submenus, procedures, and so on. For these menus, you can create a code stub that executes when the menus are chosen. For instance, you could create a general procedure that includes this function:
MESSAGEBOX("Feature not available") To create a default procedure
- Open the menu system you re designing.
- From the View menu, choose General Options.
- Assign the procedure by doing one of the following:
- Write or call a procedure in the Procedure box.
-or-
- Select Edit and then OK to open a separate editing window and write or call a procedure.
- Write or call a procedure in the Procedure box.
Setting the System Menu
You can manipulate menus that use the Visual FoxPro menu system by using the SET SYSMENU command. With SET SYSMENU, you can disable your menus, add and remove items from your menus, restore the default Visual FoxPro menus, and control access to your menus during program execution.
EAN: N/A
Pages: 58