Lesson 3: Managing Files
Lesson 3: Managing Files
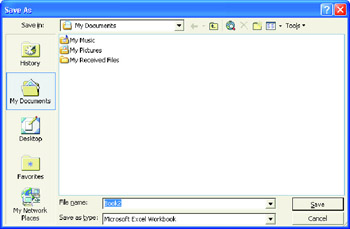
Saving Files for the First Time
To save a file for the first time, follow these steps:
-
Do any of the following:
-
On the File menu, choose Save.
-
Press Ctrl+S or F12.
-
Click the Save button in the Standard toolbar.
The Save As dialog box appears.
-
-
In the Save in list, select the drive and folder where you want to save the workbook.
-
In the File name text box, type the name you want to assign to your workbook. You can use long, descriptive filenames up to 255 characters.
-
Click Save.
You have to save every change or correction you make. Remember that every change you make and save in the screen will overwrite the document.
To update your existing file with the changes you made, click Save from the File menu, or press Ctrl+S.
Using Save As
Save As is used to save an existing file in a different location or to have a copy of the same file with a different filename.
| Note | To save a copy in a different folder, click a drive in the Save In box, or click a folder name in the folder list, or both. To save a copy in a new folder, click Create New Folder. |
Save a Copy of a Workbook
-
Open the workbook you want to make a copy.
-
On the File menu, click Save As or press F12. The Save As dialog box appears.
-
In the Filename text box, type a new name for the workbook.
-
Click Save.
There are additional options in the Save As dialog box that allow you to navigate to different locations.
These options include the following:
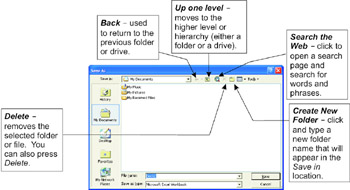
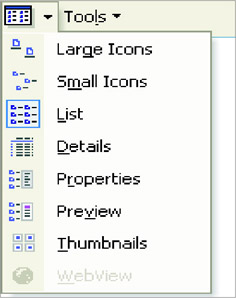
Views - Clicking the arrow beside the Views button will show different choices on how you want the list to appear.
Tools menu - Clicking the arrow beside the Tools menu allows you to delete, rename, print, and display the properties. It also allows the user to add the selected file or folder to the Favorites folder.
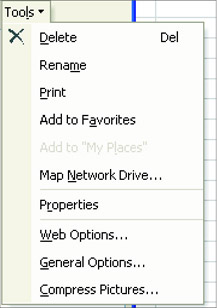
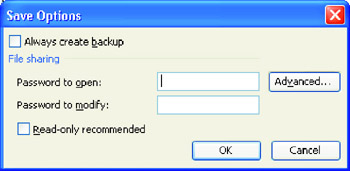
If you want your workbook to be protected from other users you may create a password on it. To create a password to your file, click on the Properties from the Tools menu of the Save As dialog box. You can also create backup files, and a read-only file.
To save a file with a password, follow these steps:
-
Click the File menu, choose Save As.
-
In the Save As dialog box, click the Tools menu and choose General Options.
The Save Options dialog box appears.
-
If you want to save a backup copy of the workbook, click on the Always Create Backup check box.
-
If you want to create a password before opening the file, type a password in the Password to Open Textbox.
-
If you enter a password in the Password to Modify Text box, the user will not be able to make changes with the file unless he/she knows the password.
-
If you want to prompt the user that the file is read-only, check the Read-only recommended check box.
-
-
Click OK and Save.
Locate and Open an Existing Workbook
To locate and open an existing workbook, follow these steps:
-
Open the Excel window.
-
Do any of the following:
-
Click File, choose Open.
-
Press Ctrl+O.
-
Click the Open
 button in the Standard toolbar.
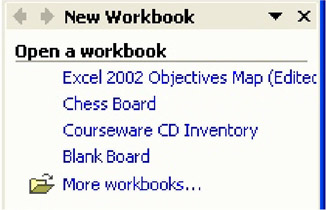
-
From the task pane, click More Workbooks from the Open a Workbook category.
The Open dialog box appears:
-
-
Locate the file by clicking the Look in drop-down arrow and choose the File directory. You may also use the Places bar at the left side of the Open dialog box.
-
Select the file.
-
Double-click on the file or press enter.
If you cannot find the workbook, search it by using the Search command.
To search files follow these steps:
-
Click File, choose Open.
-
On the Tools menu, click Search. The Search dialog box appears.
-
In the Search Text text box, type the name of the file.
-
In the Result should be drop-down list box, specify the type of file.
-
In the Search In drop-down list box, specify to where the desired file will be searched.
-
Click Search. After the search is completed, the computer will display the result in the Result list box.
-
In the Result list box, select that file you want and then click OK.
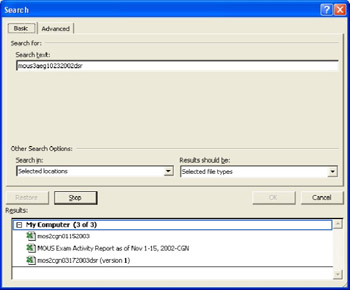
The selected file will be displayed in the Filename list box of the Open dialog box including its path. To open the file, click Open.
Create a Folder
To create a folder while saving or opening files follow these steps:
Do one of the following:
-
Click File from the menu bar, choose Save As.
-
Press F12.
The Save As dialog box appears.
-
If necessary, search for a different drive or folder where you want to place your new folder.
-
Click the
 Create New Folder button or press Alt+5. The New Folder dialog box appears.
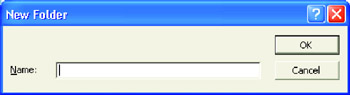
-
Type the name of the folder and click OK.
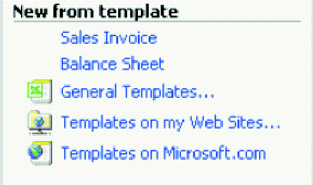
Create a New Workbook Using Templates
A template is a workbook that you create and use as the basis for other similar workbooks. You can create templates for workbooks and worksheets. It can contain text, formats, formulas, and macros that speed up the creation of a file.
| Note | In this example, we will be using the Sales Invoice Template. |
To create a new workbook based on a template, follow these steps:
-
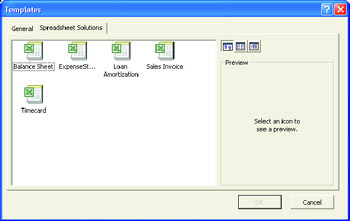
On the File menu, click New, and then click General Templates on the New Workbook task pane. The Templates dialog box appears.
-
Click the Spreadsheet Solutions tab or the tab listing your custom templates, and then double-click the template for the type of workbook you want to create.
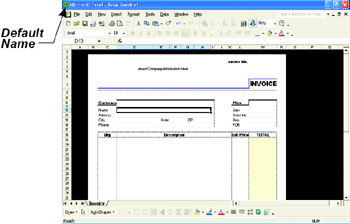
The template opens with a default name based on the name of the template.
The figure shows an illustration of a new worksheet based on the Sales Invoice template. You will only be able to enter data to a cell that is not protected. A particular cell is not protected if it can be selected.
After entering data in the template, you can now save it and you will be prompted to assign a name for your new workbook.
-
Create a new workbook using a template.
-
Select the Sales Invoice template and click OK.
-
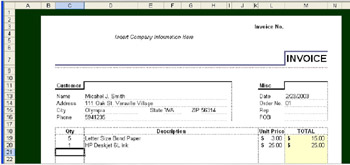
Input the necessary information to complete the invoice. You can make use of the illustration below as an example.
-
Save your worksheet as Invoice.xls
Whiz Words
| Template | Password |
| Search Command | |
Lesson Summary
You can save your existing workbook to a new location or filename by clicking Save As and then specifying the desired location and filename before saving it. You can also create a new folder while in the Save or Open dialog box by just clicking Create New Folder.
The Workbook template allows you to create a workbook based on a pre-formatted workbook. You can choose any template you want in the New Workbook task pane in the General Templates options.
Study Help
Directions: Answer the following questions briefly.
-
What is a template?
-
How do you locate an existing workbook?
-
How do you create a new folder while in the Save As dialog box?
-
Why a password is recommended to important files?
-
Enumerate the templates available in your workbook.
Directions: Follow the instructions carefully.
-
Open the MS Excel program.
-
Display the Open dialog box.
-
Select Drive C: in the Save In drop-down list box. Create a new folder named Excel-Activities.
-
Search the Invoice.xls and open it.
-
Have a copy of the Invoice.xls to the Excel-Activities folder.
-
Put a password that will prompt the user before opening this file.
-
After creating a password, click Save.