Lesson 2: Printing Options
Lesson 2: Printing Options
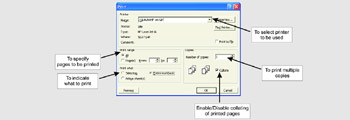
Printing Options
The Print dialog box displays options for you to specify the number of copies to be printed, specific pages and choose printer.
Setting and Clearing the Print Area
Print Area allows you to choose multiple ranges, and that each range can be printed on a separate page each time you issue a print command. The Print Area will not be moved or changed unless specified or cleared.
To set a print area, follow these steps:
-
Select a range or multiple ranges to print.
-
On the File menu, point to Print Area and then click Set Print Area.
You can also set the print area through the Page Break Preview mode.
-
On the View menu, click Page Break Preview.
-
Highlight your defined print area.
-
Right-click and then choose the option Set Print Area.
If you preview your document, only the selected range that you set as print area will be visible.
To set change or set the print area again, repeat steps 1 and 2.
You can also use The Page Setup dialog box to set the print area. To do this, follow these steps:
-
On the File menu, click Page Setup.
-
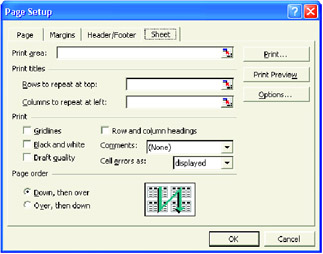
On the Page Setup dialog box, click on the Sheet tab.
-
Do any of the following:
-
Type the range in the Print Area.
-
Use the Collapse dialog button to select the range.
-
Click again the Collapse button.
-
-
Click OK.
To clear the Print Area, do the following:
On the File menu, point to Print Area and then click Clear Print Area.
If you try to preview again your document, you will see the entire content of the worksheet.
Print the Print Area
Printing the Print Area is almost the same as printing the worksheet. Once the print area has been set, perform the process of printing. That is, click File, then Print.
Set Page Margins and Centering
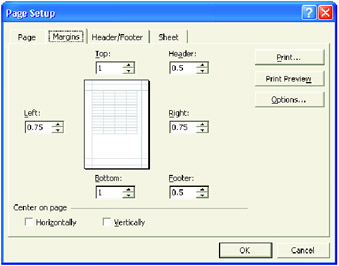
Margins are blank spaces outside the printing area on a page. Using the Page Setup dialog box, you can set the margins and center the page.
To change the margins, follow these steps:
-
On the File menu, click Page Setup.
-
Click the Margins tab.
-
To change the margins on top, bottom, left, and right of the page, do any of the following:
-
Type the desired size on the text box.
-
Use the Increment button (up and down) to increase or decrease the size of the margins.
-
-
To center the page, click the Horizontally check box under Center on Page category.
-
When finished with the settings, click OK.
Change Page Orientation and Scaling
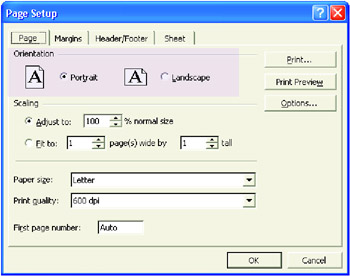
There are two kinds of page settings you can readily adjust before printing your work, Page Orientation and Scale. The former enables you to specify a portrait or landscape orientation. The latter allows you to resize the printed contents of your sheet according to percentage based on its normal size.
To do these, follow the steps below:
-
On the File menu, click Page Setup.
-
Click on the Page tab.
-
To set the orientation, click between Portrait or Landscape.
-
To scale your document, choose any of the following:
-
Click Fit to to fit the document on one page and leave 1 page(s) wide by 1 tall.
-
Type a number in the Adjust to to reduce or enlarge the text or use the increment button.
-
-
When finish with the setting, click OK.
Setting up Headers and Footers
Headers are located at the top of each page, and footers are located at the bottom of each page. Headers and Footers often contain page numbers and document information such as the filename, author, company, and so on.
To add header and footer text to a sheet for printing, follow these steps:
-
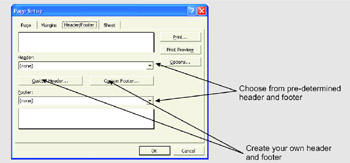
Click the Header/Footer tab in the Page Setup dialog box.
-
Do any of the following:
-
Click the Header or Footer drop-down arrow and choose from a list of built-in headers or footers.
-
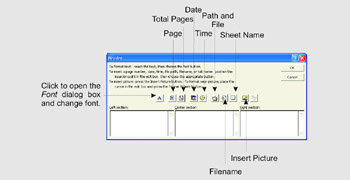
Click the Custom Header or Custom Footer button.
-
-
Type or use the buttons for the text you want in the Left Section, Center Section, and Right Section of the page. When you click a button, a code appears in the header or footer.
-
Click OK when you are finish with the Header and Footer dialog box.
-
Do any of the following:
-
Click OK to save these settings
-
Click Print Preview to see how the documents will look like when printed with a header and footer.
-
Click Print to print the document.
-
Insert and Remove a Page Break
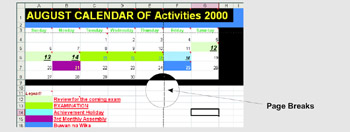
Page Breaks indicates the location where the printed pages end and new pages start. If you want to print a worksheet with multiple pages, the other page might start in an awkward position in the middle of a section.
To set a page break, do the following:
-
Click Print Preview.
-
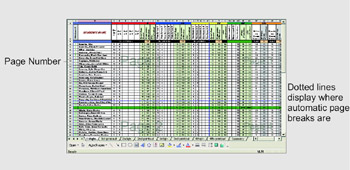
Click Close. The automatic page break displays as dotted lines on the worksheet.
-
Select a cell at any location where you want the page to break.
-
On the Insert menu, click Page Break. Longer dashes show a set of page breaks.
-
Preview your document and if you are satisfied with page break, click Print.
To remove a page break, click Remove Page Break on the Insert menu.
Using Page Break Preview
The Page Break Preview allows you to see page numbers as well as manually moves the page break lines.
-
Click on the worksheet where you want to set a page break.
-
On the View menu, click Page Break Preview. The view displays more of the worksheet, where the current page breaks are located, and page numbers.
-
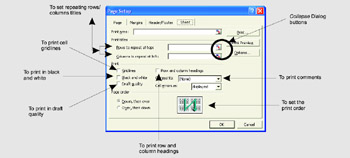
Start setting your sheet options:
-
If you want to print your sheet's gridlines, do not remove the check before the Gridlines, otherwise, uncheck it.
-
To print in black and white, check the Black and White box.
-
To print in draft quality, check the Draft Quality box.
-
To print row and column headings, check the Row and Column Headings box.
-
To set the print order, choose between Down, then Over and Over, then Down.
-
If you want to print comments, choose between At the end and As displayed on Sheet in the Comments list box.
-
-
Click OK when done.
Whiz Words
| | Page Setup |
| Page Break | Margins |
| Print Area | Clear Print Area |
| Landscape | Portrait |
| Headers and Footers | |
Lesson Summary
To set the Print Area, go to the File menu and then select the Print Area option. You can also select the Print Area through your Page Preview mode. Highlight your defined print area and right click. From the shortcut menu, choose the option set print area.
To set the margins, click the button from the Preview toolbar or you can click the Page Setup button and from its dialog box, set the margins.
To set your orientation, click the Page tab of your Page Setup dialog box, and choose Portrait or Landscape. Scale data to fit on a specific number of pages. In the Page sheet of the Page Setup dialog box, choose Fit to by selecting a number in the page(s).
To set headers and footers, open the Page Setup dialog box and then click the Header/Footer tab. You select predefined headers and footers from its drop-down list box. If you want to create your own header and footer, click on the Custom Header/Custom Footer button.
Page Breaks allows you to set the location where the printed pages end and new pages start.
Study Help
-
How do you set your print area through Page Break Preview?
-
What do you call the output on paper produced by the printer?
-
What is the importance of viewing your worksheet before printing?
-
What is the tab from the Print Dialog box that allows you to change or to set up the margin?
-
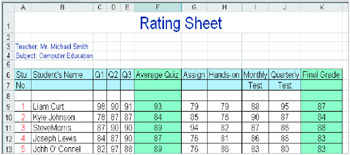
Create a worksheet that has a list of 15 students.
-
The students name should be in the first column.
-
The worksheet should contain a summary of 3 quizzes, grades for the assignment, hands-on, monthly test, quarterly test, and the final grades for the first quarter. You can refer to the illustration below.
-
Input data to the worksheet and compute for the final grades.
-
Save your work as Final.xls at Excel-Activities folder.
-
After completing the worksheet, click the Print Preview button.
-
Change the orientation to landscape.
-
Set the margins with the following specifications:
Left Margin
− 1.25″
Top Margin
− 1″
Right Margin
− 1″
Bottom Margin
− 1″
-
Use "Grading Sheet SY 2001-2002" as your header.
-
Make your gridlines invisible.
-
Print your activity.
-
Open the file Sales Report.xls.
-
Select the range A3:G9. Set the range as the Print Area.
-
Preview the Print Area.
-
Print the Print Area.
-
Close the file and do not save.