Lesson 3: Aligning Cell Content
Lesson 3: Aligning Cell Content
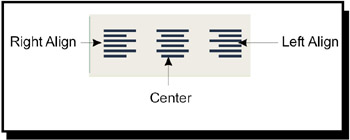
In an unformatted cell, text aligns at the left of the column, and numbers align at the right edge. To enhance your worksheet, you can align values or formula results so that they are aligned to the left, right, or center of the cell.
Aligning Cell Content
-
Select the cell/s containing the data you want to align.
-
Click the appropriate alignment button from the formatting toolbar.
| Alignment | Shortcut Keys |
|---|---|
| Align-Left | Ctrl+L |
| Align-Right | Ctrl+R |
To remove the alignment click again the alignment button you want. These buttons can be toggled on and off.

Aligning Data at the Top, Center, or Bottom of a Cell
-
On the Format menu, click Cells, and then click the Alignment tab.
-
In the Vertical box, click the option you want.
Merging and Splitting Cells
Cells can be merged to align a title across a selection of columns. This enables you to center a heading over a table or report.
To merge cells, follow the steps below:
-
Select the cells you want to merge.
-
Click the Merge and Center
 button.
To split merged cells, follow these steps:
-
Select the merged cells that you want to split.
-
Click the Merge and Center
 button.
Rotating Text and Changing Indents
To rotate text in a cell:
-
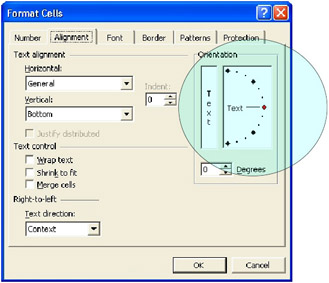
On the Format menu, click Cells, and then click the Alignment tab.
-
In the Orientation box, click a degree point, or drag the indicator to the angle you want.
-
To display text vertically from top to bottom, click the Vertical Text box under Orientation.
To increase or decrease indented text from the left edge of a cell:
-
On the Formatting toolbar, click Increase Indent or Decrease Indent.

You can also use the Format Cells dialog box to change the indentation of text.
-
Select the cells that contain the text you want to indent.
-
Press Ctrl+1 or click Format and choose Cells. The Format Cells dialog box appears.
-
Click on the Alignment tab.
-
Change the Horizontal to Left (Indent) or Right (Indent).
-
Type the number of characters to indent or use the up and down arrows in the Indent Drop-down list box.
-
Click OK.
Whiz Words
| Merge and Center | Alignment |
| Increase Indent | Decrease Indent |
Lesson Summary
You can align cell content in three ways: Align Left, Center, and Align Right. To combine series of adjacent cells together, use the Merge and Center button. Remember that all these buttons can be toggled on or off.
You can also change the direction of your text in a cell. On the Format menu, click Cells and choose the Alignment tab.
Study Help
-
How do you align the content of a cell?
-
How do you center text across columns?
-
How do you rotate text in a cell?
-
What are the buttons to be clicked to change indentations?
-
What are the different alignments available in MS Excel?
-
Open a new workbook.
-
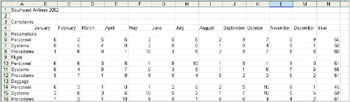
Copy the data shown below and do the following: Check the box if task is taken.
-
Format cell A1 with 18-point Arial MT, the rest should be Arial, 10.
-
Bold cells A3, A5, A9, and A13.
-
Italicize A6:A8, A10:A12, and A14:A16
-
-
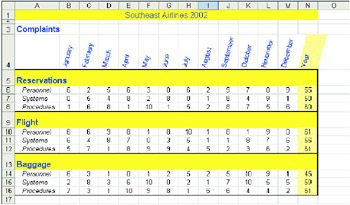
Format the worksheet like the one shown below.
-
Rotate B4:N4 to 75 degrees.
-
Change the column widths of B:N to five (5) characters.
-
Center the title in A1 in the range A1:N1.
-
Change the column width of column A to automatically fit the widest entry.
-
Center the range B6:N16.
-
Set the row height or rows 5, 9 and 13 to 24 points.
-
Set the row height of row 2 to 6 points.
-
Set the row height of row 1 to 40 points and center the title vertically.
-
Center ranges A6:A8, A10:A12, and A14:A16.
-
Apply a thick box border around the ranges A5:N8, A9:N12, and A13:N16.
-
Apply blue font color to cells A1 and B4:N4.
-
Change the size of A1 to 12 points.
-
Add yellow fill color to cells A1:N1, A5:N5, A9:N9, and A13:N13.
-
Apply a pattern that is 50% gray and yellow to the ranges N4, N6:N8, N10:N12, and N14:N16.
-
Save your work as Formats.xls on the folder Excel-Activities.
-