Defining Scopes
Before DHCP clients can use a DHCP server for dynamic TCP/IP configuration, you must define and activate scopes for your DHCP clients. A scope is the full, consecutive range of possible IP addresses for a subnet. The IP addresses in a scope define a single subnet on which DHCP services are offered. DHCP servers use scopes to manage network IP address distribution and the configuration of DHCP options.
Figure 2.7 shows the process for defining scopes.
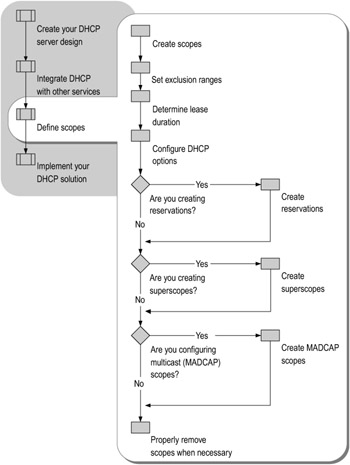
Figure 2.7: Defining Scopes
Creating Scopes
You must create a DHCP scope for each subnet in your network. Each subnet has a DHCP scope, with a single continuous range of IP addresses.
Before you create scopes, you must install DHCP on your server. For more information about installing DHCP, see "Checklist: Installing a DHCP server" in Help and Support Center for Windows Server 2003.
You can use the DHCP MMC snap-in to create a new scope on your DHCP server.
-
To create a DHCP scope
-
In the DHCP snap-in, select the name of the DHCP server.
-
Select Action, and then select New Scope. This opens the New Scope Wizard. Complete the New Scope Wizard by configuring the following properties:
-
A scope name and description of the scope.
-
A consecutive range of possible IP addresses.
-
A unique subnet mask. For more information about defining subnet masks, see "Designing a TCP/IP Network" in this book.
-
The IP addresses that are to be excluded from the scope.
-
Lease duration values.
-
Options.
-
-
For a worksheet to assist you in completing the New Scope Wizard, see the "Scope Data Collection Worksheet" (DNSDHC_1.doc) on the Windows Server 2003 Deployment Kit companion CD (or see the "Scope Data Collection Worksheet" on the Web at http://www.microsoft.com/reskit).
After you create the scope, you can set reservations and configure any additional DHCP options. For information about setting reservations, see "Creating Reservations" later in this chapter. For information about configuring additional DHCP options, see "Configuring DHCP Options" later in this chapter.
Setting Exclusion Ranges
To prevent address conflicts, the scopes that you define must exclude the IP addresses of devices that you statically configure, such as DHCP servers. By setting exclusion ranges, an administrator can exclude IP address ranges within a scope so that those addresses are not offered to DHCP clients. When you create a new scope, immediately exclude addresses of the existing statically configured computers. Excluded IP addresses can be active on your network, but only when these addresses are manually configured or distributed as reserved IP addresses. For more information about reservations, see "Creating Reservations" later in this chapter.
You can set exclusion ranges in the Add Exclusions page of the New Scope Wizard. For more information about using the New Scope Wizard, see "Creating Scopes" earlier in this chapter.
-
To set an exclusion range after a scope is created
-
In the DHCP snap-in, expand the scope you want to configure.
-
Select and right-click Address Pool under the appropriate scope.
-
Select New Exclusion Range.
-
In the Add Exclusion dialog box, type the starting and ending IP addresses of the exclusion range, and then click Add.
-
Determining Lease Duration
When a scope is created, the default lease duration is set to eight days. However, because lease renewal is an ongoing process that can affect the performance of DHCP clients and your network, you can increase or decrease the lease duration to fit your specific needs. Determine what segments of your network have specific lease duration requirements, and decide how best to modify lease duration settings to improve DHCP performance on your network.
You can set the lease duration in the Lease Duration page of the New Scope Wizard. For more information about using the New Scope Wizard, see "Creating Scopes" earlier in this chapter.
-
To set the lease duration after a scope is created
-
In the DHCP snap-in, select and right-click the scope you want to configure.
-
Select Properties.
-
In the Lease duration for DHCP clients box, adjust the lease time for the scope.
-
Increasing the Default Lease Duration
You can increase the lease duration in a scope to reduce network traffic. Increase the lease duration only if that segment of your network has a large number of IP addresses available and a configuration that rarely changes. Increasing lease duration reduces the rate at which IP addresses are reclaimed when changes occur.
In a more stable environment, you can use a long lease, such as several months. This ensures both that addresses are ultimately recovered, and that DHCP-related network traffic is kept to a minimum.
| Caution | Use caution when configuring unlimited lease durations. Even stable environments have a certain amount of client turnover. At a minimum, roving computers might be added and removed, desktop computers might be moved from one office to another, and network adapters might be replaced. If a client with an infinite lease is removed from the network, the DHCP server is not notified, and the IP address cannot be reused. |
Reducing the Default Lease Duration
Reduce the lease duration for segments of your network that have any of the following:
-
A limited number of IP addresses available.
-
Client configurations that change frequently.
-
Clients that relocate often; for example, because they connect to conference rooms or wireless networks.
Although reducing the lease duration creates more DHCP-related network traffic, it increases the rate at which addresses are returned to the available address pool for reassignment. With an average volume of DHCP request traffic, Windows Server 2003 DHCP has a four-hour default grace period after which an expired lease can be reused. This means that an address is marked for deletion four hours after the lease expires, regardless of lease duration. When the volume of DHCP-related traffic is heavy and no leases are available to service lease requests, DHCP immediately instantiates a cleanup cycle, which reclaims any leases marked for deletion. By default, the cleanup cycle occurs every 60 minutes. You can adjust the duration of the default grace period after which an expired lease is marked for deletion by editing the following key in the registry:
HKLM\System\CurrentControlSet\Services\DHCPServer\Parameters\LeaseExtension
| Caution | Do not edit the registry unless you have no alternative. The registry editor bypasses standard safeguards, allowing settings that can damage your system, or even require you to reinstall Windows. If you must edit the registry, back it up first and see the Registry Reference on the Windows Server 2003 Deployment Kit companion CD or at http://www.microsoft.com/reskit. |
Configuring DHCP Options
DHCP uses options to pass additional IP settings to DHCP clients on a network. Examples of DHCP options include:
-
The default gateway IP address
-
The DNS server IP address
-
The DNS domain name
You can configure DHCP options for specific values and enable them for assignment and distribution to DHCP clients based on server, scope, class, or reserved client levels. For example, you can enable the vendor class option Release on Shutdown for any laptops on your network to allow IP addresses assigned to mobile clients to be reincorporated into the address pool more quickly.
You can configure options for an entire server, a scope, or for a single reserved client. The most specific options (reserved client) take precedence over the least specific options (server). Values configured manually on a client override any DHCP options of any type and of any level.
Using the New Scope Wizard, you can configure some scope-level options, including router (default gateway), domain name, DNS servers, and WINS servers. You can also configure options at the server, scope, and reserved-client levels in the DHCP snap-in.
-
To configure server-level options
-
In the DHCP snap-in, expand the server for which you want to configure options.
-
Right-click Server Options, and then click Configure Options.
-
In the Server Options dialog box, select the options you want to configure.
-
In the Data Entry section of the Server Options dialog box, type the option parameters, and then click OK.
-
-
To configure scope-level options
-
In the DHCP snap-in, expand the scope for which you want to configure options.
-
Right-click Scope Options, and then click Configure Options.
-
In the Scope Options dialog box, select the options you want to configure.
-
In the Data Entry section of the Scope Options dialog box, type the option parameters, and then click OK.
-
-
To configure options for a reserved client
-
In the DHCP snap-in, expand the scope that holds the reservation for which you want to configure options, and then expand Reservations.
-
Right-click the reservation for which you want to configure options, and then click Configure Options.
-
In the Reservation Options dialog box, select the options you want to configure.
-
In the Data Entry section of the Reservation Options dialog box, type the option parameters, and then click OK.
-
For more information about configuring reservations, see "Creating Reservations" later in this chapter.
Many option types are predefined in Windows Server 2003 DHCP. Other standard DHCP option types can be added as needed to support DHCP client software that recognizes or requires them. Windows Server 2003 DHCP supports all DHCP options, including those defined in RFC 2132, although most DHCP clients use or support only a small subset of the available option types.
In general, use the following guidelines when configuring DHCP options for clients on your network:
-
Add or define new, custom option types only if you have new software or applications that require a nonstandard DHCP option.
-
If your network is large, be conservative and selective when assigning global options. These options apply to all clients of a DHCP server, unless more specific options are specified.
-
Use scope-level options for most options that clients are assigned. Setting options at the scope level allows you to take scope-related differences into account, such as different client needs or the use of a different DNS server from other scopes in the network.
-
Use class-level options if you have a large network or diverse groups of clients that are able to support membership in option classes.
-
Use reserved client options only for clients that have special requirements, for example, if your intranet has a DNS server that performs forwarding for resolving Internet DNS names not authoritatively managed on your network. In this case, you need to add the IP address of an external DNS server on your DNS server computer. You can configure your DNS server as a reserved client in DHCP and set this address as another reserved client option.
Configuring Option Classes
Windows Server 2003 DHCP includes vendor-defined and user-defined option classes. Use DHCP option classes to configure the parameters necessary for network clients to meet the special requirements of custom applications. Equipment from multiple vendors on a network can also use different option numbers for different functions. The option types used to support vendor-defined classes — the vendor class identifier and the vendor-specific option — are defined in the Internet DHCP options standard reference, RFC 2132.
You can add and configure vendor-defined classes for submanaging DHCP options that are assigned to clients identified by vendor type. You can also add and configure user-defined classes for submanaging DHCP options that are assigned to clients identified by a common need for a similar DHCP option configuration.
After you configure specific user-defined and vendor-defined options classes, you must configure scopes to assign the option classes to clients.
Vendor-Defined Classes
DHCP clients can use vendor-defined classes to identify the client's vendor type and configuration to the DHCP server when obtaining a lease. For a client to identify its vendor class during the lease process, the client needs to include the vendor class ID option (option code 60) when it requests or selects a lease from a DHCP server.
When vendor options are specified, the server performs the following additional steps to provide a lease to the client:
-
The server checks to see that the vendor class identified by the client request is a recognized class defined on the server.
-
If the vendor class is recognized, the server checks to see whether any additional DHCP options are configured for this class in the active scope.
-
If the vendor class is not recognized, the server ignores the vendor class identified in the client request, and returns options allocated to the default vendor class (includes all DHCP Standard Options).
-
If the scope contains options configured specifically for use with clients in this vendor-defined class, the server returns those options and uses the vendor-specific option type (option code 43) as part of its acknowledgment message.
In most cases, the default vendor class — DHCP Standard Options — provides a default grouping for any Windows Server 2003 DHCP clients or other DHCP clients that do not specify a vendor class ID. In some cases, you might define additional vendor classes for other DHCP clients, such as printers or some types of UNIX clients. When you add other vendor classes for these purposes, be sure that the vendor class identifier that you use to configure the class at the server matches the identifier used by clients for your third-party vendor.
User-Defined Classes
User-defined classes allow DHCP clients to specify what type of client they are, such as a remote access client or a desktop computer. For Windows Server 2003 clients, you can define specific user class identifiers to relate information about a client's software configuration, its physical location in a building, or its user preferences. If user-defined option classes are not specified, default settings are assigned.
Configuring DHCP Option Parameters
When a DHCP server actively provides option parameters, clients receive and use the associated values in their local TCP/IP configurations for the period of leased configuration.
By default, Microsoft-based DHCP clients can recognize and use two categories of option parameters: information options and protocol options.
Information Options
Use the MMC DHCP snap-in to explicitly configure information options and any associated values provided to clients. These options are not required and can be assigned at your discretion. Use information options to assign values, such as DNS servers, WINS servers, and domain name.
Windows Server 2003 Protocol Options
You implicitly configure values for protocol options based on properties configured at either the applicable server or one of its scopes. These options are always included in DHCP client/server messages, as they are a required part of protocol design. For example, Lease Duration/Time is a protocol option.
In most cases, the actual values included in these protocol options are provided to clients based on property settings for the applicable DHCP server. Depending on the needs of your clients, you can also use the DHCP snap-in to configure these options individually for defined scopes, identifying members of a specified user or vendor class, or for a single reserved client.
Creating Reservations
For clients that require a constant IP address, you can either manually configure a static IP address, or assign a reservation on the DHCP server. Reservations are permanent lease assignments that are used to ensure that a specified client on a subnet can always use the same IP address. You can use DHCP reservations for hosts that require a consistent IP address, but do not need to be statically configured. Reserved IP addresses differ from statically configured IP addresses in one significant manner: when network parameters are changed at the DHCP server, the device configured with a reserved IP address receives the new network parameters when the device requests renewal of its lease. To change network parameters on a device configured with a static IP address, the changes must be made manually to the device.
Determine the clients for which you need to manually configure an IP address — such as DHCP server, DNS servers, WINS servers, routers, and domain controllers — and which clients can receive addresses from DHCP. Keep in mind that for clients for which you manually configure static IP addresses, you must insert all configuration parameters that the client requires in order to interact with the network. This includes IP addresses, DNS and WINS parameters, and default gateway information. Clients that have reserved IP addresses always have the same IP address, but still receive updated configuration information from the DHCP server.
You might want to assign network printers and certain servers DHCP reservations to ensure that they always have the same IP address, but continue to receive updated configuration information from the DHCP server. For example, create reservations for servers that must always have the same IP address, such as:
-
Windows Internet Name Service (WINS) and Domain Name System (DNS) servers
-
Print servers that use TCP/IP print services
-
Firewalls
-
Routers
DHCP-enabled clients receive any available options, such as DNS server or router (default gateway), from the DHCP server when they renew their leases. If these devices are manually configured, an administrator must reconfigure each device individually when a change occurs.
-
To create a reservation
-
In the DHCP snap-in, expand the scope for which you want to create a reservation.
-
Select and right-click Reservations, and then click New Reservation.
-
In the New Reservation dialog box, enter the Reservation name, IP address, MAC address, and Description of the reservation.
-
Select the appropriate Supported types: DHCP only, BOOTP only, or Both.
-
Click Add.
-
Creating Superscopes
A superscope is an administrative grouping of scopes that can support multiple logical IP subnets on the same physical subnet. Superscopes contain a list of member scopes that can be activated together. You cannot configure scope-level properties on superscopes; you must configure these on the member scopes. A superscope allows a DHCP server to provide leases from more than one scope to clients on a single physical network.
You can use superscopes to resolve DHCP service issues for the following situations:
-
DHCP clients are located on a single physical network segment that includes multiple logical IP subnets.
-
Multiple DHCP servers manage separate logical subnets on the same physical subnet.
-
The available address pool for an active scope is nearly depleted and more computers must be added to the physical network segment.
-
Clients are migrating to a new scope.
-
You need to support DHCP clients on a network that has multiple logical subnets in one physical subnet on the other side of a BOOTP/DHCP relay agent.
Before you create a superscope, you must use the DHCP MMC snap-in to define at least one scope to be included in the superscope. Scopes added to a superscope are called member scopes. You can add additional member scopes either from the superscope menu, or from the individual scope menus.
-
To create a new superscope
-
In the DHCP snap-in, create at least one scope to be included in the superscope. For information about creating scopes, see "Creating Scopes" earlier in this chapter.
-
Select and right-click the DHCP server, and then select New Superscope. This opens the New Superscope Wizard.
-
On the Superscope Name page of the New Superscope Wizard, type a name for the superscope.
-
On the Select Scopes page of the New Superscope Wizard, in the Available Scopes list, select one or more scopes to include in the superscope.
-
-
To add scopes to an existing superscope
-
In the DHCP snap-in, select and right-click the superscope, and then select New Scope. This opens the New Scope Wizard.
-
Complete the New Scope Wizard. For information about creating scopes, see "Creating Scopes" earlier in this chapter.
-or-
-
Create a new scope, right-click the new scope, and then select Add to Superscope.
-
In the Add Scope name to a Superscope dialog box, in the Available superscopes list, select the superscope.
-
| Note | Deleting the superscope does not delete the member scopes. |
Configuring Multicast Scopes
Windows Server 2003 DHCP service offers MADCAP support in the form of multicast scopes. MADCAP supports dynamic assignment and configuration of IP multicast addresses on TCP/IP-based networks. Multicast scopes provide ranges of Class D IP addresses, which are reserved for multicast operation, by using directed transmission from one point to multiple points. With the exception of DHCP-assignable options, which multicast scopes do not support, you can configure a multicast scope in the same way that you configure a regular DHCP scope.
Multicast IP addresses allow multiple clients to receive data that a server sends to a single IP address, enabling point-to-multipoint communication. This type of transmission is often used for streaming media transmissions, such as video conferencing.
| Important | In all TCP/IP networks, each computer requires a unique primary computer IP address from one of the standard address classes used for building the network (Class A, B, or C range). You must assign this required primary computer IP address before you can configure a computer to support and use secondary IP addresses such as multicast IP addresses. |
Although the Windows Server 2003 DHCP service supports both DHCP and MADCAP, the services function independently; clients that do not obtain IP addresses from the DHCP service can still obtain MADCAP addresses from the DHCP service. DHCP scopes are used to allocate IP address ranges from Class A, B, or C addressing schemes, which enable unicast for point-to-point communication between networked computers. MADCAP scopes allocate Class D IP addresses to enable point-to-multipoint communication.
-
To configure a MADCAP scope
-
In the DHCP snap-in, select and right-click the DHCP server you want to configure. The New Multicast Scope Wizard appears.
-
In the New Multicast Scope Wizard, type a name and description for this multicast scope.
-
Set the multicast IP address range and Time to Live (TTL).
-
Add any exclusion ranges and the lease duration, then activate the multicast scope.
-
| Tip | Clients that use MADCAP must be configured to use the MADCAP API. For more information about writing or programming applications that use the MADCAP API, see the MSDN Online link on the Web Resources page at http://www.microsoft.com/windows/reskits/webresources. |
Removing Scopes
Remove DHCP scopes when a subnet is no longer in use or when you need to renumber your network to use a different IP address range.
Do not remove a scope while it has active leases. Before you remove a scope, deactivate the scope until all client leases expire or all lease renewal requests are denied. When you have confirmed that the scope no longer contains active leases, you can remove it by using the DHCP snap-in. For more information about deactivating scopes, see Deactivate a scope in Help and Support Center for Windows Server 2003.
EAN: N/A
Pages: 146