Sample Applications for Staging
We installed three sample applications on our stager in order to test different deployment scenarios by using applications of varying complexity, as well as determine what impact staging had on clusters that were actively serving content. The three sample applications are:
- Web Guide—This application comprises a collection of static HTML pages and graphics that we assembled locally. The 90+ files in Web Guide have a combined size of one-half of a megabyte on the drive. You can prepare a similar collection of files if you want to step through the deployment example we've provided.
- Pre-Flight Check—The Pre-Flight Check, which you already had a chance to install and test, consists of 16 Web pages (HTML and ASP) and 2 COM+ applications that contain a total of 6 components.
- FMStocks 2000—The revised version of this well-known MSDN (Microsoft Developer Network) sample application is used to instruct developers in using the .NET platform. FMStocks combines Web and ASP technologies with COM+ and database technologies in a fairly typical distributed application.
NOTE
This application also requires a back-end SQL Server database.
Installing the Applications on the Stager
Use the following steps to install the three sample applications on the staging cluster.
Web Guide
- On the controller's C drive, create a directory named GUIDE, and then put the collection of HTML pages and graphics in this folder.
NOTE
We created a separate subdirectory named Images to hold the graphics.First we'll create the Web application in IIS, and then the Application Center application.
- Expand the IIS node, and then expand the cluster controller node.
- Right-click Default Web Site, point to New, and then click Virtual Directory.
- On the Virtual Directory Creation Wizard Welcome page, click Next.
- On the Virtual Directory Alias page, in the Alias box, enter WebGuide and then click Next.
- On the Web Site Content Directory page, click Browse, locate the C:\GUIDE directory, identify it as the content directory, and then click Next.
- Accept the defaults, and then click Next.
- On the last wizard page, click Finish.
Create an Application Center Application
Finally, we'll create an Application Center application.
- In the Application Center snap-in, click Applications to display the Applications view.
- Click New, and then in the Name box, enter Web Guide as the name of the new application.
- Click Web Guide, right-click the arrow to the right of Resource Type, and then click Web Sites and Virtual Directories.
- In the Web Sites and Virtual Directories list, click Default Web Site, click Add, and then click Close.
- Right-click the arrow to the right of Resource Type; click File System Paths; in the File System Paths list, click C:\GUIDE; click Add; and then click Close.
You now have the application fully installed on the stager and ready for deployment.
Pre-Flight Check
Repeat the instructions you followed in "Validate the Configuration: Replication" earlier in this chapter to install the PreFlight Check sample application on the stager. The quickest way to do this installation is to run the following batch files in the C:\ACPF\Files directory:
- PFSetupCOM.bat—creates the two COM+ applications (AC_PF_VB and AC_PF_VC) and installs their components.
- PFSetupWeb.bat—creates a Web virtual directory (ACPFWeb) under the Default Web Site.
- PFSetupAC.bat—creates an Application Center application (ACPFApp) that contains all of the resources for the Pre-Flight Check application.
FMStocks 2000
You can find the compressed file containing the FMStocks 2000 application on the CD or you can obtain the latest version from the Microsoft Web site at http://msdn.microsoft.com/default.asp.
Copy FMStocks2000.exe to a temporary directory on the stager's drive and run this executable. This setup program will expand the executable and source code files into the \Program Files\FMStocks 2000 directory. This directory will contain the following four subdirectories: Components, Documentation, Database, and Website.
There are four batch files in the FMStocks 2000 root directory (C:\Program Files\FMStocks 2000) that you can use to install the application. These batch files are:
- Setup-web.cmd—creates the FMStocks virtual Web site in IIS.
- Setup-components.cmd—installs the COM+ components.
- Setup-db.cmd—installs database objects, such as tables, stored procedures, and initial data.
To install FMStocks 2000 on the stager, we only ran the Setup-web and Setup-components programs. The application's database was then installed on a separate server outside the cluster environment. We did this by:
- Copying the \Program Files\FMStocks 2000\database directory and the database setup file (Setup-db.cmd) to this server.
- Running Setup-db on the database server.
There are three steps required to complete the installation of FMStocks on the stager:
- Configure a component that identifies the application's data source.
- Install an ISAPI filter.
- Create an Application Center application that identifies the FMStocks resources.
Configure the Data Source
You need to configure a component that identifies the database server and database that FMStocks will use in your environment.
- On the stager, open the Application Center snap-in, and then expand the Component Services node down to and including FMStocks Core.
- Open the Components folder, and click FMStocks_DB.DBHelper.
- Right-click; on the pop-up menu, click Properties; and then click the Activation tab.
- Select the Enable object construction check box, and then in the Constructor string box, define the new data source name, which should correspond to the database server name. (See Figure 8.13.) Click OK to save this configuration.
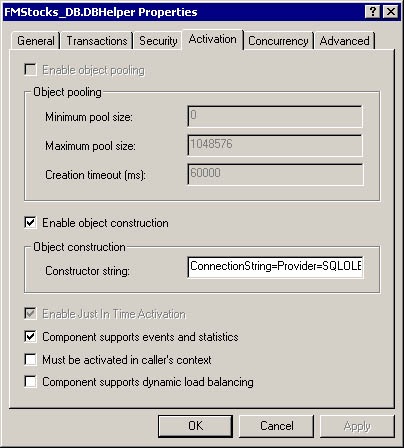
Figure 8.13 Enabling the FMStocks data connection
Install the ISAPI filter
The filter's DLL file, Fms2ksec.dll, is located in the directory \Program Files\FMStocks 2000\Components\ISAPI Filter. This filter has to be added to the properties for Default Web Site.
- Use the Application Center snap-in to open the Default Web Site Properties dialog box.
- Click the ISAPI Filters tab, and then click Add.
- Use the Filters Properties browser to name and identify the filter.
After you've done this, the Default Web Site Properties dialog box will be similar to the one shown in Figure 8.14.
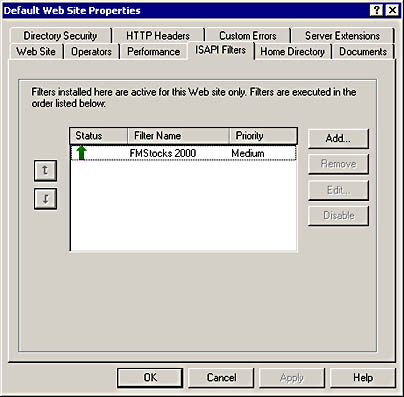
Figure 8.14 Using the Default Web Site Properties dialog box to add a global ISAPI filter
Create the Application Center Application
- In the Application Center snap-in, click Applications to display the Applications view.
- Click New, and then in the Name box, enter FMStocks 2000.
- With FMStocks 2000 highlighted, use the Resource Type list to add COM+ Components and Web Sites and Virtual Directories as resources for this application.
- Add the following COM+ applications to FMStocks 2000:
- FMStocks 2000 Core
- FMStocks 2000 Events
- FMStocks 2000 Office Extensions
- FMStocks 2000 Store Order Processing
- FMStocks 2000 Store Shopping Cart
- In the Resource Type list, click Web Sites and Virtual Directories, and then add the FMStocks Web site (Web Site/Root) as a resource.
Test the FMStocks Application
After you've finished installing FMStocks, you should test the application to see if it's installed and configured correctly. You can do a simple application to test database connectivity by running the Test FMStocks installation.vbs script, which is located in the FMStocks 2000 root directory.
You can test the application more extensively by using the Web browser to access the FMStocks home page on the server, log on, and trade stocks.
NOTE
The FMStocks sample application also contains a script that you can load into WAS and run to apply load on a server (FMStocks 2000 Template.mdb).
EAN: N/A
Pages: 183
- Enterprise Application Integration: New Solutions for a Solved Problem or a Challenging Research Field?
- The Effects of an Enterprise Resource Planning System (ERP) Implementation on Job Characteristics – A Study using the Hackman and Oldham Job Characteristics Model
- Intrinsic and Contextual Data Quality: The Effect of Media and Personal Involvement
- Healthcare Information: From Administrative to Practice Databases
- A Hybrid Clustering Technique to Improve Patient Data Quality