Lesson 3:Database Security Implementation and Administration
3 4
Implement a security design and administer it by using database tools such as Enterprise Manager and Query Analyzer. Verify a security design by connecting to the database with various security accounts, testing permissions, and auditing activity with SQL Profiler. In this lesson, you will see how to use database tools to configure authentication and authorization. You will also learn how to administer permissions after granting a security account with access to a database. Permission administration involves granting, revoking, and denying permissions to security accounts. In the last part of the lesson, you will learn how to administer roles. Role administration involves adding and removing roles from a database and controlling role membership in both user-defined and predefined roles.
After this lesson, you will be able to:
- Configure authentication and authorization for a SQL Server 2000 database.
- Administer permissions and roles.
Estimated Lesson time: 45 minutes
Administering Authentication
Before a user can connect to SQL Server, a security account must be added to the server and given SQL Server access. You accomplish this task by using Enterprise Manager or the Transact-SQL language.
Configuring Authentication in Enterprise Manager
In the Enterprise Manager console tree, expand the Security node and click Logins. Right-click in the details pane, and click New Login. In the SQL Server Login Properties - New Login dialog box, type the name of a Windows account. A domain Windows account, user, or group account includes the domain name. A workgroup Windows account, user account, or user-created group includes the computer name. A Windows local group that is predefined includes BUILTIN. For example, to add User01 from DOMAIN01, a local user (User01) on the SQL Server named SQLSERVER01, and the local PowerUsers predefined Windows group, the names to be added are as follows:
DOMAIN01\User01, SQLSERVER01\User01 and BUILTIN\PowerUsers
To add a SQL Server login ID from the SQL Server Login Properties - New Login dialog box, click SQL Server Authentication and then type the name of the login ID. Adding a SQL Server Login ID creates the ID in the database and grants the login ID access.
You can delete accounts from the Details pane of Enterprise Manager, and you can select the properties of an account and deny it access to authenticate with the server.
Configuring Authentication Using Transact-SQL
You use system stored procedures to manage SQL Server authentication. Use the sp_grantlogin, sp_denylogin, and sp_revokelogin system stored procedures to manage Windows account authentication. Use the sp_addlogin and sp_droplogin system stored procedures to manage SQL Server login ID authentication.
Windows Accounts
Use the sp_grantlogin system stored procedure in Query Analyzer or a command prompt tool such as osql to add and grant access to Windows accounts. The following code example shows how to use sp_grantlogin to add and grant access to User01 in DOMAIN01, User01 on the computer running SQL Server, SQLSERVER01, and the predefined PowerUsers group:
EXEC sp_grantlogin @loginame = 'DOMAIN01\user01' EXEC sp_grantlogin @loginame = 'SQLSERVER01\user01' EXEC sp_grantlogin @loginame = 'BUILTIN\power users'
Use sp_denylogin to deny a specific user or group access to the server without deleting the Windows account from SQL Server. You might want to perform this action to keep the database online but not allow users to connect while you are troubleshooting procedures or updating the database. The following code example shows how to use sp_denylogin to deny members of the predefined Power Users group from connecting to SQL Server:
EXEC sp_denylogin @loginame = 'BUILTIN\power users'
To delete a Windows account from SQL Server, use sp_revokelogin. The following code example shows how to use sp_revokelogin to remove SQLSERVER01\User01:
sp_revokelogin @loginame = 'SQLSERVER01\User01'
If a Windows account is granted privileges to one or more databases, sp_revokelogin will remove those privileges and delete the account from SQL Server.
SQL Server Login ID
Use the sp_addlogin system stored procedure to create, add, and grant access to a SQL Server login ID. The following code example shows how to use sp_addlogin to create, add, and grant access to User02 with a password of password02:
sp_addlogin @loginame = 'user02', @passwd = 'password02'
The only required parameter is @loginame. Optional input parameters other than @passwd include @defdb, @deflanguage, @sid, and @encryptopt. Use @defdb to specify a database (Master is the default). Use @deflanguage to specify a language (if no language is specified, the server's default language is used). Use @sid to define a unique security identifier (SID); otherwise, the database will auto-generate a unique SID. Use @encryptopt to skip password encryption. The default is to encrypt the password.
You cannot deny a SQL Server login ID from SQL Server authentication. Instead, you must delete the login ID. Use sp_droplogin to delete a SQL Server login ID. A SQL Server login ID mapped to an existing user in any database cannot be deleted until user database privileges are removed. Use the sp_revokedbaccess system stored procedure to remove database privileges. Refer to the next section of this lesson for details concerning sp_revokedbaccess.
Administering Authorization
Authentication alone is not enough to access databases in SQL Server. Security accounts (Windows accounts and SQL Server login IDs) configured for authentication are authorized to access a specific database if any one of the following three conditions is met:
- The Guest role is permitted to access the database.
- A predefined or other standard role of which the user is a member is permitted to access the database.
- A Windows group of which the user is a member is permitted to access the database.
Configuring Authorization in Enterprise Manager
In the Enterprise Manager console tree, expand the Databases node, expand a specific database, and then click Users. Right-click in the details pane and click New Database User. In the Database User Properties - New User dialog box, select the name of an authenticated security account. Only authenticated security accounts can be added. You can optionally specify a username that is different than the authenticated security account name. From this dialog box, you also specify role membership. Notice in Figure 13.4 that the Public role is automatically selected. Any accounts added to a database are automatically added to the Public role. You cannot remove a database member from the Public role.
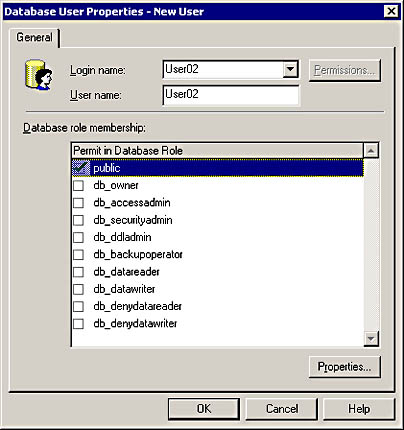
Figure 13.4 Adding User02 to a database from the Database User Properties - New User dialog box.
Once an account is added in the Database User Properties - New User dialog box, the Permissions button appearing in Figure 13.4 becomes active. Use the Permissions button to assign permissions to the account or to view existing permissions.
Configuring Authorization Using Transact-SQL
Like authentication, system stored procedures are used to manage SQL Server authorization. Use sp_grantdbaccess and sp_revokedbaccess to grant or revoke database access to a security account. These system stored procedures work with all valid security accounts, Windows accounts, and SQL Server login IDs. Granting access is also called mapping an account to a database. The following code example shows how to use sp_grantdbaccess to map access for the Pubs database to the following users: User01 in DOMAIN01, User01 in the server running SQL Server (SQLSERVER01), the User01 SQL Server login ID, and the local Power Users group:
USE pubs EXEC sp_grantdbaccess @loginame = 'DOMAIN01\User01' EXEC sp_grantdbaccess @loginame = 'SQLSERVER01\User01', @name_in_db = 'LocalUser01' EXEC sp_grantdbaccess @loginame = 'user01', @name_in_db = 'SQLUser01' EXEC sp_grantdbaccess @loginame = 'BUILTIN\power users'
Notice that @name_in_db was specified for SQLSERVER01\User01 and for the User01 SQL Server login ID. The @name_in_db parameter allows you to alias a different name to the security account. If @name_in_db is not specified, the security account name is the username alias.
Use sp_revokedbaccess to remove a security account from a database. You cannot delete a SQL Server login ID until you run sp_revokedbaccess on any databases where privileges are granted. However, you can delete a Windows account without first removing any database mappings. The following code example shows how to use sp_revokedbaccess to remove User01 with an alias of SQLUser01 from the Pubs database:
USE pubs EXEC sp_revokedbaccess @name_in_db = SQLUser01
Administering Permissions
The effective rights of a security account granted access to a database is the sum of the permissions assigned to the Public role, the permissions that the user gains as a member of other authorized roles and groups, and any permissions directly assigned to the account. The Deny permission state negates all permissions either inherited or granted directly to the security account.
Configuring Permissions in Enterprise Manager
To assign additional permissions, access the properties of a security account that appears in the Users node of a database. From there, assign the user to fixed database roles or to any custom roles defined for the database. To directly assign permissions to a user, role, or group, click the Permissions button to see the Database User Properties dialog box. From this dialog box, assign object permissions. You can also assign permissions to a specific object by accessing the properties of the object. SQL Server only allows permissions that are valid for the type of object. For example, execute (EXEC) permission is available for a stored procedure but not for a table or view. If you select a table or view in the Database User Properties dialog box, the Columns button is available. If you press the Columns button, you can assign SELECT and UPDATE object permissions on a per-column basis.
To assign the statement permissions CREATE and BACKUP, right-click on a database in the console tree and select Properties. From the database_name Properties dialog box that appears, click the Permissions tab. All security accounts granted access privileges appear in the Permissions tab and so do the statement permissions that can be assigned to the accounts.
For any permissions that are assigned through Enterprise Manager, a permission checkbox has three states: checked, unchecked, and marked with an X. A checked permission is granted; an unchecked permission is unassigned or revoked if previously assigned; and a check box marked with an X is a denied permission. The denied permission supercedes any assignment of the permission elsewhere.
Configuring Permissions Using Transact-SQL
Use the GRANT, REVOKE, and DENY statements to administer object and statement permissions from Query Analyzer, or use a command prompt tool such as osql.
The GRANT Statement
When using GRANT, you must specify the permission (or permissions) to assign and to whom they are assigned. Use the ALL keyword to assign all valid object or statement permissions. When assigning object permissions, you must also specify on what object the permissions should be applied. This specification is not required for statement permissions because they apply to a database, not to a single object in the database. Optionally, specify the WITH GRANT OPTION clause to permit a security account to grant others the same permission that has been granted to it. Use the AS keyword to specify a security account (group or role) in the current database that has the authority to execute the GRANT statement. If permissions are granted for an object to a group or role, you must use the AS keyword to specify the group or role with authority to assign permissions to others. SQL Server security will verify that you are a member of the specified group or role before allowing you to use the GRANT statement.
The main clauses in a GRANT statement when assigning statement permissions are summarized as follows:
GRANT ALL | statement_ permission(s)
TO security_account_name(s)
The main clauses in a GRANT statement when assigning object permissions are summarized as follows:
GRANT ALL | object_ permission(s)
(column(s)) ON table_name | view_name
| ON table_name | view_name (column(s))
| ON stored_ procedure_name | user_defined_ function_name
TO security_account_name(s)
WITH GRANT OPTION
AS group_name | role_name
The ON keyword that specifies stored_ procedure_name includes extended stored procedures. Multiple statement and object permissions are comma-delimited, as are security account names, as shown in the following code example:
USE pubs GRANT CREATE TABLE, CREATE VIEW, BACKUP DATABASE, BACKUP LOG TO user01, [BUILTIN\power users]
User01 and the Power Users group are granted four statement permissions. The Power Users group is specified with brackets because of the backslash and space in the group name.
If you want to grant one or more security accounts with all valid object or statement permissions, use the ALL keyword, as shown in the following code example:
USE pubs GRANT ALL TO public
The Public role is granted all assignable statement permissions to the Pubs database. The result of this assignment is that all authorized users are permitted to run any statement permission against the database. Making this assignment would be atypical, but the code example demonstrates how to open the database to all authorized users. If you map the special Guest account to the Pubs database, all authenticated users who are not mapped to the Pubs database are also granted full statement permissions because the Guest account is a member of the Public role.
You can mix column and table permissions so that the last permission specified is assigned to the column. You must make sure that the last object permission is a legal column permission (SELECT or UPDATE), as shown in the following code example:
USE pubs GRANT INSERT, DELETE, UPDATE, SELECT (ord_date, ord_num, qty) ON dbo.sales TO user01
User01 is granted INSERT, DELETE, and UPDATE permissions to the dbo.sales table and SELECT column permissions to the Ord_Date, Ord_Num, and Qty columns. Notice that the table name is qualified with the owner name, dbo. This specification is optional but is a good coding practice if there are other identically named tables in the database having different owners. The following code example shows how to assign UPDATE and SELECT object permissions exclusively to the columns:
USE pubs GRANT UPDATE, SELECT ON dbo.sales (ord_date, ord_num, qty) TO test
The only valid object permission for a stored procedure is EXECUTE. The following code example assigns EXECUTE to Power Users for the xp_cmdshell extended stored procedure:
USE master GRANT EXEC ON xp_cmdshell TO [BUILTIN\power users]
The xp_cmdshell extended stored procedure is in the Master database. Therefore, you must make Master the current database. You can only grant, revoke, or deny permissions on objects in the current database.
NOTE
For more information, refer to the GRANT statement in SQL Server Books Online.
The Revoke Statement
Use the REVOKE statement to remove previously granted permissions from a security account. The format of the REVOKE statement is similar to the GRANT statement with some exceptions. The TO keyword in the GRANT statement is replaced with FROM when revoking statement permissions and is either TO or FROM when revoking object permissions. The syntax for revoking object permissions includes the optional CASCADE keyword and the GRANT OPTION FOR clause. Use the GRANT OPTION FOR clause to revoke the WITH GRANT OPTION permission assigned to a security account. Use the CASCADE keyword to revoke permissions granted to the specified security account and any other security accounts that were granted permissions by the specified security account. You should include both GRANT OPTION FOR and CASCADE to revoke the Grant permission state assigned by the security account to other security accounts. The following code example revokes the EXEC permission from User01 and any other users to whom User01 assigned the EXEC permission:
USE master REVOKE EXEC ON xp_cmdshell FROM user01 CASCADE
Run the following system stored procedure to view the current permissions of the extended stored procedure:
EXEC sp_helprotect 'xp_cmdshell'
The DENY Statement
Use the DENY statement to explicitly prohibit a security account from the privileges specified and to prohibit the security account from inheriting the permission through group or role membership. The format of the DENY statement is similar to the GRANT and REVOKE statements. Like the GRANT statement, the TO keyword specifies to whom the statement applies. The DENY statement includes the CASCADE keyword to explicitly deny permissions that were granted to the specified security account and to any other security accounts that were granted permissions by the specified security account. The following code example denies statement permissions from a SQL Server login ID and a group:
USE pubs DENY CREATE TABLE, CREATE VIEW, BACKUP DATABASE, BACKUP LOG TO user01, [BUILTIN\power users]
Administering Roles
You administer group membership outside SQL Server and administer role membership within SQL Server. Roles are created in Enterprise Manager or by using Transact-SQL. Predefined roles cannot be members of other roles. For example, you cannot make the SecurityAdmin fixed server role a member of the db_Owner fixed database role. All predefined roles (fixed server and fixed database) can contain groups and users as members. Fixed database roles can also contain user-defined, standard roles. User-defined, standard roles can contain other user-defined roles, groups, and users as their members. You cannot create circular role membership. For example, if Role01 is a member of Role02, Role02 cannot be a member of Role01. Application roles cannot be members of a role or contain members.
Adding and Deleting Roles
You can add and delete user-defined, standard roles in a database. You cannot delete the predefined, fixed database and fixed server roles. To add a role by using Enterprise Manager, expand the Roles node below a database in the console tree, right-click in the Details pane, and then click New Database Role. From the Database Role Properties - New Role dialog box that appears, name the role and select a role type (standard or application). If you select a standard role, you can add role members when you create the role. If you choose an application role, you can define a password for the role. To delete the role, select it in the details pane and press the DELETE key.
Use the sp_addrole system stored procedure to add a standard role to a database from Query Analyzer, or use a command prompt tool such as osql. The sp_addrole system stored procedure contains input parameters to specify the role name (and optionally, the role's owner). If you don't specify role ownership, the role owner defaults to the role creator. The following code example adds a role named Role01 to the Pubs database:
USE pubs EXEC sp_addrole @rolename = 'role01'
Use the sp_droprole system stored procedure to drop a user-defined, standard role. The following code example drops a role named Role01:
USE pubs EXEC sp_droprole @rolename = 'role01'
Use the sp_addapprole system stored procedure to add an application role to a database from Query Analyzer, or use a command prompt tool such as osql. Like sp_addrole, the first input parameter is @rolename. Unlike sp_addrole, the second input parameter for sp_addapprole is @password. The application role name and password are used to activate the application role, as you will see in the next section of this lesson. Use sp_dropapprole to delete an application role. The following code example adds an application role, AppRole01, with a password of password01 to the pubs database and then deletes the application role:
USE pubs EXEC sp_addapprole @rolename = 'appRole01', @password = 'password01' EXEC sp_dropapprole @rolename = 'appRole01'
Administering Role Membership
Standard roles are located in two places within Enterprise Manager. Database roles are contained in the Roles node of a database, and server roles are contained in the Server Roles node below the Security node. To add a member to a standard role in Enterprise Manager, right-click the role in the details pane and click Properties. A server role displays the Server Role Properties dialog box, and a database role displays the Database Role Properties dialog box. From the Server Role Properties dialog box, you administer role membership and view role permissions. From the Database Role Properties dialog box, you administer role membership and set permissions for user-defined roles. You cannot modify permissions on any fixed roles.
Use the sp_addrolemember system stored procedure to add members to a user-defined standard role or to a fixed database role. Use sp_addsrvrolemember to add a security account to a fixed server role. The sp_addrolemember system stored procedure uses @rolename and @membername as input parameters, and sp_addsrvrolemember uses @loginame and @rolename as input parameters. The following code example adds Role02, BUILTIN\Power Users and User01 to Role01 (a user-defined, standard role):
USE pubs EXEC sp_addrolemember @rolename = 'role01', @membername = 'role02' EXEC sp_addrolemember @rolename = 'role01', @membername = 'BUILTIN\power users' EXEC sp_addrolemember @rolename = 'role01', @membername = 'user01'
You must specify the mapped name for the @membername input parameter. For example, if the Power Users group alias in the database is PowerU, then the @membername value is poweru. Any user or group to be made a member of a role must be mapped to the database for membership addition to succeed.
Role membership restrictions control which members you can add using sp_addrolemember. For example, if you attempt to add a predefined role such as db_DataWriter to a user-defined role, membership will fail, as shown in the following code example:
USE pubs EXEC sp_addrolemember @rolename = 'role01', @membername = 'db_datawriter'
SQL Server displays the following error message:
Server: Msg 15405, Level 11, State 1, Procedure sp_addrolemember, Line 74 Cannot use the reserved user or role name 'db_datawriter'.
You remove role members by using the sp_droprolemember system stored procedure. The following code example drops User01 from Role01:
USE pubs EXEC sp_droprolemember @rolename = 'role01', @membername = 'user01'
NOTE
Enterprise Manager includes the Create Login wizard. You can use this wizard to add security accounts (authentication), to assign predefined, fixed server role membership, and to authorize database access. You cannot assign database role membership by using this wizard.
Activating an Application Role
After creating an application role, a user who authenticates with SQL Server can use an application role that is assigned to a database by activating the role. The connected user's security context is the effective rights of the application role. When the application role is activated, the user's privileges in the database are irrelevant until the session is ended. Use the sp_setapprole to activate an application role. The following code example uses sp_setapprole to activate the App1 application role with a password of secretpass. The application role is located in the Pubs database:
USE pubs sp_setapprole 'app1', 'secretpass'
Exercise 2: Implementing Security for BookShopDB

In this exercise, you will use Query Analyzer to implement the security design you created in Exercise 1. You might want to review the security design you created in Exercise 1. In the first practice, you will create and configure Windows user accounts and a group. You will use these security accounts and a SQL Server login ID in the design implementation.
To create a Windows group and Windows users
- Logon to the LAB1 computer as Administrator.
- Open a command window.
- At the command prompt, type the following commands. Press ENTER between each line:
net user manager01 /add net user manager02 /add net user staff01 /add net user staff02 /add net user staff03 /add
A message appears, stating that each command completed successfully. The Manager01 and Manager02 Windows user accounts are added to the local computer.
- Close the command window.
- Using the Computer Management console, add a group named Managers and make Manager01 and Manager02 members of the Managers group.
NOTE
The NET GROUP command line command is not used in the previous step because it functions only on domain controllers.
To configure group authentication
- Open Query Analyzer and connect to your local server.
- In the Editor pane of the Query window, enter and execute the following code:
USE bookshopdb EXEC sp_grantlogin @loginame = 'BUILTIN\users' EXEC sp_grantlogin @loginame = 'LAB1\managers'
The Users local group and Managers local group on LAB1 are added to SQL Server so that members of these two groups can establish a connection to SQL Server.
- In the Editor pane of the Query window, enter and execute the following code:
sp_addlogin @loginame = 'devuser', @passwd = 'devpass'
The developer can now establish a connection with SQL Server by using the SQL Server login ID DevUser. The only optional parameter specified is @passwd, because the defaults for optional parameters not specified in the code are appropriate for this user.
- In the Editor pane of the Query window, enter and execute the following system stored procedure:
sp_helplogins
The Results pane of the Query window shows all security accounts that can establish a connection with SQL Server. Notice that the BUILTIN\Administrator and sa accounts appear in the list as well as the three security accounts that you added in the previous steps. SQL Server Setup adds the BUILTIN\Administrator and sa security accounts. You cannot delete the sa account from the authentication list.
To authorize the security accounts in BookShopDB
- In the Editor pane of the Query window, enter and execute the following code:
EXEC sp_grantdbaccess @loginame = 'BUILTIN\users', @name_in_db = 'All Staff' EXEC sp_grantdbaccess @loginame = 'LAB1\managers' EXEC sp_grantdbaccess @loginame = 'devuser' EXEC sp_grantdbaccess @loginame = 'LAB1\manager01' EXEC sp_grantdbaccess @loginame = 'LAB1\staff01' EXEC sp_grantdbaccess @loginame = 'LAB1\staff02'
The security accounts are now mapped to BookShopDB. The Users group is given an alias of All Staff. Manager01 is added separately from the Managers group, because this user account will be assigned special privileges to the database. Two of the Staff accounts, Staff01 and Staff02, are added separately from the Users group, for the same reason.
- In the Editor pane of the Query window, enter and execute the following code:
sp_helpuser
The Results pane of the Query window shows a list of users who are authorized to access BookShopDB. Notice that dbo appears in the list. This security account appears in each database and is the special database owner account. You cannot be authenticated or authorized to use a database using this account.
To configure permissions for the authorized accounts
- In the Editor pane of the Query window, enter and execute the following code:
sp_helprotect @name = NULL, @username = 'public'
The Results pane of the Query window shows a list of permissions assigned to the Public role. The Public role contains all authorized users, so permission assignment begins here to establish a security hierarchy. Notice that the list of permissions shows that Public is granted the SELECT object permission to many of the local system tables but has no object permissions for the user tables or statement permissions for the database.
- In the Editor pane of the Query window, enter and execute the following code:
GRANT SELECT ON authors TO public GRANT SELECT ON bookauthors TO public GRANT SELECT ON bookcondition TO public GRANT SELECT ON books TO public GRANT SELECT ON customers TO public GRANT SELECT ON formofpayment TO public GRANT SELECT, INSERT, UPDATE, DELETE ON orders TO public GRANT SELECT, INSERT, UPDATE, DELETE ON bookorders TO public GRANT SELECT, INSERT, UPDATE, DELETE ON orderstatus TO public
The SELECT permission is now assigned to Public for all user tables except the Employees and Positions tables. The INSERT, UPDATE, and DELETE object statements have also been granted to Public for the Orders, BookOrders, and OrderStatus tables.
Run sp_helprotect again if you wish to verify that the permissions were set or if you want to review the permissions in Enterprise Manager.
- In the Editor pane of the Query window, enter and execute the following code:
GRANT INSERT, UPDATE, DELETE ON authors TO [LAB1\managers] GRANT INSERT, UPDATE, DELETE ON bookauthors TO [LAB1\managers] GRANT INSERT, UPDATE, DELETE ON bookcondition TO [LAB1\managers] GRANT INSERT, UPDATE, DELETE ON books TO [LAB1\managers] GRANT INSERT, UPDATE, DELETE ON customers TO [LAB1\managers] GRANT INSERT, UPDATE, DELETE ON formofpayment TO [LAB1\managers] GRANT ALL ON employees TO [LAB1\managers] GRANT ALL ON positions to [LAB1\managers]
A security hierarchy is formed because the Managers group is a member of the Public role. The Public role has been assigned permissions that flow down to the Managers group. Permissions not assigned to the Public role are assigned to the Managers group, so the effective rights of the Managers group are all permissions to all user tables. Notice that the last two GRANT statements specify that all permissions should be assigned. The public role has no permissions to the Employees or Positions tables.
To assign fixed role membership
- In the Editor pane of the Query window, enter and execute the following code:
EXEC sp_addrolemember @rolename = 'db_backupoperator', @membername = 'LAB1\staff01' EXEC sp_addrolemember @rolename = 'db_backupoperator', @membername = 'LAB1\staff02'
The two staff members are now members of the db_backupoperator fixed database role so that they can perform backups of BookShopDB.
- In the Editor pane of the Query window, enter and execute the following code:
EXEC sp_addsrvrolemember @loginame = 'LAB1\managers', @rolename = 'securityadmin' EXEC sp_addsrvrolemember @loginame = 'LAB1\manager01', @rolename = 'SysAdmin' EXEC sp_addsrvrolemember @loginame = 'devuser', @rolename = 'SysAdmin'
The Managers group is now a member of the SecurityAdmin fixed server role so that all managers can administer SQL Server security. Manager01 and DevUser are members of the SysAdmin fixed server role so that they have full access to SQL Server. Notice that the input parameters for sp_addsrvrolemember are different than the input parameters for sp_addrolemember.
Lesson Summary
Implement a security design by using database tools such as Enterprise Manager and Query Analyzer. The first step is to configure authentication by adding security accounts to SQL Server and permitting the accounts to establish a connection to SQL Server. Security accounts include Windows user accounts, Windows group accounts, and SQL Server login IDs. Configure security account authentication from the Logins node of Enterprise Manager or by using system stored procedures. The primary system stored procedures for configuring Windows account authentication are sp_grantlogin, sp_denylogin, and sp_revokelogin. The primary system stored procedures for configuring SQL Server login ID authentication are sp_addlogin and sp_droplogin.
The second step in security design implementation is authorizing security accounts to access a database. Configure security account authorization from the Users node of a database that appears in Enterprise Manager or by using system stored procedures. The primary system stored procedures for configuring security account authorization are sp_grantdbaccess and sp_revokedbaccess. Database authorization provides rudimentary permissions to the database. Administer permissions in Enterprise Manager from the properties of a security account or from the properties of an object. Administer permissions from tools such as Query Analyzer with the GRANT, REVOKE, and DENY statements.
The final task in security implementation is administering roles. Role administration involves adding and deleting roles and managing role membership. Add and delete roles from the Roles node in Enterprise Manager or by using system stored procedures. The system stored procedures for adding roles are sp_addrole and sp_addapprole, and the system stored procedure for deleting roles is sp_droprole. Manage role membership from the Roles and Server Roles nodes in Enterprise Manager. The system stored procedures for administering role membership are sp_addrolemember, sp_addsrvrolemember, and sp_droprolemember. Application roles do not contain members. To activate an application role, use the sp_setapprole system stored procedure.
EAN: 2147483647
Pages: 97