Lesson 2:Index Creation and Administration
3 4
In this lesson, you will learn how to create, rebuild, rename, and delete an index using Transact-SQL or the graphical interface tools in Query Analyzer and Enterprise Manager. Before creating an index for a production database, you must understand how data is accessed. You should only create indexes that serve the majority of queries that users request. The way in which the database is used dictates how liberal you can be about creating indexes. There are important performance optimization features included with SQL Server 2000 to help you determine what indexes to create or delete and to help you maintain existing indexes. This lesson concludes with a survey of these features.
After this lesson, you will be able to:
- Create, rebuild, rename, and delete indexes.
- Determine when an index is appropriate.
- Describe the key performance optimization tools for indexes in SQL Server 2000.
Estimated lesson time: 45 minutes
Index Creation
There are a number of ways to create an index in SQL Server. You can create a custom application that uses the SQL-DMO interface to create an index. As you saw in Lesson 1, you can use the Manage Indexes option from the Object Browser or access it from an execution plan in Query Analyzer. The Manage Indexes option is also available from the context menu of a table or view in Enterprise Manager. Enterprise Manager also offers a Create Index Wizard to step you through index creation. You create an index for a table or view by using the CREATE INDEX Transact-SQL statement. You can specify index properties of a primary key or unique constraint during table creation (CREATE TABLE) or table modification (ALTER TABLE).
Using a Graphical Interface
To access the Manage Indexes option in Enterprise Manager, expand a database in the console tree and then select a table or view. In the Details pane, right-click a table, select All Tasks, and then select Manage Indexes. From the Manage Indexes dialog box, click the New button to access the Create New Index dialog box. Figure 11.3 shows the Create New Index dialog box.
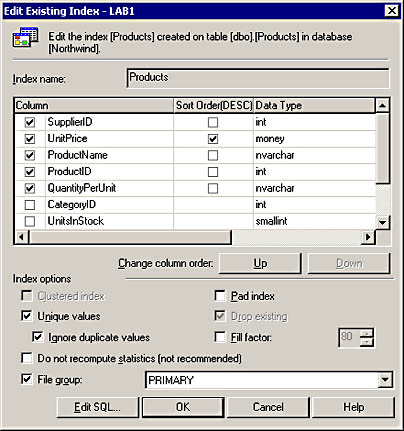
Figure 11.3 The Create New Index dialog box for the Products table of the Northwind database.
From the Create New Index dialog box, you can provide an index name, the column or columns to include in the index, the type of index (clustered or nonclustered), and index properties (unique, pad index, fill factor, and the file group where the index should be created, to name a few). You can also change the order of the columns that are part of a composite index key by selecting the column and clicking the Up and Down buttons. The column that is first in the list of selected columns will define the primary sort order of the index key. Notice that you can also specify a descending sort order for any part of the index key. The Query Optimizer chooses the Product index that appears in Figure 11.3 when the following SELECT statement executes:
SELECT supplierid, unitprice, productname FROM products
The result set shows the SupplierID in ascending order, followed by the UnitPrice in descending order. The index sorts ProductName in ascending order, but this order doesn't appear in the result set because SupplierID and UnitPrice supersede the order of the ProductName column. Here are a few records from the result set to illustrate this point:
| supplierid | unitprice | productname |
|---|---|---|
| 1 | 19.0000 | Chang |
| 1 | 18.0000 | Chai |
| 1 | 10.0000 | Aniseed Syrup |
| 2 | 22.0000 | Chef Anton's Cajun Seasoning |
| 2 | 21.3500 | Chef Anton's Gumbo Mix |
| 2 | 21.0500 | Louisiana Fiery Hot Pepper Sauce |
| 2 | 17.0000 | Louisiana Hot Spiced Okra |
| 3 | 40.0000 | Northwoods Cranberry Sauce |
| 3 | 30.0000 | Uncle Bob's Organic Dried Pears |
If you prefer more help with creating indexes, use the Create Index Wizard in Enterprise Manager. The Create Index Wizard is available in the Wizards option under the Tools menu. Clicking Wizards displays the Select Dialog box. In the Select Dialog box, expand Database, select the Create Index Wizard, and click OK to start the Wizard. The Wizard enables you to view the indexes already created on a table or view and to create a new index by selecting the column (or columns) that should be part of the index and by setting index properties.
Using Transact-SQL Statements
The CREATE INDEX, CREATE TABLE, and ALTER TABLE statements participate in index creation. You can create an index with these Transact-SQL statements by using Query Analyzer or a command prompt tool such as osql.
When using CREATE INDEX, you must specify the index name, the table or view, and the column(s) upon which the index is applied. Optionally, you can specify whether the index should contain only unique values, the index type (clustered or nonclustered), the column sort order for each column, index properties, and the file group location for the index. The default settings are as follows:
- Create a nonclustered index.
- Sort all columns in ascending order and use the current database for sorting the index.
- Use the SQL Server global settings for the pad index and fill factor.
- Create all sort results during index creation in the default file group.
- Update index statistics.
- Roll back a batch of multiple inserts if a unique index is violated by any of the records being inserted.
- Prevent an existing index from being overwritten.
The main clauses in a CREATE INDEX statement are summarized as follows:
CREATE
[UNIQUE] [CLUSTERED | NONCLUSTERED] INDEX
index_name
ON [table_name | view_name](column_name [,...n])
[WITH [index_ property [,...n] ]
[ON file_ group]
So far, you have learned the meaning of these clauses, which clauses are optional, and what the default settings are for any clause not specified in the CREATE INDEX statement. In summary, the UNIQUE and CLUSTERED or NONCLUSTERED clauses are optional. It is also optional to specify index properties by using the WITH clause and to specify the file group where the index is created by using the second ON clause.
The following CREATE INDEX statement uses default settings for all optional clauses:
CREATE INDEX index01 ON table01(column01)
An index named Index01 is created on Table01. The index key for the table is Column01. The index is not unique and is nonclustered. All index properties match the default settings for the database.
Using optional clauses customizes the following CREATE INDEX statement:
CREATE UNIQUE CLUSTERED INDEX index01 ON table01(column01, column03 DESC) WITH FILLFACTOR = 60, IGNORE_DUP_KEY, DROP_EXISTING, SORT_IN_TEMPDB
An index named Index01 replaces the existing index of the same name created on Table01. The DROP_EXISTING keyword instructs Index01 to be replaced. The index key includes Column01 and Column03, making Index01 a composite index. The DESC keyword sets the sort order for Column03 to descending (rather than ascending). The FILLFACTOR keyword configures the index so that the leaf level index pages are 40 percent full, leaving 60 percent of the space to contain additional index key entries. The CLUSTERED and UNIQUE clauses configure the index as clustered and unique; the table is physically sorted by the index; and duplicate keys are not allowed. The IGNORE_DUP_KEY keyword enables a batch containing multiple INSERT statements to succeed by ignoring any INSERTS that would violate the uniqueness index requirement. The SORT_IN_TEMPDB keyword instructs the index to perform intermediate sort operations in TempDB. This keyword is typically used to improve the speed at which a large index is created or rebuilt and to decrease index fragmentation. Because the second ON clause does not appear, Index01 is created in the default file group for the database.
Creating a primary key constraint or a unique constraint automatically creates an index. You define these constraints when you create or alter a table definition. The CREATE TABLE and ALTER TABLE statements include index settings so that you can customize the indexes that accompany these constraints.
The main clauses in CREATE TABLE statements that relate to index creation are as follows:
CREATE TABLE table_name
(column_name data_type
CONSTRAINT constraint_name
[PRIMARY KEY | UNIQUE]
[CLUSTERED | NONCLUSTERED]
[WITH FILLFACTOR = fill_ factor ]
[ON file_ group] )
A primary key constraint is always set to NOT NULL. You can specify NOT NULL, but it is implicit in the definition of a primary key constraint. The following CREATE TABLE statement uses default index settings when creating a table with a primary key constraint:
CREATE TABLE table01 (column01 int CONSTRAINT pk_column01 PRIMARY KEY)
A table named Table01 is created with a single column named Column01. The PRIMARY KEY clause defines Column01 with a primary key constraint named Pk_Column01. The primary key constraint, Pk_Column01, is a unique and clustered index by default.
Using optional clauses for index creation customizes the following CREATE TABLE statement:
CREATE TABLE table01 (column01 int CONSTRAINT pk_column01 PRIMARY KEY WITH FILLFACTOR = 50 ON SECONDARY)
The ALTER TABLE syntax for creating or modifying primary key or unique constraints is similar to the CREATE TABLE statement. In the ALTER TABLE statement, you must specify whether you are altering, adding, or dropping a constraint. For example, the following ALTER TABLE statement adds a column with a unique constraint to Table01:
ALTER TABLE table01 ADD column02 int CONSTRAINT uk_column02 UNIQUE
The unique constraint is named uk_column02 and is a nonclustered index. A unique constraint creates a nonclustered index unless CLUSTERED is specified and a clustered index does not already exist for the table.
Index Administration
Maintenance tasks include rebuilding, deleting, and renaming indexes. Delete an index if it is no longer needed or if it is corrupted. Rebuild an index to maintain a custom fill factor or to reorganize the storage of the index data so that the index is contiguous in the database. Rename an index if your naming conventions change or if an existing index doesn't follow existing naming conventions.
Deleting an Index
Unused indexes for tables that are frequently updated with new information should be removed. Otherwise, SQL Server will waste processing resources to maintain unused indexes. Use the following syntax to delete an index:
DROP INDEX table_name.index_name | view_name.index_name [ ,...n ]
The table name or view name must be included in the DROP INDEX statement. You can drop multiple indexes in a single DROP INDEX statement. The following example deletes a table and a view index:
DROP INDEX table01.index01, view01.index02
You can delete an index using the Object Browser in Query Analyzer or using Enterprise Manager. In the Object Browser, right-click an index name and then click Delete. In Enterprise Manager, open the Manage Indexes dialog box, select an index, and then click Delete.
Rebuilding an Index
If a clustered index exists on a table or view, any nonclustered indexes on the same table or view will use the clustered index as their index key. Dropping a clustered index by using the DROP INDEX statement causes all nonclustered indexes to be rebuilt so that they use a RID (rather than an index key) as a bookmark. If a clustered index is then re-created by using the CREATE INDEX statement, all nonclustered indexes are rebuilt so that the clustered index key replaces the RID as the index bookmark. For large tables or views that have many indexes, this rebuild process is resource intensive. Fortunately, there are other ways to rebuild an index. There are two alternatives to deleting and re-creating an index: issuing the DBCC DBREINDEX statement or specifying the DROP_EXISTING clause in the CREATE INDEX statement.
The DBCC DBREINDEX statement rebuilds one or more indexes on a table or view by using a single statement. This approach saves you from having to issue multiple DROP INDEX and CREATE INDEX statements to rebuild multiple indexes. To rebuild all indexes, instruct DBCC DBREINDEX to rebuild the clustered index, thereby causing a rebuild of all indexes on a table or view. Alternatively, you can simply leave the index name out of the DBCC DBREINDEX statement, and when the statement runs, all indexes are rebuilt. DBCC DBREINDEX is especially useful for rebuilding indexes on primary key and unique constraints, because unlike DROP INDEX, it isn't necessary to drop the constraint first before rebuilding the index. For example, the following statement will fail to delete an index on a primary key constraint named Pk_Column01:
DROP INDEX table01.pk_column01
However, the following DBCC DBREINDEX statement will rebuild the index for the primary key constraint:
DBCC DBREINDEX (table01, pk_column01, 60)
The index Pk_column01 on the primary key constraint Pk_column01 is rebuilt with a fill factor of 60 percent. DBCC DBREINDEX is commonly used to reestablish fill factor settings on indexes and thus decreases the frequency of page splits.
The DROP_EXISTING clause of the CREATE INDEX statement replaces a table or view index of the same name. As a result, the index is rebuilt. DROP_EXISTING brings efficiencies to the rebuild process (much like DBCC DBREINDEX). If you use CREATE INDEX with the DROP_EXISTING clause to replace a clustered index with an identical clustered index key, the nonclustered indexes are not rebuilt—and the table is not resorted. If the clustered index key is changed, the nonclustered indexes are rebuilt only once—and the table is resorted.
Renaming an Index
You can rename an index by deleting and recreating it. A simpler way to rebuild an index, however, is with the sp_rename system stored procedure. The following example demonstrates how to rename an index named index01 to index02:
sp_rename @objname = 'table01.index01', @newname = 'index02', @objtype = 'INDEX'
The table qualifier was included with the @objname input parameter. If you don't include the table name, the system stored procedure is incapable of locating the index to rename. However, the table qualifier was intentionally excluded from the @newname input parameter. If you do include the table name with the new index name, the index will be named after the table. For example, if you specify @newname = table01.index02, then the index is named table01.index02 instead of index02. The table qualifier is unnecessary on @newname because the table is assumed from @objname. The @objtype input parameter must be set to `INDEX' or the system stored procedure will be incapable of locating the correct object type to rename.
Choosing to Index
Thus far, you have learned what an index is and how to create and administer it. Additionally, in Exercise 1 you saw examples of how to increase the frequency of index use by carefully designing your queries and indexes. This section provides additional guidelines on determining when to create an index and deciding which index properties to configure for optimal performance. Keep in mind that only one clustered index is allowed on a table or view. Therefore, a carefully designed clustered index is more important then a carefully designed nonclustered index.
You create indexes to accommodate the types of queries that users commonly run against a database. The Query Optimizer then uses one or more indexes to satisfy the query. The following query types, separately or in combination, benefit from indexes:
- Exact match queries. Queries that use the WHERE clause for finding a specific value:
SELECT contactname, customerid FROM customers WHERE customerid = 'bergs'
A clustered index is a good choice for exact match queries if the WHERE clause returns a distinct value. For this reason, creating a clustered index is the default for primary key constraints. Online transaction processing (OLTP) applications also benefit from clustered indexes on unique keys.
Use a nonclustered index for an exact match query that does not return a unique record. For example, if users often query on a specific first name and last name, such as Bob Smith, an exact match query might return multiple records from the database.
- Wildcard queries. Queries that use the LIKE clause for finding values:
SELECT contactname, customerid FROM customers WHERE customerid LIKE 'bl%'
Wildcard queries starting with the percentage sign ( % ) are not aided by indexes, because index keys start with a specific character or numeric value.
- Range queries. Queries that search for a sequence of values:
SELECT contactname, customerid FROM customers WHERE customerid BETWEEN 'b%' AND 'c%'
Clustered indexes are an excellent choice for this type of query because the index pages are physically sorted in sequential order. Therefore, once the first record is located, it is likely that the other records in the range will be adjacent or at least nearby.
- Table joins. Queries that build a result set based on values in another table:
SELECT c.contactname, c.customerid c, o.orderid FROM customers c INNER JOIN orders o ON c.customerid = o.customerid
- Sorted output without an ORDER BY clause. You saw examples of this situation in Lesson 1 and Exercise 1.
If a specific column (or combinations of columns) is often sorted in a specific way, consider a clustered index to accommodate the sort order.
- Covered queries. Queries that make use of covering indexes.
You should keep clustered index keys as small as possible, because nonclustered indexes use the clustered index key as their bookmark. As a result, a wide clustered index key creates large, nonclustered indexes. If you decide to create a clustered index as covering, use as few columns as possible to cover your queries. If you need a wide index for a covered query, create a nonclustered index as a covering index.
- Queries that return large result sets:
SELECT * FROM customers
For a large result set, don't create a covering index that includes all columns. Instead, create a clustered index on one or a few columns. The Query Optimizer will use the clustered index to look up matching values.
Creating indexes for almost every query that you can imagine or creating very wide index keys containing many columns will negatively impact processor performance and increase disk capacity requirements to store the indexes. Processor performance is impacted by indexes because table and view modifications require indexes to be updated regularly. Use indexes sparingly on tables and views that undergo frequent modification. Do not use indexes for small tables and views that change infrequently, because an index could actually decrease the speed at which records are returned from a query. Conversely, indexing large tables will significantly improve query performance.
Index Performance
Designing and maintaining appropriate indexes for a database is difficult, especially if common database queries change or if the database structure is modified. SQL Server includes the Index Tuning Wizard to assist you with choosing indexes for a table or view. The Index Tuning Wizard analyzes a representative sample of database activity (a workload) to recommend an ideal set of indexes for a database. If the database workload or structure changes, rerun the Index Tuning Wizard to reanalyze indexes for a database. The workload input for the Wizard can be a SQL script (.SQL) file, a SQL Profiler Trace (.TRC or .LOG) file, a trace table, or a script selected in Query Analyzer.
Index Statistics
SQL Server maintains statistics concerning the distribution of values in columns that indexes use. The Query Optimizer depends on these statistics to make accurate choices on the appropriate indexes to use for a query. You can disable statistics updates by using the STATISTICS_NORECOMPUTE clause of the CREATE INDEX statement. This clause disables the automatic re-computation of outdated index statistics. Disabling statistics is inadvisable if a table or view changes frequently. To restore automatic statistics updating, execute the UPDATE STATISTICS statement on the index without including the NORECOMPUTE clause, or you can use the sp_autostats system stored procedure. The sp_autostats procedure displays or changes the automatic UPDATE STATISTICS setting.
NOTE
For more information about UPDATE STATISTICS and sp_autostats, refer to SQL Server Books Online. For more details about index performance, refer to Chapter 14, "SQL Server Monitoring and Tuning," and SQL Server Books Online.
Exercise 2: Creating a Clustered Index

In this exercise, you will create a clustered index and some nonclustered indexes for several tables in the BookShopDB database and run several SELECT statements to observe their use. You will then administer the indexes by changing the fill factor, renaming the index, and dropping the indexes from the database.
To create and test a nonclustered index
- Open Query Analyzer and connect to your local server.
- In the Editor pane of the Query window, enter and execute the following code:
USE bookshopdb sp_helpindex books
The Results pane in the Grids tab shows that a clustered, unique index on the TitleID index key exists for the primary key constraint Books_pk.
You observe how employees access data in the Books table, and you cannot justify changing this index in any way. Employees often query on the TitleID, Title, and Sold columns to let customers know if a book is available. The Title column value can be long, so you decide that it would be best to create a nonclustered index to cover a query on the TitleID, Title, and Sold columns.
- In the Editor pane of the Query window, enter and execute the following code:
CREATE NONCLUSTERED INDEX TitleSoldStatus ON books(title, sold)
There could be two titles of the same name that have the same sold status. Therefore, this index is being created as nonunique (the UNIQUE keyword is not included).
- If the Execution Plan tab does not appear in the Results pane of the Query Analyzer, click Query and then click Show Execution Plan.
- To test that the nonclustered index is used by the Query Optimizer, enter and execute the following code in the Editor pane of the Query window:
SELECT titleid, title, sold from books
The result set appears in the Grids tab of the Results pane.
- Click the Execution Plan tab and move the mouse pointer over the Books.TitleSold... index.
A box appears, showing index scan statistics for the TitleSoldStatus index. Notice that the fully qualified index name appears at the bottom of the box.
- Why didn't the Query Optimizer use the clustered index Books_pk?
To prepare a table for a new index configuration
- In the Editor pane of the Query window, enter and execute the following code:
sp_helpindex orders
The Results pane in the Grids tab shows that Orders_pk is a clustered, unique index containing the OrderID index key. Orders_pk is a primary key constraint.
You observe that employees usually query on both the OrderID and the CustomerID in the Orders table; therefore, you decide to create a clustered index containing the OrderID and CustomerID columns. To accomplish this task, you must change the Orders_pk clustered index to a nonclustered index.
- In the Editor pane of the Query window, enter and execute the following code:
CREATE UNIQUE NONCLUSTERED INDEX orders_pk ON orders(orderid) WITH DROP_EXISTING
The Results pane in the Grids tab displays an error message, indicating that you cannot convert a clustered index to a nonclustered index.
To change a clustered index to a nonclustered index, you must drop and re-create the index. Because the index is part of a primary key constraint and a foreign key constraint on another table, you must use ALTER TABLE to drop the constraints, starting with the foreign key constraint.
- In the Editor pane of the Query window, enter and execute the following code:
ALTER TABLE bookorders DROP CONSTRAINT orderid_fk
The foreign key constraint is dropped from the BookOrders table. Any foreign key constraints must be removed before primary key constraints are dropped. Later in this practice, you will re-create the foreign key constraint.
Next, you will drop the primary key constraint.
- In the Editor pane of the Query window, enter and execute the following code:
ALTER TABLE orders DROP CONSTRAINT orders_pk
The primary key constraint is dropped from the Orders table.
In the next practice, you will re-create this constraint and the foreign key constraint after you create a clustered index for the Orders table.
To create a clustered index
- In the Editor pane of the Query window, enter the following code:
CREATE UNIQUE CLUSTERED INDEX CustomerOrder ON orders(customerid, orderid) WITH FILLFACTOR = 70
This Transact-SQL statement creates a clustered index named CustomerOrder with a composite index key. It is a composite key because it contains the CustomerID and OrderID columns.
- Execute the code.
The CustomerOrder clustered index is created from the Orders table. For efficiency, you can create the clustered index before creating the nonclustered index. This sequence is more efficient than creating the nonclustered index first because the nonclustered index is built only once, using the clustered index key as its bookmark.
Now that you have created the clustered index, you will restore the primary key constraint and the foreign key constraint, starting with the primary key constraint.
- In the Editor pane of the Query window, enter and execute the following code:
ALTER TABLE orders ADD CONSTRAINT orders_pk PRIMARY KEY NONCLUSTERED (orderid)
The primary key constraint is re-created on the Orders table. The index of this primary key constraint is nonclustered. Notice that the NONCLUSTERED keyword is specified. This keyword is unnecessary, however, because a clustered index already exists for the table. It is included as good measure to document the intent of the programmer.
Now that you have created the primary key constraint, you will re-create the foreign key constraint.
- In the Editor pane of the Query window, enter and execute the following code:
ALTER TABLE bookorders ADD CONSTRAINT orderid_fk FOREIGN KEY (orderid) REFERENCES orders(orderid)
- In the Editor pane of the Query window, enter and execute the following code:
sp_helpindex orders GO sp_helpindex bookorders
From the result sets appearing in the Results pane, review the indexes configured for the Orders and BookOrders tables.
To rename and drop indexes
- In the Editor pane of the Query window, enter the following code:
sp_rename @objname ='orders.customerorder', @newname = 'IN_CustomerOrder', @objtype = 'INDEX'
The CustomerOrder index is being renamed to IN_CustomerOrder to comply with a company nomenclature policy that all indexes not tied to a primary key constraint must be prefixed with IN_.
- Execute the code.
The Results pane in the Grids tab displays a message indicating that the index was renamed to IN_CustomerOrder and displays a caution message that changing an object name could break scripts and stored procedures that use the object.
Next, you will delete the IN_CustomerOrder index.
- In the Editor pane of the Query window, enter and execute the following code:
DROP INDEX orders.in_customerorder, books.titlesoldstatus
The IN_CustomerOrder index is deleted from the Orders table, and the TitleSoldStatus index is deleted from the Books table.
- In the Editor pane of the Query window, enter and execute the following code:
CREATE UNIQUE CLUSTERED INDEX orders_pk ON orders(orderid) WITH DROP_EXISTING
The Orders_pk index on the Orders_pk primary key constraint is converted from a unique, nonclustered index to a unique, clustered index. Notice that you converted a nonclustered index to a clustered index here, but earlier in this exercise, a clustered index could not be directly converted to a nonclustered index.
Lesson Summary
You create indexes by using the CREATE INDEX statement or by using graphical tools such as the Object Browser in Query Analyzer or Enterprise Manager. In addition, Enterprise Manager contains the Create Index Wizard to step you through index creation. Indexes are created automatically for primary key and unique constraints. These constraints are created by using the CREATE TABLE and ALTER TABLE statements or a graphical tool such as Enterprise Manager. When creating an index, you specify index properties, such as index type, sort order, and fill factor.
Administration tasks include rebuilding, deleting, and renaming indexes. Delete an index with the DROP INDEX statement or by using graphical tools such as the Object Brower in Query Analyzer. An index is most efficiently rebuilt with the DBCC DBREINDEX statement or the DROP_EXISTING clause of the CREATE INDEX statement. Use the sp_rename system stored procedure to change the name of an index.
Careful index design is critical to improving query performance without significantly degrading database performance. Create indexes based on the most common queries performed against the database. Indexes are especially useful for exact match queries, certain types of wildcard queries, range queries, queries involving table joins, sorted output queries, covered queries, and queries that create large result sets. Use the Index Tuning Wizard to aid in the design of appropriate queries. The Index Tuning Wizard analyzes the database's workload and then suggests appropriate indexes to accommodate database activity. SQL Server automatically maintains statistics regarding the distribution of column values that make up an index key. The Query Optimizer depends on these statistics to satisfy query requests appropriately.
EAN: 2147483647
Pages: 97