Lesson 1: Introduction to SQL Server Automated Administration
SQL Server provides many options for automating routine administrative tasks. This lesson discusses the benefits of automating administration, the SQL Server components that enable automated administration, and how to prepare your server for automated administration.
After this lesson, you will be able to
- Explain how the components of SQL Server automated administration interact
- Explain how jobs and alerts are processed
- Configure SQL Server Agent to use a MAPI client to send e-mail messages
Estimated lesson time: 75 minutes
Reasons to Automate
Automating routine maintenance tasks on your local server or in a multiserver environment allows you to spend time on other database administrative functions that lack predictable responses. Another benefit of automated administration is the ability to configure your server to recognize and respond to potential problems.
Performing Regularly Scheduled Tasks
You perform several maintenance and administrative tasks routinely on SQL Server, such as
- Backing up databases
- Transferring data
- Maintaining indexes
You can automate these tasks to occur on a regular schedule. For example, you can define index maintenance tasks to occur on the first Sunday of every month.
Recognizing and Responding to Potential Problems
SQL Server allows you to be proactive and prepare for potential problems by
- Responding to SQL Server errors. You can define a job to correct a given problem. For example, error number 9002 indicates that the transaction log is full. You can define a job that, when error number 9002 is raised, executes a Transact-SQL statement to back up and truncate the transaction log.
- Defining performance conditions that monitor potential problems. For example, you can define SQL Server Agent to detect when locks are blocking users from modifying data and automatically notify a system administrator that a particular user is causing the locks that are blocking the data.
Before you automate tasks, it is important to consider the fundamentals of preparing for and performing SQL Server automated administration.
For a video demonstration that covers automating administration tasks, run the placeholder.avi file located in the \Auto.htm folder on the Supplemental Course Materials CD-ROM.
Components of SQL Server Automated Administration
Components of SQL Server automated administration include the SQL Server SQLServerAgent and MSSQLServer services and the Microsoft Windows NT EventLog service. As Figure 13.1 illustrates, these services work together to allow automated administration. The term administrative task refers generically to activities that system administrators or database owners perform.
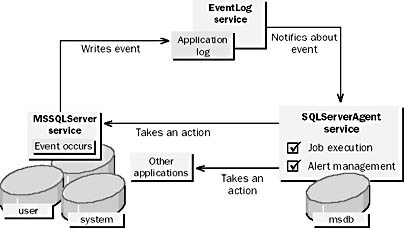
Figure 13.1 Components of SQL Server automated administration
NOTE
SQL Server Agent was called SQL Server Executive in previous versions of SQL Server.
The SQLServerAgent Service
When the SQLServerAgent service starts, it registers with the EventLog service and connects to the MSSQLServer service. This allows the EventLog service to notify the SQL Server Agent when events are written to the Windows NT application log. The SQLServerAgent service then reads the Windows NT application log to determine whether the event was generated by SQL Server and if so to determine whether there is a defined action to be taken in response to the event.
The SQLServerAgent service communicates with the MSSQLServer service to take action when an event occurs. Actions include executing jobs or firing alerts. These actions are defined in the msdb database. SQL Server Agent can also execute other applications.
The EventLog Service
The MSSQLServer service writes events to the Windows NT application log. An event is anything that happens within the system or application that requires attention. Events are written to the EventLog service by SQL Server when
- SQL Server errors with severity levels between 19 and 25 occur
- Error messages have been defined to be written to the Windows NT application log with the sp_addmessage or sp_altermessage system stored procedures
- The RAISERROR WITH LOG statement is executed
- The xp_logevent extended stored procedure is executed
NOTE
Windows 95 and Windows 98 does not support services. When you run SQL Server on Windows 95 or Windows 98, SQL Server Profiler is used to monitor logged events and forward them to SQL Server Agent.
Processing Jobs and Alerts
Jobs and alerts are defined separately and can be executed or fired independently. A job is a maintenance or administrative task that consists of one or more steps. Jobs execute according to their defined schedules or in response to an alert. You can automate the process of recognizing and responding to potential problems by creating alerts. Alerts fire when SQL Server Agent is notified about events by the EventLog service or when SQL Server Agent receives performance data from the MSSQLServer service. Figure 13.2 illustrates how SQL Server processes jobs and alerts.
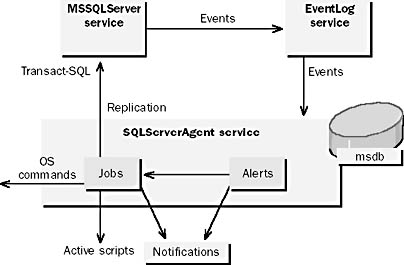
Figure 13.2 Processing jobs and alerts
NOTE
Jobs were called tasks in previous versions of SQL Server.
Defining an Alert That Executes a Job
You will typically create an alert to notify an operator when an error occurs in a database or to execute a job in response to the fired alert. For example, you can create an alert that fires if a transaction log backup fails due to a tape device error. The alert executes a job that performs the backup to a disk device and notifies an operator.
Defining a Job That Executes Regularly
You can create a job that executes on a regular schedule and notifies an operator when it completes. For example, you can define a job to transfer data from another database into the Northwind database once a month. The job definition may include several steps: backing up the transaction log, transferring the data, and then backing up the database.
Other things you can define a job to do include
- Deleting itself when it completes, if it is a one-time action
- Notifying operators if any of the job steps fail to execute
- Writing the success or failure of the job to the Windows NT application log
Defining an Alert That May Fire While a Job Is Executing
Jobs and alerts complement one another because an alert may fire in response to an error that has occurred because a job step failed. The alert can in turn execute a job to correct the problem.
Preparing to Automate
Before you begin creating jobs and defining alerts, you should ensure that SQL Server Agent is running and has been set up properly. If you plan to notify operators by e-mail or pager, you should also configure a SQL Server Agent mail profile.
Ensure That SQL Server Agent Is Running
SQL Server Agent is a Windows NT service that must be running in order to execute jobs automatically and fire defined alerts. You should set up the SQLServerAgent service to start automatically whenever you start Windows NT.
Use an Appropriate SQL Server Agent User Account
When SQL Server is installed, a user account is specified in the startup properties of the SQLServerAgent service. SQL Server Agent can use either the local System account or a domain user account.
Using the local System account for SQL Server Agent allows the service access to the local computer only. A domain user account is required for SQL Server Agent to have permission to
- Communicate with most e-mail systems to send or receive e-mail
- Access resources across the network
- Perform SQL Server replication
- Execute multiserver administrative jobs
Configure a SQL Server Agent Mail Profile
If you plan to send notifications to operators using e-mail or pagers, you must
- Have a MAPI-1-compliant e-mail client
- Configure a mail profile for SQL Server Agent to use to establish a mail session with your messaging server
SQL Server Agent requires a profile in order to start a mail session and send notification by e-mail or pager. A SQL Server Agent mail session is started every time the SQLServerAgent service is started. You can create the profile with a mail client, such as Microsoft Outlook, that is installed locally on the SQL Server computer.
If Microsoft Exchange Server is used, a mail profile must be configured for the domain user account that SQL Server Agent uses.
For pager notifications, SQL Server Agent sends e-mail to your messaging server. On the messaging server, you must have third-party pager-to-e-mail software and/or hardware that converts the inbound e-mail into pager messages.
Sharing a Profile with SQL Mail
SQL Server uses two separate mail sessions:
- The MSSQLServer service uses a mail session that is referred to as SQL Mail.
- The SQLServerAgent service uses a mail session that is exclusive to SQL Server Agent activities.
SQL Server uses this mail session when your database applications execute the xp_sendmail extended stored procedure to send a message or query result set to a recipient or when they execute the sp_processmail system stored procedure to process incoming mail.
If the SQLServerAgent and MSSQLServer services use the same Windows NT domain user account, by default they will use the same mail profile for SQL Server Agent and SQL Mail mail sessions. This allows both services to share a common mailbox.
Creating Separate Profiles
You can configure separate mailboxes for SQL Server and SQL Server Agent by creating separate mail profiles. There are two ways to accomplish this:
- Use separate domain user accounts for each service. This requires you to configure a mail profile for each user account.
- Use the same domain user account for each service and create multiple mail profiles.
Practice: Configuring Mail Profiles
In this practice, you will use Windows Messaging to configure the Microsoft Mail service and create profiles for the SQLService user account to enable SQL Server Agent and SQL Mail to send and receive messages. You will then create a profile for your administrative user account, to send and receive messages with Windows Messaging. Finally, you will use SQL Server Enterprise Manager to configure SQL Server Agent to use the mail profile that is configured for the SQLService user account. You will configure SQL Mail in the next lesson.
Exercise 1: Configuring a Workgroup Postoffice and Adding Mailboxes
In this exercise you will configure a workgroup postoffice and add mailboxes to the newly created postoffice.
- To configure a workgroup postoffice and add mailboxes to the postoffice
- Log on to your computer as Administrator.
- Open Control Panel. If there is an icon for Microsoft Mail Postoffice, go to step 7.
- Open Add/Remove Programs in the Control Panel.
- On the Windows NT Setup tab, check Windows Messaging in the Components list.
- Click OK to close the Add/Remove Programs dialog box. Follow the prompts to install Windows Messaging.
- You may have to close and reopen Control Panel or select Refresh from the View menu before you see the Microsoft Mail Postoffice icon.
- Double-click Microsoft Mail Postoffice in the Control Panel.
- Select the Create A New Workgroup Postoffice radio button, and click Next.
- Type C:\ in Postoffice Location, and click Next. Click Next again to confirm the new postoffice location.
- Type Admin in Name and Mailbox. Click OK, and then click OK again.
- Double-click Microsoft Mail Postoffice in the Control Panel.
- Select the Administer An Existing Workgroup Postoffice option, and click Next. Click Next again to accept the postoffice location.
- Type Admin in the Mailbox field and password in the Password field. Click Next.
- In the Postoffice Manager, click Add User to add a new user to the workgroup postoffice.
- Type SQLAgent in Name and Mailbox. Click OK.
- Click Add User to add another new user to the workgroup postoffice.
- Type SQLMail in Name and Mailbox. Click OK.
- Click Close to close the Postoffice Manager.
Exercise 2: Configuring Profiles for the SQLService Account
In this exercise, you will configure profiles for the user account, SQLService.
- To configure profiles for the SQLService account
- Log on to your computer with a user name of SQLService and a password of password, in the STUDYSQL domain.
- Double-click Inbox on the desktop. Under Use The Following Information Services, check Microsoft Mail. Ensure that no other services are checked. Click Next. Click Next to confirm the postoffice path of C:\Wgpo0000.
- In the list of mailbox names, select SQLAgent. Click Next.
- Type password in Password, and click Next.
- Click Next to accept the personal address book location.
- Click Next to accept the personal folders location.
- Click Next if you are prompted to do so to indicate that the Inbox should not be added to the Startup group.
- Click Finish to complete the creation of the new profile and open the Inbox.
- Close the Inbox - Windows Messaging application (the application may be called Inbox - Microsoft Exchange).
- Double-click Mail in the Control Panel. (This icon may be labeled Mail and Fax).
- Click Show Profiles. One profile, called Windows Messaging Settings, is shown. Highlight Windows Messaging Settings, and click Copy. (If there is no profile called Windows Messaging Settings, copy the profile called MS Exchange Settings or the currently active profile.)
- Type SQLServerAgent Profile in New Profile Name, and click OK.
- Highlight SQLServerAgent Profile, and click Copy.
- Type SQLMail Profile in New Profile Name, and click OK.
- Highlight SQLMail Profile, and click Properties.
- Highlight Microsoft Mail, and click Properties.
- On the Logon tab, change the name in the Enter The Name Of Your Mailbox field to SQLMail. Click OK to close the Microsoft Mail dialog box, and then click OK to close the SQLMail Profile Properties dialog box.
- Click Close to close the Mail dialog box.
- Log off of Windows NT.
You have now added a profile for SQL Server Agent to use. Next you will change the default name of this profile and add a profile for SQL Mail.
Exercise 3: Configuring a Profile for the Administrator Account
In this exercise, you will configure a profile for the Administrator user account.
- To configure a profile for the Administrator account
- Log on to your computer as Administrator.
- Double-click Inbox on the desktop. Under Use The Following Information Services, check Microsoft Mail. Ensure that no other services are checked. Click Next. Click Next to confirm the postoffice path of C:\Wgpo0000.
- In the list of mailbox names, select Admin. Click Next.
- Type password in Password, and click Next.
- Click Next to accept the personal address book location.
- Click Next to accept the personal folders location.
- Click Next if you are prompted to do so to indicate that the Inbox should not be added to the Startup group.
- Click Finish to complete the creation of the new profile and open the Inbox.
- On the Tools menu, click Services.
- Highlight Microsoft Mail in the list of information services, and then click Properties.
- On the Delivery tab of the Microsoft Mail dialog box, change the Check For New Mail Every option to 1 minute. Click OK twice to close the dialog boxes.
- Leave the Inbox open, as you will begin receiving messages in the exercises that follow.
Exercise 4: Configuring SQL Server Agent to Use the Profile
In this exercise, you will use SQL Server Enterprise Manager to configure SQL Server Agent to start a mail session that uses the SQLServerAgent Profile profile.
- To configure SQL Server Agent to use the mail profile
- In SQL Server Enterprise Manager, expand your server, and then expand Management.
- In the console tree, right-click SQL Server Agent, and then click Properties.
- In the Mail Profile drop-down list, select SQLServerAgent Profile.
- Click Test.
- Click OK to close the SQL Server Agent Properties dialog box.
- In the console tree, right-click SQL Server Agent, and then click Display Error Log.
- In the Type drop-down list, select All Types.
- Verify that a mail session was established when SQL Server Agent was started.
A message appears, indicating that the test was successful. Click OK to close the message.
A message appears asking you if you want to restart SQL Server Agent so that the changes you have made will take effect. Click Yes. Click OK when the service has restarted.
Lesson Summary
Automating administration saves time and reduces errors that occur when a database administrator forgets to perform a task or is unavailable. SQL Server uses the SQLServerAgent service and the Windows NT application log to enable automated administration. If you intend to make full use of automated administration, you must ensure that the SQLServerAgent service is running, configure an account for the SQLServerAgent, and configure a SQL Server Agent mail profile.
EAN: 2147483647
Pages: 100