Lesson 1: Windows Application User Interfaces
In this lesson, you will explore elements of the user interface that are created for you when you generate a document/view-based application using the MFC AppWizard. You will learn how to use the Microsoft Visual C++ resource editors to edit standard interface features to suit your own requirements, how to handle user menu or toolbar selections, and how to update the interface to communicate information to the user.
After this lesson, you will be able to:Estimated lesson time: 50 minutes
- Describe the icons that you are required to supply for a program that meets the Microsoft Windows 98 or Microsoft Windows NT logo requirements, and how to use the graphics editor to design icons.
- Describe how to edit menus and toolbars.
- Describe how to implement accelerator keys for menu and toolbar commands.
- Describe how to add code to handle menu or toolbar selections.
- Describe how to dynamically update the appearance of menu and toolbar commands.
- Describe how to write to the status bar.
Application and Document Icons
An application that meets the Windows 98 or Windows NT logo requirements must define standard (32x32 pixels) and small (16x16 pixels) icons for both the application and the document type. Icons are application resources that are associated with Windows icon (.ico) files. The MFC application framework automatically defines default icon resources and creates icon files for you.
All application resources such as icons, menu commands, dialog boxes, controls, and so on have a unique numeric identifier known as a resource ID. The resource.h file defines memorable names to correspond to these IDs.
Figure 4.1 illustrates the icons, resource IDs, and icon files that are created for the MyApp sample application.

Figure 4.1 MFC default icons
Your program's application object calls CWinApp::RegisterShellFileTypes() to register the icons with the Windows file manager when the program starts.
The Graphics Editor
The graphics editor supplied with Visual C++ has an extensive set of tools for drawing images. In addition to creating and editing images in bitmap (.bmp) format, you can edit .gif or .jpg images, and convert .gif or .jpg images to bitmaps.
To access the graphics editor, open a graphical resource by double-clicking an object in ResourceView. This allows you to access the special features that support icon files and toolbar bitmaps. Figure 4.2 shows the graphics editor opened to edit the standard-sized default document icon.

Figure. 4.2 The graphics editor
- Return to the MyApp project you modified in Chapter 3.
- In ResourceView, expand MyApp Resources.
- Expand the Icon folder.
- Double-click the IDR_MAINFRAME object to open the icon in the graphics editor.
Experiment with the drawing features of the graphics editor. Note that you can switch between the Standard (32x32) icon format and the Small (16x16) icon format using the Device list in the upper left corner of the editor pane.
You can use New Device Image to create icons in other device formats. The graphics editor provides different pencil and brush styles, area fill, and text tools; it also allows you to select an area of your icon to move, resize, or copy to the clipboard.
If you are feeling creative, you might like to design your own icons for the MyApp application. The easiest way to do this is to edit the existing icons, leaving their resource IDs as they are. When you build the application, your changes to the .ico files will be saved.
Editing Application Menus
Menus offer a convenient and consistent way for you to group commands, and an easy way for users to access them. An application generated by the MFC AppWizard will generally include a main menu resource appropriate to the options selected by the developer. Figure 4.3 depicts a typical menu generated for an SDI application and illustrates the elements of a menu interface.
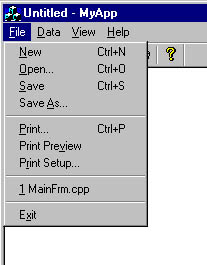
Figure 4.3 SDI application menu
The menu as a whole is created with a resource ID of IDR_MAINFRAME. You will recognize that this is the same ID as the application icon that you read about in Chapter 3. When a document template object is created, it is associated with a resource ID that specifies a group of resources to be used by the document type. These might include menu, toolbar, icon, accelerator table, and string resources.
Using the menu editor supplied with Visual C++ (shown in Figure 4.4), you can visually construct a menu and edit the properties of the menu commands.

Figure 4.4 The menu editor
In the following exercises, you will learn how to add and remove menus, and you will add menu commands to the MyApp application menus. You'll start by removing the standard Edit menu that is depicted in Figure 4.4. You would want to do this if your application was not going to support the selection of objects in the view, or the Cut, Copy, and Paste commands that work on selected objects. In its place, you will add a new menu—the Data menu. The Data menu will contain commands that will allow the user to connect to a remote database, and to upload application data. You will add two commands to the menu: the Connect command and the Upload command.
- In the MyApp project, click the ResourceView tab and expand the MyApp Resources folder.
- Expand the Menu folder.
- Double-click the IDR_MAINFRAME menu resource to open the menu editor.
- Click Edit on the menu bar and then press DELETE. Click OK to confirm the deletion of the Edit menu.
- Click the blank menu command to the immediate right of the Help menu.
- Drag the blank command to place it between the File and View menus.
- Double-click the blank menu command to display its properties. Type &Data as the Caption property. The ampersand (&) has the effect of designating the character following it as an access key. An access key is used to select the menu using the keyboard. By preceding the "D" in Data with an ampersand, users can select the Data menu by pressing ALT+D.
NOTE
If you want to include the ampersand character in a menu name, use two ampersands as in: "Mutt && Jeff". This would result in the menu name "Mutt & Jeff".
- If the Data menu is not already selected, click Data.
- Click the blank command under the Data menu title.
- Type the string &Connect…\tCTRL+C.
- \t is the tab character.
- CTRL+C denotes the shortcut key you will assign to this menu command in a following exercise.
- As you start typing, the Menu Item Properties dialog box will appear. In the Prompt box, type Connect to database. This is the text to display on the status bar when the command is selected.
- Click the thumbtack icon in the upper-left corner of the Menu Item Properties dialog box. This will keep the dialog box open while you move between different menu commands.
- Click another command, and then click Connect again. The dialog box for the Import command should now look as it does in Figure 4.5.
- Notice that the editor has constructed the ID_DATA_CONNECT command ID by appending the command name to the menu name. You can change this ID if you want, but generally you just accept the default.
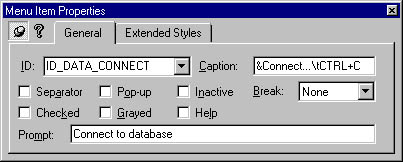
Figure 4.5 The Menu Item Properties dialog box
Each selectable menu command (everything but menu titles or separator bars) is associated with an ID that allows it to be mapped to a handler function. Remember that when a menu command is selected, the framework generates a WM_COMMAND message, which is handled by one of the application objects. This message takes the menu command's command ID as a parameter. You will learn how to associate the command ID with a handler function later in this chapter in the section Handling Menu and Toolbar Selections.
Following the steps just described, add another command to Data menu. This command caption should be &Upload…\tCTRL+U, and the prompt string should be Upload data to the database. Allow the menu editor to generate the command ID ID_DATA_UPLOAD.
Adding Shortcut Keys
You will remember that the captions for commands in the Data menu referred to keys that could be used as shortcut keys—namely, CTRL+C for the Connect command and CTRL+U for the Upload command. Shortcut keys are used as keyboard shortcuts for program commands that are also available on a menu or toolbar, though you can also define key combinations for commands that don't have a user-interface object associated with them.
Shortcut keys, or accelerator keys as they were once known, are defined in an accelerator table, a Windows resource that contains a list of the defined keys and the command identifiers that are associated with them. The accelerator table can be edited by using the accelerator editor (shown in Figure 4.6).
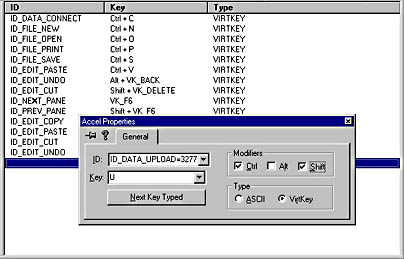
Figure 4.6 The accelerator editor
In this exercise, you will add the CTRL+C and CTRL+U key combinations to the application's accelerator table using the accelerator editor.
- In ResourceView, expand the Accelerator folder.
- Double-click the IDR_MAINFRAME accelerator resource to open the accelerator editor.
- In the Accel Properties dialog box, select ID_DATA_CONNECT from the ID list. Close the Accel Properties dialog box to update the ID.
- To add a new shortcut key, double-click the blank entry at the bottom of the table. In the ID list, click ID_DATA_UPLOAD.
- Type u in the Key box.
- Select the Ctrl check box and clear the Shift check box. The accelerator editor pane should look similar to the one in Figure 4.6.
- Close the Accel Properties dialog box. The shortcut key is added to the table.
Notice that the CTRL+C shortcut key is already defined for the ID_EDIT_ COPY command ID. To change the association, double-click the CTRL+C entry at the top of the table.
Editing Application Toolbars
When AppWizard generates an application, it will create a standard toolbar resource that includes buttons that are associated with commonly used commands from the File and Edit menus. The toolbar is one of the groups of resources that is associated with the application's document template, and thus has the same IDR_MAINFRAME ID as the application icon, accelerator, and menu resources.
A toolbar resource is associated with a bitmap file, which contains the button images. The file associated with the IDR_MAINFRAME toolbar is named toolbar.bmp. The framework places a copy of this file in the \Res folder beneath the project folder. If you create additional toolbars from within ResourceView, additional bitmaps with names that reflect the toolbar resource IDs will be created in this folder.
All the button images in the toolbar must be the same size, and are by default 16 pixels wide and 15 pixels high. The bitmap file contains all of the images side by side in the order they appear in the corresponding resource definition. For this reason, it is recommended that you edit this file using the special features of the graphics editor, which are accessible only by double-clicking a toolbar object in the ResourceView window. These features allow you to manipulate the bitmap in manageable, button-sized chunks, and to maintain the relationship between buttons and command IDs.
Figure 4.7 shows the graphics editor being used to edit a toolbar.

Figure 4.7 Editing toolbars with the graphics editor
In this exercise, you will delete the Cut, Copy, and Paste toolbar buttons.
- In ResourceView, expand the MyApp resources.
- Expand the Toolbar folder and double-click the IDR_MAINFRAME toolbar resource to open the toolbar editor.
- Drag the Cut button off the toolbar.
- Repeat the process for the Copy and Paste buttons.
In this exercise, you will add buttons to correspond to the Connect and Upload commands that you added earlier.
- Click the blank button to the right of the toolbar.
- Drag the button to the desired location on the toolbar. For this exercise, drag it to the left of the Print button.
- Use the graphics editor facilities to design the simple icon shown in Figure 4.8, which represents a connection to a database.
- Press ENTER. The Toolbar Button Properties dialog box will appear.
- In the ID list box, click ID_DATA_CONNECT. Click another toolbar button to assign the new ID.
- Click the Connect toolbar button to redisplay the properties. Note how the prompt string associated with the ID_DATA_CONNECT command ID is now displayed. Add the string \nConnect to the end of the prompt string. This is to specify the ToolTip text for the button.
- Repeat the previous steps to add another toolbar button for the Upload command shown in Figure 4.9. Associate this button with the command ID ID_DATA_UPLOAD, and add the string \nUpload to specify the ToolTip text.
- Build and run the MyApp application. Test the changes you have made to the menu and toolbar. Notice that the commands that you have added appear dimmed. This is because these commands do not yet have handlers associated with them. However, you are still able to check that the prompt strings and the ToolTips display properly.
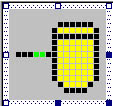
Figure 4.8 The Connect Toolbar button
Figure 4.9 The Upload Toolbar button
Handling Menu and Toolbar Selections
In Lesson 3 of Chapter 3, you learned how to use ClassWizard to handle the command messages that are generated when a user selects a menu or toolbar command. In the following exercises, you will add handlers for the Connect and Upload commands.
The command routing feature of the MFC application framework allows you to define class handlers inside the class most closely associated with the handler function. You might decide that a connection to a remote database is best conceived as a feature of the application as a whole, in which case you would consider handling the Connect command in your CMyAppApp application class.
In this case, the Connect command handler function would contain code to locate and connect to a remote database. You would probably want to record the current state of the database connection in a Boolean variable so that the application would always be able to tell whether there was a live connection to the database. This variable would be set to TRUE after a successful connection to the database and set to FALSE after disconnection or if the connection failed. For the purposes of our example, you will not need to implement the database connection code. Instead, you will simulate connection and disconnection by creating the Boolean variable m_isDatabaseConnected as a member of the CMyAppApp class. The Connect command function will then switch the variable between TRUE and FALSE.
- On the ClassView tab, right-click the CMyAppApp class icon.
- On the shortcut menu, click Add Member Variable.
- In the Add Member Variable dialog box, type BOOL in the Variable Type box.
- Type m_isDatabaseConnected into the Variable Name text box.
- Ensure that the Public Access option is set. Click OK to add the variable. You can see the new variable by expanding the CMyAppApp class.
- Double-click the CMyAppApp class constructor icon to edit the constructor code.
- Add the following line of code to the body of the constructor (inside the opening and closing braces) to initialize the m_isDatabaseConnected variable:
NOTE
When developing MFC code, we will use the MFC-defined BOOL type (an integer type) rather than the C++ built-in bool type. This is to maintain compatibility with the MFC functions, which predate the adoption of the bool type as an ANSI standard and use the BOOL type for Boolean parameters and return values.
m_isDatabaseConnected = FALSE; |
In this exercise, you will add a function to handle the Connect command.
- From within the MyApp project, press CTRL+W to open ClassWizard. Click the Message Maps tab and do the following:
- In the Class Name list, click CMyAppApp.
- In the Object IDs list, click ID_DATA_CONNECT.
- In the Messages list, click COMMAND.
- Click Add Function. A dialog box appears and suggests the name OnDataConnect() for your handler function. Click OK to accept the name.
- Click Edit Code. The MyApp.cpp file is opened and the insertion point is positioned at the top of the function implementation.
- Replace the // TODO comment line with the following line of code:
m_isDatabaseConnected = m_isDatabaseConnected ? FALSE : TRUE; |
Your next task is to add a handler for the Upload command. The purpose of this function is to upload the application data to the database. As application data is contained within an application's document class, the CMyAppDoc class seems to be the appropriate place for the OnDataUpload() function. For the purposes of this example, all your function will do is display a message box.
- Repeat the previous steps, but this time add the OnDataUpload() function to the CMyAppDoc class to handle the ID_DATA_UPLOAD command.
- When editing the OnDataUpload function, replace the // TODO comment line with the following code:
- Build and run the MyApp application.
- Now that you have added handlers, the new menu and toolbar commands are available. The Connect command will have no effect yet, but the Upload command displays a message box.
AfxMessageBox("Upload successfully completed"); |
Dynamically Updating Menu and Toolbar Commands
Even if we had provided full implementations of the OnDataConnect() and the OnDataUpload() functions, in terms of logical design, the user interface as it stands would still need adjustments. Consider the following points:
- We have no indication of the current state of the data connection—whether the database is connected or disconnected. Thus we do not know what the effect of our selecting the Connect command will be.
- The Upload command, the purpose of which is to upload application data to a remote database, depends on the existence of a current live connection to the database. As the program stands, a user can select the Upload command when there is no connection, a situation in which the upload is bound to fail.
- Menu and toolbar commands often need to be updated to convey the state of the application to the user. If a menu command or a toolbar button switches between on and off states, the command should be "checked" to indicate the on state. You can arrange menu commands and toolbar buttons into what are known as radio groups. In a radio group, only one of the group buttons can be selected at a time. The act of selecting a radio button automatically de-selects any other selected buttons in the group.
- Menu commands and toolbar buttons that cannot perform any useful func-tion within the current state of the application should be made unavailable. For example, an option that allows you to upload data to a remote database should be unavailable when the remote database is offline.
- It is possible to change the text of a menu command according to the application context. You should use this option carefully, as it is generally confusing for the user to have menu command captions changing in the middle of a program.
The MFC application framework provides us with an easy way to update the appearance and status of menu commands and toolbar buttons by allowing us to provide handler functions for user-interface update command messages.
User Interface Update Command Handlers
You will recall from the discussion of MFC message handling in Chapter 3 that the application framework generates user-interface update command messages, which signal the application to update the status of user-interface elements. When this occurs, the message maps of command target objects in the command routing are searched for ON_UPDATE_COMMAND_UI entries, which associate command IDs with update handler functions. This process occurs for shortcut menus as they are opened, and for toolbar buttons during application idle time.
You can create user interface update handler functions to modify the appearance of menu commands and toolbar buttons. The framework passes the functions a single parameter—a pointer to a CCmdUI object. The CCmdUI class gives access to the user-interface element associated with the handler and allows you to update a menu command or toolbar button using one of the member functions described in Table 4.1.
Table 4.1 CCmd UT Member Functions
| Function | Purpose |
|---|---|
| Enable | When set to TRUE, makes a menu command or toolbar button available. When set to FALSE, makes a menu command unavail- able. Unavailable commands are dimmed. |
| SetCheck | When set to TRUE, places a check mark next to a menu command and makes toolbar buttons available. When set to FALSE, removes the check mark from a menu command and makes toolbar buttons unavailable. |
| SetRadio | Works like SetCheck, except that it operates on user-interface commands acting as part of a radio group. Clearing the other commands in the group is not automatic unless the commands themselves maintain the radio-group behavior. |
| SetText | Sets the text of the user-interface command. Has no effect on toolbar buttons. |
In the following exercises, you will add user-interface update command handlers to the CMyAppApp class to modify the status of the Connect and Upload commands and the corresponding toolbar buttons.
- From within the MyApp project, press CTRL+W to open ClassWizard. Click the Message Maps tab and do the following:
- In the Class Name list, click CMyAppApp.
- In the Object IDs list, click ID_DATA_CONNECT.
- In the Messages list, click UPDATE_COMMAND_UI.
- Click Add Function. A dialog box appears and suggests the name OnUpdateDataConnect() for your handler function. Click OK to accept the name.
- Click Edit Code. The MyApp.cpp file is opened and the insertion point is positioned at the top of the function implementation.
- Replace the // TODO comment line with the following code:
pCmdUI->SetCheck(m_isDatabaseConnected); |
A Boolean parameter is passed to the SetCheck() function. TRUE selects the command and FALSE clears it. The effect of the code just added will be to provide a visual indication as to the state of the m_isDatabaseConnected variable used to signify a successful live connection to the database.
In the next exercise, you will add the user-interface update command handler for the Update command.
- Repeat the steps above, but this time add the OnUpdateDataUpload() function to the CMyAppApp class to handle the UPDATE_COMMAND_UI message for the ID_DATA_UPLOAD command.
- When editing the OnUpdateDataUpload() function, replace the // TODO comment line with the following code:
- Build and run the MyApp program. Notice how the Connect menu command and the corresponding toolbar button are affected by being selected. Note, too, how the selection of the Connect command makes the Upload command available.
pCmdUI->Enable(m_isDatabaseConnected); |
The Enable() function also takes a single Boolean parameter. TRUE makes the command available and FALSE makes it unavailable. The effect of the code will be to make the Upload command available only when there is a live connection to the database. A live connection will be signified by CMyAppApp::m_ isDatabaseConnected being set TRUE.
Writing to the Status Bar
In some cases, simply updating menu and toolbar commands is not an adequate method of conveying information about the status of your application. For example, consider the MyApp example application above. As it stands, the Connect command simply allows you to connect to and disconnect from a single data source. What if there were a number of alternative data sources available and the application was often required to switch between them?
In this case, you might use the OnDataConnect() function to display a list of data sources from which the user can select. The connection status would need to be displayed on the user interface either as the name of the currently selected data source or as a string indicating that no data source is currently selected.
The appropriate place to display this type of information is on the application's status bar. You have already seen how an MFC application uses the status bar to display text that you supply as a menu command prompt. If you run your MyApp application, you will see that it also displays the status of the CAPS LOCK, NUM LOCK and SCROLL LOCK keys in separate indicator panes (indicators) on the status bar.
MFC support for status bars is encapsulated in the CStatusBar class. CStatusBar allows you complete control over the number and style of status bar indicators and the text they display.
The framework stores indicator information in an array with the leftmost indicator at position 0. By default, the first indicator is "elastic"—it takes up the status-bar length not used by the other indicators, so the other panes are right-aligned. It is in this indicator that the MFC framework displays menu and toolbar prompt strings.
When you create a status bar, you use an array of string IDs (which identify entries in a string table resource) that the framework associates with the corresponding indicators. You can then use either a string ID or an index to access an indicator.
The recommended way to update text on a status bar indicator is to use an ON_UPDATE_COMMAND_UI entry in a message map to associate a user- interface update handler function with an indicator's string ID. You can then use the SetText() function of the handler's CCmdUI parameter to display text in the indicator. Note that ClassWizard does not automate the association of indicator IDs with handler functions, so you are obliged to add these message map entries manually.
It is possible to update the indicator text by using the CStatusBar::SetPaneText() function. Even so, you will need to create an update handler. Without an update handler for the indicator, MFC automatically disables the indicator, erasing its content.
In the exercises that follow, you will replace the MyApp default status bar indicators for the CAPS LOCK, NUM LOCK, and SCROLL LOCK keys, with a single database connection indicator. This indicator will display the name of the current data source, which will be stored as a variable in the application class. If the application is disconnected from a data source, the string "Database not connected" will appear. For the purposes of this exercise, you will not implement a data source selection routine, but simply hard-code a single name to appear.
In the following exercise, you will add a data member to the CMyAppApp class to hold the name of the current data source.
- On the ClassView tab, right-click the CMyAppApp class icon.
- On the shortcut menu, click Add Member Variable.
- In the Add Member Variable dialog box, type CString in the Variable Type box.
- Type m_strDSN in the Variable Name box.
- Ensure that the Public Access option is set. Click OK to add the variable. You should see it appear under the CMyAppApp class on the MyApp classes tree.
- Double-click the CMyAppApp class constructor icon to edit the constructor code.
- Add the following line of code to the body of the constructor to initialize the m_strDSN variable with the name of a data source:
m_strDSN = "MyDatabase"; |
In the following exercise, you will create a string ID for the new indicator.
- In the MyApp workspace window, click the ResourceView tab.
- Expand the String Table folder.
- Double-click the String Table resource to open the string table editor.
- Locate the string IDs that represent the indicators. Each of these IDs begins with ID_INDICATOR_.
- Right-click the last of these entries: ID_INDICATOR_REC.
- On the shortcut menu, click New String.
- In the ID box, type ID_INDICATOR_DB.
- In the Caption box, type Database not connected. This is a default string that must always be supplied for a string table entry. Use the space bar to type 15 blank spaces after the string. The framework will use the length of the string, including spaces, to size the indicators. The blank spaces ensure that the indicator pane is large enough to take the longest string that it is required to display. Your screen should now look something like Figure 4.10.
- Press ENTER to add the new string. Close the string table editor.

Figure 4.10 Adding a string to the string table
Now you will modify the application's status bar creation code so that it creates the ID_INDICATOR_DB pane instead of the three standard key lock indicators.
- In the MyApp workspace window, click the FileView tab.
- Expand the Source Files folder.
- Double-click the MainFrm.cpp file icon to edit the file.
- Locate the code that declares the status bar indicator array. You'll find it just below the message map. The code reads as follows:
- Delete the last three elements of the array so that only ID_SEPARATOR remains. Add the ID_INDICATOR_DB identifier as the second element. The code should now read as follows:
static UINT indicators[] = { ID_SEPARATOR, // status line indicator ID_INDICATOR_CAPS, ID_INDICATOR_NUM, ID_INDICATOR_SCRL, }; |
static UINT indicators[] = { ID_SEPARATOR, // status line indicator ID_INDICATOR_DB, }; |
If you look through the CMainFrm::OnCreate() function further down the file, you will see that this array gets passed to the CStatusBar::SetIndicators() function that is called for the CMainFrame::m_wndStatusBar object.
Now you must manually implement the message map entry and handler function to enable the framework to update the indicators.
- Locate the message map. It should be just above the array that you edited in the previous exercise.
- Add the following entry macro to the message map:
ON_UPDATE_COMMAND_UI(ID_INDICATOR_DB, OnUpdateDB) |
Note that all message map entries that are not created by ClassWizard should be placed outside the {{AFX_MSG_MAP comment block. The entire message map should read:
BEGIN_MESSAGE_MAP(CMainFrame, CFrameWnd) //{{AFX_MSG_MAP(CMainFrame) // NOTE - ClassWizard will add and remove mapping macros here. // DO NOT EDIT what you see in these blocks of generated code! ON_WM_CREATE() //}}AFX_MSG_MAP ON_UPDATE_COMMAND_UI(ID_INDICATOR_DB, OnUpdateDB) END_MESSAGE_MAP() |
- In the MyApp workspace window, click the FileView tab.
- Expand the Header Files folder.
- Double-click the MainFrm.h file icon to edit the file.
- At the bottom of the CMainFrame class declaration, just above the DECLARE_MESSAGE_MAP macro, add the following function definition:
- Switch back to the MainFrm.cpp file. At the bottom of the file, add the following code to implement the OnUpdateDB() function:
afx_msg void OnUpdateDB(CCmdUI *pCmdUI); |
Note that this entry is also outside the {{AFX_MSG comment block.
void CMainFrame::OnUpdateDB(CCmdUI *pCmdUI) { CMyAppApp * pApp = dynamic_cast<CMyAppApp *>(AfxGetApp()); ASSERT_VALID(pApp); if(pApp->m_isDatabaseConnected) pCmdUI->SetText("Connected to: "+ pApp->m_strDSN); else pCmdUI->SetText("Database not connected"); } |
This function is straightforward. The code checks for a live database connection by checking the CMyAppApp::m_isDatabaseConnected variable. If m_isDatabaseConnected contains TRUE, then the function retrieves the name of the current data source from CMyAppApp::m_strDSN and displays it on the status bar pane. Otherwise it displays the string "Database not connected."
Note the use of the MFC global function AfxGetApp(), which returns a pointer to the main application object. This function must be cast to the CMyAppApp * type so that you can reference the CMyAppApp member variables. To cast down the inheritance hierarchy, you should use the dynamic_cast<>() operator.
NOTE
Before you can use the dynamic_cast<>() operator, you must make sure that you have selected the Enable Run-Time Type Information (RTTI) check box on the language settings of the C/C++ page in the project settings. (See Lesson 2 of Chapter 2 for details on how to do this.)
- Build and run the MyApp program. Test the Connect command to see how the text on the status bar is updated to indicate the database connection status. In subsequent exercises, you will change the Connect command so that instead of it simply switching on and off, it will open a dialog box where you can select a data source. In this scenario, you will rely entirely on the status-bar indicator to inform the user of which data source (if any) the application is connected to.
Note the use of the ASSERT_VALID debug macro to check the validity of the pointer.
Lesson Summary
A document/view-based application generated by the MFC AppWizard provides a fully featured user interface that you can adapt to suit your own requirements. Along with the application classes and code, the AppWizard creates a group of resources that can contain application icons, menus and toolbars, and a string table.
These resources can be edited using tools that come as part of the Visual C++ development environment. The graphics editor can be used to edit icons and toolbar buttons. The menu editor allows you to edit menus visually. There are also editors for string table entries and shortcut key associations.
While using these editors, you can also edit the property pages of the objects that you are editing. These property pages allow you to set the text for menu options, status bar prompt strings and ToolTips, and set command IDs for menu and toolbar options.
Command IDs are used to map menu or toolbar selections to handler functions. Using ClassWizard, you can easily add message map entries and create handler functions for any of the classes derived from CCmdTarget. Similarly, you can use ClassWizard to add user-interface update command handlers. These are functions that are called by the framework to allow you to update the status or appearance of user interface elements. The framework passes these functions a pointer to a CCmdUI object as a parameter. The CCmdUI class gives access to the user-interface element associated with the handler, and provides member functions that allow you to alter the appearance or status of menu or toolbar commands.
You can also convey information on the status bar about the status of your application. The MFC class CStatusBar allows you complete control over the number and style of status bar indicators and the text they display. You can set up an array of status bar indicators that are associated with string IDs in the application's string table. You can use these IDs or the array index to access and update individual status bar panes. The recommended way to update text in a status bar pane is to use an ON_UPDATE_COMMAND_UI entry in a message map to associate a user-interface update handler function with an indicator's string ID. You can then use the SetText() function of the handler's CCmdUI parameter to display text in the pane. ClassWizard cannot be used to add handler functions for indicator IDs, so you are obliged to add these message map entries manually.
EAN: 2147483647
Pages: 95