Creating an XML Document
Microsoft Office Specialist
New in Office 2003 XML capabilities
Web documents are coded with Hypertext Markup Language (HTML) so that they can be displayed in a Web browser, no matter what that browser might be. HTML is a small, fixed subset of the Standard Generalized Markup Language (SGML), a comprehensive system for coding the structure of text documents and other forms of data so that they can be used in a variety of environments. The Extensible Markup Language (XML) is another subset of SGML. However, instead of being fixed like HTML, XML can be customized (extended) to store data so that it can be used in many ways or in many environments—for example, as text, in a database or spreadsheet, or as a Web page.
To save a Word document in XML format, you need to attach an XML schema to it. This schema describes the structure allowed in the document, including the names of structural elements and what elements can contain what other elements. For example, a numbered list might be defined as an element that can contain only numbered items—no regular paragraphs, graphics, or sidebars. Generally, companies employ a specialist with in-depth knowledge of XML to create custom schemas, but after a schema is created, anyone can attach it to a Word document and convert the format to an XML document.
| Tip | If you don’t have a custom schema, you can still save a Word document as an XML document by using Word’s built-in XML schema, which is called WordML. To use WordML, create a Word document and then save it as an XML document. Word will apply XML tags that define the document’s structure and store formatting information. |
In this exercise, we can’t teach you all the details of XML programming, but you will learn how to attach a schema to a Word document and tag elements to create valid structure. Then you’ll save the file as an XML document.
USE the AttachSchema document in the practice file folder for this topic. This practice file is located in the My Documents\Microsoft Press\Word 2003 SBS\CreatingWeb\CreatingXML folder and can also be accessed by clicking Start/All Programs/Microsoft Press/Word 2003 Step by Step.
| OPEN | the AttachSchema document. |
-
On the Tools menu, click Templates and Add-Ins.
-
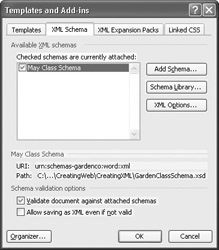
In the Templates and Add-ins dialog box, click the XML Schema tab, and then click Schema Library.
-
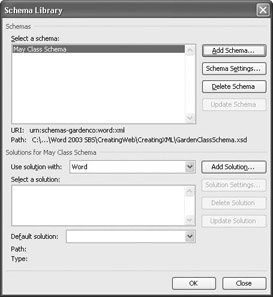
In the Schema Library dialog box, click Add Schema.
The Add Schema dialog box appears.
-
If the contents of the My Documents folder are not displayed, click the My Documents icon on the Places bar. Then navigate to the Microsoft Press\Word 2003 SBS\CreatingWeb\CreatingXML folder, and double-click GardenClassSchema.
The Schema Settings dialog box appears.
-
In the Alias box, type May Class Schema, and click OK.
Word adds the schema to the Schema Library.
-
Click OK to close the Schema Library dialog box.
-
On the XML Schema tab of the Templates and Add-ins dialog box, select the May Class Schema check box in the Checked schemas are currently attached box.
-
In the Schema validation options area, make sure the Validate document against attached schemas check box is selected.
-
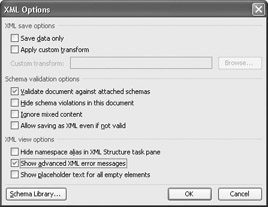
Click XML Options to display the XML Options dialog box.
-
In the Schema validation options area, make sure the Hide schema violations in this document check box is cleared. Then in the XML view options area, make sure the Hide namespace alias in XML Structure task pane check box is cleared, and then select the Show advanced XML error messages check box.
-
Click OK to close the XML Options dialog box, and then click OK again to close the Templates and Add-ins dialog box.
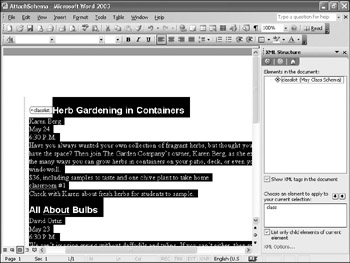
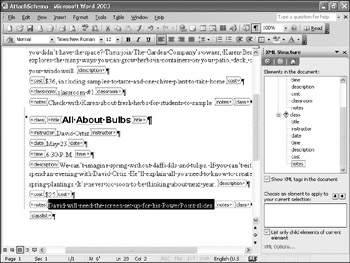
The XML Structure task pane opens.
-
In the XML Structure task pane, make sure the Show XML tags in the document check box is selected.
Tip When you don’t need to see XML tags in a document, you can toggle them off by clearing the “Show XML tags in the document” check box.
-
Click anywhere in the document window. Then in the Choose an element to apply to your current selection box at the bottom of the XML Structure task pane, click classlist {May Class Schema}.
Word asks whether you want to apply this element to the entire document.
-
Click Apply to Entire Document.
Word selects all the text in the document, adds an opening XML tag and a closing XML tag at either end of the document to indicate that the entire document is now a classlist element, and lists the element in the “Elements in the document” box in the XML Structure task pane.
-
Select all the text from Herb Gardening in Containers down to Check with Karen about fresh herbs for students to sample. In the Choose an element to apply to your current selection box, click class.
Word tags the selection as a class element.
Tip By default, the “List only child elements of current element” check box is selected. This simplifies the list of elements by showing only the ones that are valid in the current location. If you want to see a complete list of elements allowed in this schema, clear this check box. Invalid elements are then flagged with a slash inside a circle (the “not allowed” symbol).
-
Select the Herb Gardening in Containers heading, and tag it as title.

Show/Hide
-
On the Standard toolbar, click the Show/Hide button, and then select each of the next six paragraphs one at a time, and tag them in turn as instructor, date, time, description, cost, and classroom.
As you tag each new element, Word adds that element to the growing structure in the “Elements in the document” box. An X next to the class element tells you that the structure is not valid according to the schemas rules, and three dots under the classroom element tell you that the schema calls for an element that is missing.
-
Point to the X beside class.
A ScreenTip tells you that “Text is not allowed in the context of element ‘class’ according to DTD/Schema.” In other words, untagged text is not valid; all text must be enclosed in valid start and end element tags.
-
Select Check with Karen about fresh herbs for students to sample.—the only remaining untagged text in the class element (don’t include the closing class tag).
-
Scroll the Choose an element to apply to your current selection list, and click notes.
Word tags the element, and the X next to class disappears.
-
Select all the text from All About Bulbs down to David will need the screen set up for his PowerPoint slides. In the Choose an element to apply to your current selection box, click class.
-
Select each of the paragraphs in this class in turn, and tag them as title, instructor, date, time, description, cost, and notes.
Important When you select the first and last paragraphs, be sure not to include the tags for the class element.
In the “Elements in the document” area of the XML Structure task pane, a question mark appears next to the second class element, and a wavy purple line appears in the left margin to show you the section with invalid structure.
-
Point to the question mark.
Word tells you that the “Content for element ‘class’ is incomplete according to DTD/Schema.”
-
In the All About Bulbs class in the document window (not the XML Structure task pane), click to the right of the cost end tag, and press [ENTER].
-
Type classroom #2. Then select that text, and tag it as classroom.
The “Elements in the document” box of the XML Structure task pane shows that the document’s structure is now fully valid, and you are now ready to save it.
Troubleshooting If the “Allow saving as XML even if not valid” check box is cleared in the XML Options dialog box, Word will not allow you to save a document as XML unless the structure is valid. If Word tells you that it cannot save your document as XML because its structure violates the rules set by the schema, you have three choices: save the file as a Word document; click Cancel and change the option in the XML Options dialog box; or click Cancel and go back to the “Elements in the document” box of the XML Structure task pane to correct the structure of marked elements.
-
On the File menu, click Save As.
-
In the Save As dialog box, click the down arrow to the right of the Save as type box, and click XML Document in the drop-down list.
-
Click Save to save the AttachSchema XML document.
CLOSE the AttachSchema XML document, and if you are not continuing on to the next chapter, quit Word.
Using Attributes and Transforms
If the schema that you are using has defined attributes for any of its elements, you can assign the attributes from the XML Structure task pane.
To assign an attribute to an element:
-
Right-click the element in the XML Structure task pane, and then click Attributes.
The Attributes dialog box appears.
-
Select an attribute from the Available attributes box, and click Add.
-
Click OK.
The power of XML is its adaptability. By applying different transforms to an XML document, you can pull only the data you need, put it in the necessary format, and send it in different directions. For example, if The Garden Company has an XML document that is a list of gardening classes, they can apply a transform that extracts the title, description, instructor, cost, date, and time of the class and then formats that information as a Web page for customers. They can also apply a different transform that extracts the date, classroom, and notes and then formats that information as a memo for setup staff.
To apply a transform to an XML document:
-
On the File menu, click Save As.
The Save As dialog box appears.
-
In the File name box, type a name for the file.
-
Click the down arrow to the right of the Save as type box, and click XML Document in the drop-down list.
The “Apply transform” check box appears to the right of the “File name” box.
-
Select the Apply transform check box, and then click Transform.
-
In the Choose an XSL Transformation dialog box, navigate to the folder where the transform you want to apply is stored, and double-click the transform.
-
Click Save.
Word warns you that saving a file through a transform without WordML could remove features such as formatting and pictures.
-
To save the file without WordML, click Continue. To save the file with WordML, click Keep WordML.
EAN: 2147483647
Pages: 156