Tracking and Managing Document Changes
New in Office 2003 Reading Mode Markup toolbar Setting insertions and deletions to different colors
When two or more people collaborate on a document, one person usually creates and “owns” the document and the others review it, suggesting changes to make it more accurate, logical, or readable. Reviewers can turn on the Track Changes feature so that the revisions they make to the document are recorded without the original text being lost.
To turn on change tracking, you click Track Changes on the Tools menu. You then edit the text as usual. Word shows changed text in a different color from the original text and uses revision marks, such as underlines, to distinguish the revised text from the original text. In Print Layout view, Word identifies the change and its type, such as a deletion, in a comment balloon—a text box that appears in the margin of the document—and displays a vertical line in the margin to the left of any changed text to help you locate changes in the document.

To help you manage changes, you can turn on the Reviewing toolbar by right-clicking any visible toolbar and clicking Reviewing on the shortcut menu. You can then use the buttons on this toolbar to work with tracked changes in the following ways:
-
If revision marks are distracting, you can track changes without showing them on the screen. Word then shows the text as it would be if you were making changes without tracking them. To hide revision marks, click the down arrow to the right of the Display for Review box, and then click Final. To display the changes again, click the down arrow again, and click Final Showing Markup.
-
When revisions are visible in the document, you can click the down arrow to the right of the Show button to specify that only certain types of revisions be displayed.
-
You can move among the changes by using the Next and Previous buttons.
-
You can use the Accept Change or Reject Change/Delete Comment button to incorporate a change into the document or delete it and restore the original text. To accept all the changes at once, click the right arrow to the right of the Accept Change button, and then click Accept All Changes in Document. To reject all the changes at once, click the down arrow to the right of the Reject Change button, and then click Reject All Changes in Document.
If you want a record of changes made to a document, you can save different versions of it. Saving versions saves disk space because Word saves only the differences between versions, not an entire copy of each document. After you’ve saved several versions of the document, you can review, open, print, and delete earlier versions. You can also have Word save a version of your document each time the document is closed, which is useful when you need a record of who made changes and when, as in the case of a legal document. To save a version every time you close a document, you use the Versions command on the File menu.
In this exercise, you will open a document, turn on change tracking, make changes to the document, accept and reject changes, and create a second version of the document.
| BE SURE TO | start Word before beginning this exercise. |
| USE | the TrackChange document in the practice file folder for this topic. This practice file is located in the My Documents\Microsoft Press\Word 2003 SBS\CollaboratingOther\TrackingChange folder and can also be accessed by clicking Start/All Programs/Microsoft Press/Word 2003 Step by Step. |
| OPEN | the TrackChange document. |
-
On the View menu, point to Toolbars, and then click Reviewing.
The Reviewing toolbar appears.

Track Changes
-
On the Reviewing toolbar, click the Track Changes button.
Any changes that you make will now be tracked.
Important When the Track Changes feature is turned on, the Track Changes button is orange and has a border, and the letters TRK on the status bar are black instead of gray. When change tracking is turned off, the Track Changes button has no border, and TRK is gray on the status bar.
-
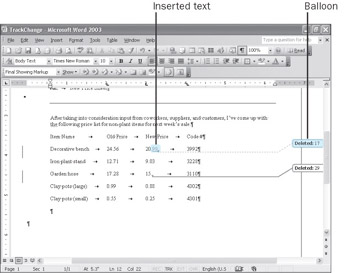
Scroll the document to see the product information, click to the right of 20.17,the new price for the decorative bench, and press the [BACKSPACE] key twice.
Word displays a balloon with the text Deleted: 17 to describe the type and content of your change.
-
Type 99.
The price changes from $20.17 to $20.99, with 99 in a different color.
-
Click to the right of $15.29, the new price for the garden hose.
-
Press [BACKSPACE] twice to delete 29.
The document now shows two balloons, each identifying text that has been deleted.
-
Type 99.
-
Point to 99 in the price for the decorative bench.
A ScreenTip tells you who made the change, when the change was made, and the type of change.
Tip When you point to a change on the screen, the ScreenTip displays the name that was entered when the operating system was installed. If no name was entered, the ScreenTip shows User as the name. You can change the name by clicking Options on the Tools menu, clicking the User Information tab, typing a name in the Name box, and then clicking OK.
-
Press [CONTROL]+[HOME] to move to the beginning of the document.

Next
-
On the Reviewing toolbar, click the Next button.
Word selects the first change in the document—the number 99 in the decorative bench price.

Accept Change
-
On the Reviewing toolbar, click the Accept Change button, and then click the price to deselect it.
Word accepts the change, and the price of the decorative bench now appears as $20.99 without revision marks. A balloon still shows that you deleted 17 from this text.
Tip To accept a change, you can also right-click the change and then click Accept Insertion or Accept Deletion on the shortcut menu.
-
Click 99 in the new garden hose price.

Reject Change/Delete Comment
-
On the Reviewing toolbar, click the Reject Change/Delete Comment button, and then click the same button again.

The first click rejects the new price that you entered, and the second rejects the deletion of 29.
-
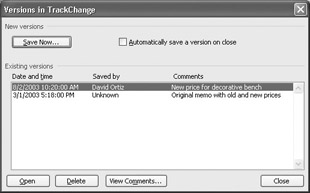
On the File menu, click Versions.
The “Versions in TrackChange” dialog box appears, showing who saved the original version of the document (in this case, the author is unknown).
-
Click Save Now to open the Save Version dialog box, type New price for decorative bench in the Comments on version box, and click OK.
Word closes the Versions in TrackChange dialog box and saves the current version of the document.
-
On the File menu, click Versions to open the Versions in TrackChange dialog box again.
Tip You can also double-click the Versions icon on the status bar to open the Versions in TrackChange dialog box.
The new version appears in the “Existing versions” area.
-
Click the Close button to close the Versions in TrackChange dialog box.

Save
-
On the Standard toolbar, click the Save button to save the document.
CLOSE the TrackChanges document.
Entering Handwritten Changes
New In Office 2003 Support for handwriting
Microsoft Word 2002 introduced handwriting recognition—the ability to enter text in a document using the mouse or a device such as a Tablet PC. You could leave this text in handwritten form or convert it to text using Word’s optical character recognition (OCR) function.
The ink features in Word 2003 significantly expand these capabilities. Now you can use a Tablet PC to mark up a Word document in your own handwriting, just as though you were marking up the document on paper. You can circle words or paragraphs, cross things out, draw arrows, and sketch diagrams to make your point.
To use these ink features, you must be running Word on a Tablet PC. To add ink annotations in Print Layout view, tap Ink Annotations on the Insert menu. To add ink annotations in Reading Layout view:
-
On the Reading Layout toolbar, tap the Actual Page button.
-
On the Reviewing toolbar, tap the Insert Ink Annotations button.
The Ink Annotations toolbar appears.
-
Add your annotations to the document.
-
When you are finished, tap the Stop Inking button on the Ink Annotations toolbar.
In addition to entering annotations directly in the document with Word’s Ink Annotations feature, you can use the Ink Comment command to insert handwritten text in comment balloons.
Other people don’t need a Tablet PC to see your handwritten notes. Your annotations appear as objects in the Word document, where they can be moved and sized, or deleted when they are no longer necessary.
EAN: 2147483647
Pages: 156