Internet Printing
Installing and configuring a printer from the Internet is like printing on a local port except that the address is a URL. The URL can also be used within an intranet. It makes no difference to the application, which is typically unaware that the printer is accessed through a URL.
If the print server and print client are not within the same intranet, the URL is listed on the client as the printer address.
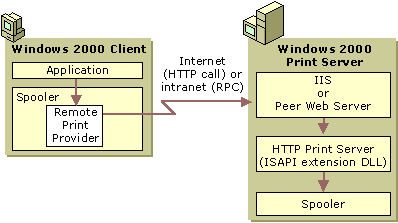
Figure 4.11 shows the path that print data takes from a client application to a print server spooler when the client prints to a URL-identified job queue.
Enlarge figure
Figure 4.11 Processing Flow when Printing to a URL
Prerequisites
Before a computer running Windows 2000 Professional can print to a printer using a URL address, it must be running Microsoft® Peer Web Services (PWS). A Windows 2000 Server must have Internet Information Services (IIS). The low-level protocol used for job submission is Internet Printing Protocol (IPP) 1.0, which uses the HTTP protocol as a carrier.
Installing a Printer from a Web Page
You can view Web pages to find a URL-identified printer. You can also connect to a printer share via a Web page from clients running Windows 2000, Windows 98, and Windows 95.
Automatic installation begins on the printer's installation page (share_name on server_name) on the Web. The installation page displays the options your permissions allow you to choose. Click the Install option. Windows 2000 downloads the printer software to the client, and the printer is displayed in the Printers folder on the client.
The installation route depends on whether the client and print server are both running Windows 2000 or Windows NT and are within the same intranet. If they are, they communicate via RPCs, and the installed printer will continue to use RPCs to link the client and the server even if HTTP is not specified in the address.
The installation uses HTTP, not RPCs, as the communication medium in the following instances:
- The client and server are not on the same intranet.
- The client is not running Windows 2000, Windows 98, or Windows 95.
- The printer contains an internal network adapter and supports IPP 1.0, and is not connected to a server.
With HTTP, the print server generates and sends the client a cabinet (CAB) file containing the required INF and installation files. On the client computer, the CAB file starts the Add Printer Wizard to complete the installation. A progress report is displayed in HTML while the wizard is working.

Important
Installation is not automatic for Web-based printers with internal network adapters. You must start the Add Printer Wizard, enter the printer's URL instead of a universal naming convention (UNC), and finish the wizard manually. This method can be used to install any URL-identified printer by means of HTTP.
Information Displays in HTML
Regardless of the underlying protocol used, the job queue appears in the standard Win32 format when you open the queue window from the Printers folder. When communication is by means of HTTP, however, the job queue is displayed in HTML from http://server_name/share_name.
If the print server is running IIS or PWS, the Printers folder on the client displays an HTML link to the Web-based printer information page, generated by the print server.
Security for Internet Printing
Print server security is provided by IIS or PWS, which runs on the print server. Basic authentication, which all browsers support, is allowed. To support all browsers and all Internet clients, the administrator must select basic authentication. IIS and PWS also allow the use of Windows NT challenge/response authentication and Kerberos authentication, both of which are supported by Internet Explorer.
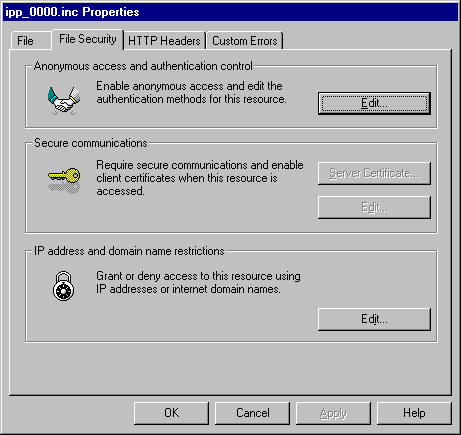
The administrator selects the authentication method in IIS or PWS by clicking the File Security tab in the Properties dialog box for that server. This displays the File Security page as shown in Figure 4.12.
Enlarge figure
Figure 4.12 File Security Page
To select an authentication method
- In the console tree of the IIS console, expand the node for the server, and then expand the Default Web Site node.
- Click the icon at the Printers node. This node represents a virtual directory that is used to set all security for Internet printing. A list of Web server proxy pages appears in the details pane.
- Right-click a page icon, click Properties, and then click the File Security tab. The tab displays three choices for security control: Anonymous access and authentication control, Secure communications, and IP address and domain name restrictions.
- Click the respective Edit button to enable either Anonymous access and authentication control or Secure communications, and then fill in details.
- Click the Edit button under IP address and domain name restrictions to list exceptions to access rights and to toggle the default to either:
- Grant access to all computers other than the listed exceptions (the initial setting).
– Or –
- Deny access to all computers other than the listed exceptions.
- Click OK to save your settings.
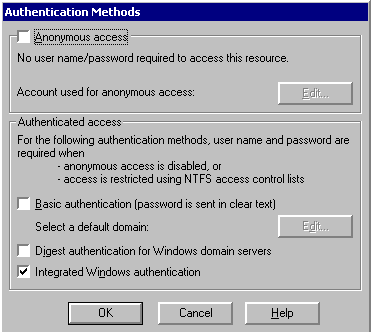
Typically, administrators select Anonymous access. After clicking the Edit button, anonymous access is enabled on the Authentication Methods dialog box (Figure 4.13) by clicking the Anonymous access check box. Then click the Basic authentication check box to select basic authentication.

Note
Integrated Windows authentication is checked by default and takes precedence over basic authentication if the user's Web browser supports it. To ensure that users are authenticated only with basic authentication, clear all check boxes except Basic authentication.
Enlarge figure
Figure 4.13 Authentication Methods Dialog Box
Checking Basic authentication allows all clients to access each server resource by impersonating the Anonymous account IUSR_computername. No user action is required. However, if a user attempts to go to another domain or proxy server that does not allow anonymous access, a dialog box appears that asks for the user name and password. If the user closes the box, it does not appear again in the same logon session.
For basic authentication, user names and passwords are not encrypted; they are base-64 encoded and can potentially be intercepted. Integrated Windows authentication is more secure because it does not send the password. IIS applies either challenge/response or Kerberos encryption technology, depending on the capability of the client, when the Integrated Windows authentication check box is selected. For more information about IIS security, see the Microsoft® Windows® 2000 Server Resource Kit Internet Information Services Resource Guide.
© 1985-2000 Microsoft Corporation. All rights reserved.