5.4 DB2 EJB sample application setup
|
| < Day Day Up > |
|
5.3 Creating and configuring DB2 Data Source
An application uses a data source to access the data in the database. A data source is associated with a JDBC provider that supplies the specific JDBC driver implementation class. The data source represents the J2EE Connector Architecture (JCA) connection factory for the relational resource adapter.
You can create multiple data sources associated with the same JDBC provider. Each JDBC provider supports the interfaces defined by Sun Microsystems listed below. These interfaces enable the application to run in a single-phase or two-phase transaction protocol.
-
ConnectionPoolDataSource
A data source that supports application participation in all transactions, including two-phase commit transactions. When this kind of data source is involved in a global transaction, transaction recovery is not provided by the transaction manager. The application is responsible for providing the backup recovery process if multiple resource managers are involved.
-
XADataSource
A data source that supports application participation in a single-phase or a global (two-phase) transaction environment. When this data source is involved in a global transaction, the transaction manager provides transaction recovery.
5.3.1 The steps to create and configure DB2 Data Source
In this section the general steps to create and configure DB2 Data Source in WebSphere Application Server V5 environment are provided. For WebSphere Application Server V5, we could create and configure a DB2 Data Source using the administrative console or using the Java Management Extensions API. In the example shown below, we use the WebSphere Application Server Administrative Console to create the Data Source. The following shows the general steps:
-
Prepare the J2C Authentication Data Entry for the Data Source
The authentication data entry is generally required for database authentication in run time. You could define the user ID and password in the custom properties of a data source. But possibly it is not desirable as the password can be seen by anyone who accesses the resources.xml file. By defining J2C authentication data entry as an alias, obtaining directly visible password from resources.xml can be avoided. In addition, Each alias can be reused by many Data Source.
To define a new alias for the J2C Authentication Data Entries, choose Security -> JAAS Configuration -> J2C Authentication Data. Click New on the J2C Authentication Data Entries page then fill in the fields on the resulting page. An example is shown in the Figure 5-11.
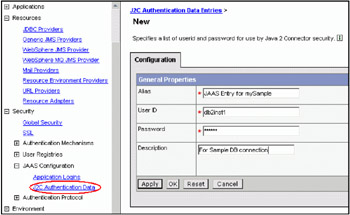
Figure 5-11: Creating J2C Authentication Data Entry for the Data Source Connection -
Choose data source type based on the desired DB2 JDBC Provider
There are two types of data sources available in WebSphere Application Server V5, which represent two types of separate connection manager (CM) architectures:
-
Data Sources: This data source uses the JCA standard architecture to provide J2EE 1.3 support. It runs under the JCA connection manager and the relational resource adapter. Applications using this type of data source might behave differently because of the J2EE 1.3 architecture.
-
Data Sources (Version 4.0): This data source runs under the CM architecture. Applications using this data source behave as if they were running in Version 4.0.
In our case, we choose Data Sources for J2EE 1.3 support. Click Resources -> JDBC Providers, then click the previously defined JDBC Providers in the list of the resulting page. In our case, it is My DB2 Universal JDBC Provider. Scrolling down to the bottom of the new page then choose Data Sources.
-
-
Create a new DB2 Data Source
Follow on the previous step. Click New to create a new data source in the Data Sources page, then enter properties for your data source, as shown in the Figure 5-12 on page 148.
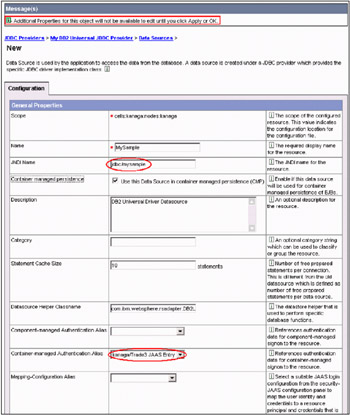
Figure 5-12: Creating New DB2 Data SourcePlease be aware that additional properties for this new data source will not be available to edit until you click Apply or OK.
The following contains descriptions for the general properties of the data source:
-
Scope
Specifies the level to which this resource definition is visible—the cell, node, or server level.
-
Name
Specifies the display name for the data source.
-
JNDI Name
Specifies the Java Naming and Directory Interface (JNDI) name.
If you leave this field blank, a JNDI name is generated from the name of the data source. For example, a data source name of markSection generates a JNDI name of jdbc/markSection.
Note After you set this value, save it, and restart the server, you can see this string when you run dumpnamespace.
-
Container managed persistence
Specifies if this data source is used for container managed persistence of enterprise beans.
If the checkbox is selected, a CMP Connector Factory that corresponds to this data source is created for the relational resource adapter.
-
Description
Specifies a text description for the resource.
-
Category
Specifies a category string if you want to use it to classify or group the resource.
-
Statement Cache Size
Specifies the number of free statements that are cached per connection.
The WebSphere Application Server data source optimizes the processing of prepared statements. A prepared statement is a precompiled SQL statement that is stored in a prepared statement object. This object is used to efficiently execute the given SQL statement multiple times.
If the cache is not large enough, entries are discarded to make room for new entries. To determine the largest value for your cache size to avoid any cache discards, add the number of uniquely prepared statements, callable statements (as determined by the SQL string, concurrency, and the scroll type) for each application that uses this data source on a particular server. This value is the maximum number of possible prepared statements that are cached on a given connection over the life of the server. Setting the cache size to this value means you never have cache discards. In general, the more statements your application has, the larger the cache should be. For example, if the application has five SQL statements, set the statement cache size to 5, so that each connection has five statements.
-
Datasource Helper Classname
Specifies the datastore helper that is used to perform database specific functions. Accept the default value.
-
Component-managed Authentication Alias
This alias is used for database authentication in run time. If your resource authentication (res-auth) is set to Application, set the alias in the Component-managed Authentication Alias.
-
Container-managed Authentication Alias
This alias is used for database authentication in run time. If your res-auth is set to Container, set the Container-managed Authentication Alias. In our case, container-managed authentication is used, and previously created alias for J2C Authentication Data Entry is chosen here.
-
Mapping-Configuration Alias
The DefaultPrincipalMapping JAAS configuration maps the authentication alias to the userid and password. You may define and use other mapping configurations.
After applying the above changes, then choose or click Resources -> JDBC Providers -> My DB2 Universal JDBC Provider (previously created) -> Data Sources. The newly created data source is displayed in the resulting page.
-
-
Specify additional properties for the new data source
Now it is ready to specify additional properties for the new data source, such as database name, driver type, server name or TCPIP address and port number, etc. As a follow-up of the above step, click the new DB2 data source name within the list in the Data Sources page, then scroll down to the bottom of the resulting page. The Additional Properties block and Related Items block are displayed, as shown in the Figure 5-13 on page 150.
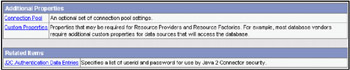
Figure 5-13: Modify the Additional Properties for the New Data SourceHere you could specify properties of the connection pool, such as connection timeout, maximum and minimum number of managed connections, and so forth, by clicking Connection Pool. For more information about the meanings of the parameters for a specific data source, please refer to the topic "Connection Pool Setting" in WebSphere Application Server V5 InfoCenter. In our case, we just use the default values for the data source initially.
To specify custom properties of the DB2 data source, click Custom Properties, then you could change those properties in the resulting page as shown in Figure 5-14 on page 151.
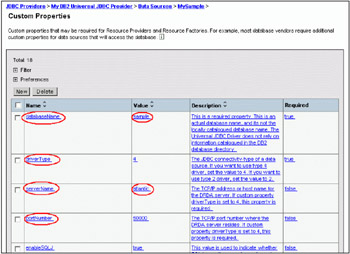
Figure 5-14: Specifying Custom Properties for the New Data SourceIn our case, the sample database shipped with DB2 UDB V8 is used. It is located on the machine Atlantic which is an AIX server. The port number is 50000. We use the Type 4 driver of the DB2 Universal JDBC Driver Provider and enabled SQLJ support.
The following contains descriptions for some of the custom properties for the data source:
-
databaseName
This is a required property. For Type 4 driver, this is an actual database name, but not the locally catalogued database alias. For Type 2 driver, it could be the actual database name if the associated serverName and portNumber where the database resides are also provided. If serverName and portNumber is not available for Type 2 driver, then use a locally catalogued database alias alone for this property is also working.
-
driverType
This is a required property. It stands for the JDBC connectivity-type of a data source. If you want to use type 4 driver, set the value to 4. If you want to use type 2 driver, set the value to 2.
-
serverName
The TCP/IP address or host name for the DRDA server. If custom property driverType is set to 4, this property is required.
-
portNumber
The TCP/IP port number where the DRDA server resides. If custom property driverType is set to 4, this property is required.
-
enableSQLJ
This value is used to indicate whether SQLJ operations may be performed with this data source. If enabled, this data source can be used for both JDBC and SQLJ calls. Otherwise, only JDBC usage is permitted.
-
description
The description of this datasource.
-
traceLevel
The DB2 trace level for logging to the logWriter or trace file. Possible trace levels are:
-
TRACE_NONE = 0
-
TRACE_CONNECTION_CALLS = 1
-
TRACE_STATEMENT_CALLS = 2
-
TRACE_RESULT_SET_CALLS = 4
-
TRACE_DRIVER_CONFIGURATION = 16
-
TRACE_CONNECTS = 32
-
TRACE_DRDA_FLOWS = 64
-
TRACE_RESULT_SET_META_DATA =128
-
TRACE_PARAMETER_META_DATA = 256
-
TRACE_DIAGNOSTICS = 512
-
TRACE_SQLJ = 1024
-
TRACE_ALL = -1
-
-
traceFile
The trace file to store the trace output.
Besides the properties listed above, there are still a few more other properties that impacts the connection behaviors to the DB2 data source, such as resultSetHoldability to control cursor behavior when committing a transaction; readOnly to control if the connection is read only of not, etc. For more complete descriptions for the DB2 Universal JDBC Driver Provider properties, refer to the data source custom properties page in the WebSphere Application Server Administrative Console, or visit the following URL:
http://www.ibm.com/software/data/db2/udb/ad/v8/java/ad/rjvdsprp.htm
-
-
Test the connection to the newly defined data source
After applying and saving the changes made in the above steps, then click or choose Resources -> JDBC Providers -> My DB2 Universal JDBC Provider -> Data Sources. In the resulting page, you could begin to test the connection to the data source by checking the check box preceding to the desired data source name, then click the button Test Connection, as shown in the Figure 5-15.
Figure 5-15: Test Connection to the Data SourceIf the testing is successful, then a window like Figure 5-16 would be displayed. If the connection could not be established successfully, make sure the properties given are correct and working. There is a section "Connectivity scenario" on page 359 talking about the problem troubleshooting for connectivity issues, you could refer to that for more information.

Figure 5-16: Successful Connection Testing to the Data Source
|
| < Day Day Up > |
|
EAN: N/A
Pages: 90