Lesson 2: Replacing and Upgrading Chips
A computer technician is commonly expected to upgrade computers. Because the CPU is the "brain" of a computer, replacing this single component can bring new life to an aging system. Replacing the chip is easy, but understanding the possible scenarios for a successful upgrade can be more challenging.
After this lesson, you will be able to:
- Decide whether a CPU is worth upgrading.
- Find the type of CPU required for upgrade.
- Install a new CPU.
Estimated lesson time: 15 minutes
Replacing a CPU can be very simple, but it is important to first carefully consider whether to do so. If you do decide to replace it, you will need to take care to avoid damaging the chip during installation. Before undertaking this process, always ask yourself, "What CPUs can be put on this motherboard?" The best source for an answer is the documentation packaged with the computer or motherboard. If the customer does not have the motherboard manual and you do not have a reference, the document should be available on the manufacturer's Web site.
Possible Upgrade Scenarios
There are a number of issues to think about when deciding whether to upgrade a CPU or replace a machine altogether. Perhaps the most important issue is the "value" of the upgrade. Will the suggested upgrade meet the operational requirements for that computer? There are limits to what can be upgraded and the results that can be expected from the upgrade. A poor upgrade can lead to total failure and, ultimately, require replacement of the motherboard. Again, the best source of information regarding CPU upgrades is the documentation that comes with the motherboard. The following table lists several possible scenarios for upgrading a CPU.
| Existing CPU | Recommendation |
|---|---|
| 8086/8088 | Cannot be upgraded. |
| 80286 | Replace the motherboard with a new 486 or Pentium. |
| 80386SX | Same as for 80286. Replace the motherboard. |
| 80386DX | CPU has limited use—very slow. Upgrade to a Pentium motherboard. |
| 486SX | If it has a good L2 cache (greater than 64 KB) and room to upgrade RAM, and VESA Local Bus (see Chapter 10, "Expansion Buses"), consider an AMD486DX/4 or a new Pentium motherboard. |
| 486DX | Same as for 486SX. |
| 486DX/2 | Pentium upgrade chips will give you some improvement. |
| 486DX/4 | Same as for 486DX/2. |
| Pentium | Replace a Pentium 60, 66, or 75 with a faster CPU. |
On average, it is more cost effective to replace an entire motherboard than it is to upgrade a CPU. However, you have to judge for yourself. Make sure that the new motherboard will fit into the computer case (check size and alignment of expansion buses) before starting the installation. Be sure that the power supply of the old case and new motherboard are of the same type with the proper connectors (such as AT, ATX). Always make sure that you can return a CPU and motherboard to the vendor if it won't fit. Be sure to determine this before you open the packaging or attempt to install. Keep in mind that many suppliers charge a restocking fee of 15 to 20 percent for returns.
Inserting a CPU
Several types of CPU sockets are sold. The three most common are:
- Low-insertion force (LIF).
- Zero-insertion force (ZIF).
- Single-edge connector (SEC).
LIF Socket
Removing an old CPU from a LIF socket is a muscular business! Luckily, there are special tools that are designed for this. However, a flat-head screwdriver, or a plate cover for an expansion card slot, will also work—just be sure to pry evenly around the CPU or you will risk damaging the CPU, the socket, or both.
NOTE
There is a notch in one corner of a LIF socket. The CPU will also have a notch and a dot in one corner, designed to help align the CPU correctly. The index corner of the CPU must line up with the notch on the socket. Firmly press the CPU into the PGA socket, making sure all the pins are lined up.
ZIF Socket
The ZIF socket, shown in Figure 4.14, was the most popular mount for desktop and tower PCs with 486 and early Pentium CPUs.
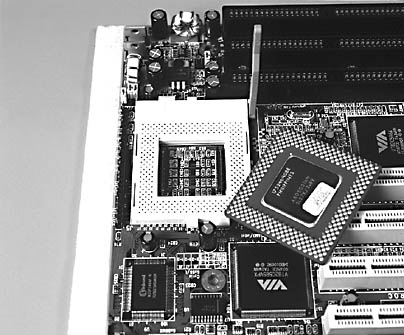
Figure 4.14 ZIF socket with CPU inverted showing matching pins
A ZIF socket has a lever arm that allows for simple removal and installation of CPUs. ZIF sockets were introduced during the early 1990s as a safe means of providing a user-friendly CPU upgrade. The first ZIF socket had 169 pins and was used on 486SX systems. These systems were sold with a 486SX chip already installed in a PGA socket and provided a ZIF socket for a 486 overdrive chip. (An overdrive chip is a special processor designed to increase the speed of 486 computers. It works similarly to the standard clock-doubling processors—DX2 and DX4—used on 486 motherboards.) Often, this is a good method of increasing the speed of a computer without replacing the motherboard.
The following table describes the types of ZIF sockets.
| CPU Type | Number of Pins | Pin Layout | Voltage |
|---|---|---|---|
| 486SX/SX2, DXUDX2, DX40DPR | 169 | 17 x 17 PGA | 5v |
| SX/SX2, DX/DX2, DX40DPR, Pentium OverDrive | 238 | 19 x 19 PGA | 5v |
| SX/SX2, DX/DX2, DX40DP, Pentium OverDrive | 237 | 19 x 19 PGA | 5v/3.3v |
| Pentium 60/66 | 273 | 21 x 21 PGA | 5v |
| Pentium 75/90/100/120 | 320 | 37 x 37 SPGA | 3.3v |
| 486 DX4, Pentium OverDrive | 235 | 19 x 19 PGA | 3.3v |
| Pentium 75-200 | 321 | 21 x 21 SPGA | VRM |
NOTE
ODPR stands for overdrive processor replacement. PGA is a pin grid array. SPGA is a staggered pin grid array, and VRM is a voltage regulator module.
Upgrade Advice
Be very careful when handling a CPU or any exposed IC. Static discharge can damage or ruin the chip. Be sure to use a wrist-grounding strap or other approved antistatic device. Take great care to not bend any pins, and make sure the CPU is properly lined up to seat Pin 1 by using the code notch.
CAUTION
If you encounter any resistance, stop at once and figure out what is wrong.
Check the memory and bus speed required for the new CPU before attempting to boot the PC after the procedure. It might require new RAM and will most often demand that a jumper be set on the motherboard before operating at the new speed.
SEC Package/Slot 1 Upgrades
The Pentium II and III series are most commonly packaged in a SEC. This package, shown in Figure 4.15, is very simple to work with. You will need a motherboard mount and might have to purchase a fan and heat sink before installing the CPU. Check the manual for jumper-setting adjustments, and follow the simple directions that come with the CPU.
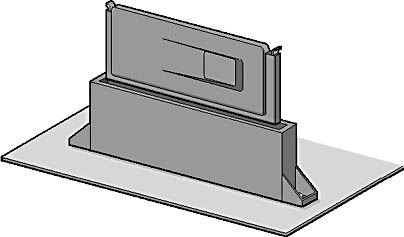
Figure 4.15 Pentium Processor in an SEC Package and Slot 1
The actual task involves seating two plastic pins, sliding two guides over the sides of the CPU, then pushing the frame and CPU into the slot on the board. With dual CPU boards, you need to know which slot to use, and you might have to place a special card (which comes with the motherboard) in the second CPU position if it is to remain empty.
CAUTION
Be sure to properly mount the cooling system, and make sure the fan works before running the new CPU for any amount of time or closing the case. Failure to ensure proper heat removal will destroy the CPU very quickly!
Lesson Summary
The following points summarize the main elements of this lesson:
- Replacing a CPU is usually a simple task.
- It is important to consider the limitations and potential of an upgrade before deciding to replace a CPU.
EAN: N/A
Pages: 127