Configuring Tracking Method Settings
The tracking method you choose has a significant impact on your team members and their interaction with their timesheets. Not only do some of these options control what data a resource reports, but they also determine the appearance of the timesheet. In Chapter 3 I discussed the organizational indicators for identifying a tracking method preference. You must understand the interface impact to decide on tracking method settings.
Your first decision is whether to configure Project Server to provide a default tracking method that an individual project manager may change or to lock down the tracking method to the default type only. Figure 9-6 shows the upper area of the Tracking settings interface in Project Web Access that you reach by selecting Customize Microsoft Project Web Access ![]() Tracking settings from the Admin menu. Lock down the system to a single tracking method by selecting the radio button “Force project managers to use the progress reporting method …” specified previously for all projects under the “Lock down defaults” area.
Tracking settings from the Admin menu. Lock down the system to a single tracking method by selecting the radio button “Force project managers to use the progress reporting method …” specified previously for all projects under the “Lock down defaults” area.
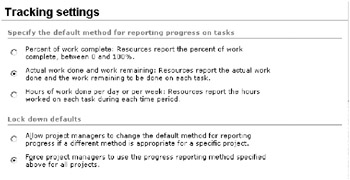
Figure 9-6. The Tracking settings interface in Project Web Access
Most organizations choose to force project managers to use the default tracking method in an enterprise implementation. The consequence of not locking this down is potentially confusing resources with a timesheet displaying tasks that follow different tracking methods. In this scenario, a resource must know how to report progress three different ways. Generally, simplicity and uniformity are more desirable. In certain implementations where project teams are static entities, multiple reporting methods may be a viable option. Project Server defaults to “Percent of work complete.”
The important difference between tracking methods is the information collected by each one, which varies by method.
-
Percent of work complete: Resources may enter the percent of work complete and the percent of work remaining.
-
Actual work done and work remaining: Resources may enter the actual work completed and the work remaining on a task.
-
Hours of work done per day or per week: Resources may enter hours by day or week and work remaining.
You can base time-period settings on a weekly or a monthly frequency. Certain options change according to the frequency selection. Figure 9-7 shows the “Time period settings” page with Weekly selected, and Figure 9-8 shows the “Time period settings” page with Monthly selected. In both cases, the “Week starts on” selection is set by choosing from the pull-down menu provided.
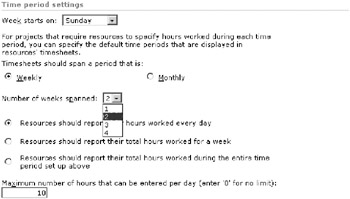
Figure 9-7. The “Time period settings” interface with Weekly selected
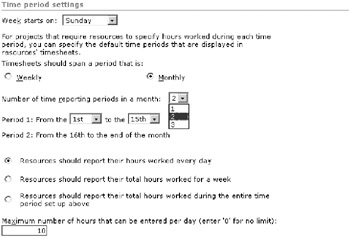
Figure 9-8. The “Time period settings” interface with Monthly selected
When you select a weekly span, you may set the number of weeks spanned on the timesheet view from 1 to 4. When you select a monthly span, semimonthly reporting periods are modeled by selecting up to three reporting periods and building the start and stop rules using the Period selection pull-down dates. With either span selected, you must choose one of three radio buttons to determine how the timesheet will accept hourly input.
Selecting the “Resources should report their hours worked every day” option causes the timesheet to provide daily input cells for time entry within the format specified by the span period and number of periods spanned. Figure 9-9 shows a weekly timesheet with a 1-week span with daily reporting selected.
Figure 9-9. Timesheet view with daily reporting configured
Selecting the “Resources should report their total hours worked for a week” option opens weekly entry cells on the timesheet for resource hour entries. Figure 9-10 shows a weekly timesheet with a 2-week span with weekly reporting selected.

Figure 9-10. Weekly reporting accepts the total for a week at a time.
Using the “Resources should report their total hours worked during the entire time period set up above” option, you can force the input cells to represent the total by time period. This is the setting to gather totals for nonstandard periods such as semimonthly. Figure 9-11 shows this option selected along with “Actual work done and work remaining” selected as the tracking method. Figure 9-12 shows the same span options selected with “Percent work complete” selected as the tracking method.
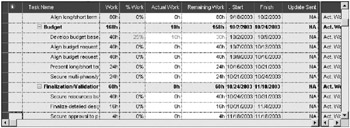
Figure 9-11. Time entry for an entire period using the “Actual work done and work remaining” method
Figure 9-12. Time entry for an entire period using the “Percent work complete” method
| Tip | You can’t mix daily and weekly reporting methods. If you want your resources to report on a day-by-day basis, select this up front. Once you’ve published plans using weekly reporting blocks, you won’t be able to easily change this. |
Setting the maximum number of hours a resource may report per day limits the daily input to the number entered. Nondaily entries are restricted by the aggregate total of the number of working days in the period multiplied by the daily limit.
Finally, in its own section not shown in any of the preceding figures is an option to set the current task definition in number of days. This allows you to set the timesheet to display tasks that are due to start within the number of days set in the option.
EAN: 2147483647
Pages: 185
- Constraint-Based Routing and Operation in MPLS TE
- Introduction to Layer 2 VPNs
- Modular QoS CLI: Configuration of QoS on Cisco Routers
- Case Study 2: Implementing Multi-VRF CE, VRF Selection Using Source IP Address, VRF Selection Using Policy-Based Routing, NAT and HSRP Support in MPLS VPN, and Multicast VPN Support over Multi-VRF CE
- Command Reference