Setting Options for Enterprise Features
Your logical first step is to make sure that, at a high level, Project Server behavior is configured to your requirements. You access the screen shown in Figure 9-1 by clicking the “Manage enterprise features” link from the Admin menu in Project Web Access.
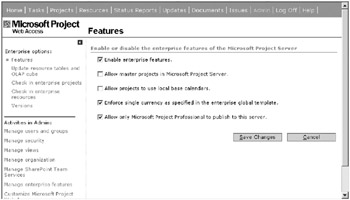
Figure 9-1. The “Manage enterprise features” area
Make sure that the submenu Features is selected to reveal five check-box settings:
-
Enable enterprise features.
-
Allow master projects in Microsoft Project Server.
-
Allow projects to use local base calendars.
-
Enforce single currency as specified in the enterprise global template.
-
Allow only Microsoft Project Professional to publish to this server.
The first and last options in the list have a large impact on Project Server behavior. In the purest sense, the tightest enterprise configuration would have both option 1 and option 5 checked. With this combination, you enable enterprise features and the server is set to accept projects from Project Professional only. It’s possible to uncheck the last option and enable enterprise options at the same time, but the results are that the projects saved to the server from Project Professional will be enterprise enabled, whereas those saved from versions other than Project Professional won’t be enterprise projects. Microsoft doesn’t support this type of configuration, and it’s beyond the scope of this book.
Allowing publishing of master projects to the server is problematic. First, Project Server theoretically diminishes the need for master projects. Second, master projects cause doubling of work values when published to Project Server. I recommend that you use master projects on-the-fly if you really need to see a view like this. Save copies of your project files, create the master project outside the auspices of the server, and toss it when you’re through. You can’t manage updates to a master plan using the Project Web Access interface. If you do wish to allow master projects in your installation, you must set another option under Manage organization ![]() Features from the Admin menu. You must select the check box “Allow master projects to be published to Microsoft Project Server.” (See Figure 9-4 in the “Setting Base URL Paths for Your Server” section later in this chapter.) Selecting this option allows your users to publish from master plans, which renders the system vulnerable to doubling assignments.
Features from the Admin menu. You must select the check box “Allow master projects to be published to Microsoft Project Server.” (See Figure 9-4 in the “Setting Base URL Paths for Your Server” section later in this chapter.) Selecting this option allows your users to publish from master plans, which renders the system vulnerable to doubling assignments.
In Microsoft Project terms, a master project is a project that contains two or more inserted projects. You create these by opening a new project plan, and then selecting the Insert menu and choosing Project. From here, the system allows you to navigate to an existing project and insert it into the current plan as a subproject.
The other two check boxes you encounter control global behaviors for the system. If checked, option 3 permits your project managers to define and select their own base calendar for a project. You want to enable this feature if your company is managing projects with calendar requirements that vary by project and aren’t easily standardized. Enforcing a single currency (option 4) is another option that determines whether the system permits multiple currencies for costing. In all likelihood, you’ll want your system configured exactly as shown in Figure 9-1, with a single currency enforced and the local base calendars option unchecked. Click Save Changes to save the settings you’ve chosen.
If you determined that your company will use versions to accommodate saving more than one version of a plan to the server, then you’ll configure them by clicking Versions in the submenu. Click the Add Version button to add a new version. Create your version by providing a name for it, which you should keep short because it shows up as a file extension in project names. Choose whether it’s an archived version or not and select a Gantt Bar style for the version in Project Web Access displays, as shown in Figure 9-2. The difference between an archived version and a nonarchived version is that a nonarchived version can continue to be changed and used for modeling. You can save a nonpublished over a published version to make it the current working version. Archived versions are snapshots in time and they’re stored for informational purposes only.
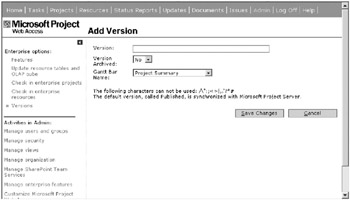
Figure 9-2. Add a new version to your server configuration.
EAN: 2147483647
Pages: 185