Installation Preparation
Review the Microsoft Project Server Installation Guide in its entirety. This is included on your installation CD as PJSVR10.CHM. Copy the file to your hard drive or a network share and read it from there. Don’t try e-mailing it, as most e-mail systems prevent this type of file from being sent. This document contains valuable Project Server technical information. Everything you need to know to successfully install Project Server is contained in this document; however, it leaves many people guessing. Follow the steps I’ve outlined, but don’t overlook the value of the manufacturer’s documentation in the process.
Before you begin following my instructions, check your servers against the technology checklist shown in Table 5-1.
| TECHNOLOGY | VERSION | NOTES |
|---|---|---|
| Windows 2000 Server | SP2 | Can be either Advanced Server or Server. |
| Internet Information Services | See Notes | Version 5.0 for Windows 2000. |
| SMTP Server | N/A | May be any external SMTP, or use built-in IIS capability. |
| Indexing Service | N/A | Installed and enabled. |
| SQL Server 2000 Analysis Server | SP2 | Server name or named instance using TCP/IP and set to run in mixed authentication mode. |
I also assume that you’ve installed your OSs and database software from original Microsoft-supplied media without any installation or postinstallation modifications. Those who modify their implementations should have the OS talent available to diagnose potential issues, particularly with security changes. Finally, if you’re planning on deploying across multiple servers, you’re operating in a domain environment and you’re using domain logons for authentication.
For a single-server installation, you’ll use the same server for Project Server, SQL Server, Analysis Services, and Indexing Service. You may also use the local SMTP service, but this is optional. For a two-server configuration, SQL Server 2000 and SQL 2000 Analysis Services are installed on one box, whereas IIS, Indexing Services, Project Server Web Access, STS, and the optional SMTP Service are on the other box. The box on which Project Server is running also has the Analysis Services Decision Support Objects (DSO) installed on it.
Verifying Installed Technologies
The first step is to verify your installed technologies. The following sections give you the steps for verifying each specific technology.
Verify Windows 2000 Server SP2
To verify Windows 2000 Server SP2, follow these steps. Open Windows Explorer and select Help ![]() Help About. You should see Windows 2000 version 5 SP2.
Help About. You should see Windows 2000 version 5 SP2.
| Caution | Project Server may not install on Windows 2000 Service Pack 3 (SP3). This has been a troublesome service pack for Microsoft. Install SP3 after you’ve installed Project Server and STS to avoid problems. If you must install on a server that has had SP3 applied, and you run into difficulties, contact Microsoft Support for an update. |
Verify SQL Server 2000 SP2
To verify SQL Server 2000 SP2, follow these steps:
-
Click the Start button and select Programs
 MS SQL Server Query Analyzer.
 -
Type select @@version and click the Execute (F5) button.
The version should be 8.00.532.
Verify Analysis Services SP2
To verify Analysis Services SP2, follow these steps:
-
Click the Start button and select Programs
MS SQL Server Analysis Services Analysis Manager. -
Right-click the Analysis Services node.
-
Click About Analysis Services.
The version should be 8.0.532.
In order to proceed with the installation, you’ll need to record the server names you will be using (see Table 5-2).
| SERVER | NAME | FULLY QUALIFIED DOMAIN NAME |
|---|---|---|
| STS/Project Server | ||
| SQL Server | ||
| SMTP Server |
Verifying That FrontPage Extensions Are Not Installed
The server that runs STS should not have FrontPage Server Extensions installed prior to installing STS. For installations on Windows 2000 Server, you must use the STS version and FrontPage Server Extensions shipped with Project Server. The pre-existence of FrontPage Server Extensions on the server will interfere with the STS installation.
The following sections describe how to verify on various servers that FrontPage Server Extensions aren’t installed.
On a Windows 2000 Server, follow these steps:
-
From the Control Panel, launch Add/Remove Programs.
-
Click Add/Remove Windows Components to open the Windows Component Wizard.
-
In the Windows Component Wizard dialog box, highlight Internet Information Services (IIS).
-
Click Details.
-
Verify that the FrontPage 2000 Server Extensions option isn’t checked (see Figure 5-1).
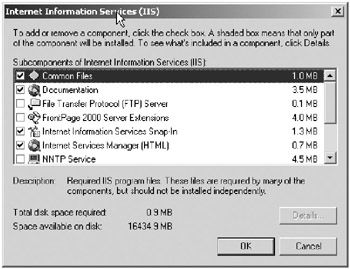
Figure 5-1. Internet Information Services subcomponent details
Checking Security Settings in IIS
In the next step you verify that IIS is configured for STS and Project Server. STS installs on a Web site while Project Server installs as a virtual directory. On Windows 2000 Server, the default Web site is an acceptable target for installing STS and Project Server. Alternately, you can choose to create a new Web site on a different port and install STS onto it. Note that the STS administrative and search sites install on the default Web site.
To check security settings, follow these steps:
-
Launch Internet Services Manager and expand the server.
-
Right-click the Default Web Site and choose Properties.
-
Select the Home Directory tab and verify that Execute Permissions is set to Scripts Only.
-
Select the Directory Security tab, click Edit in the “Anonymous access and authentication control” area, and verify that “Anonymous access and Integrated Windows authentication” is selected.
-
Click Edit in the anonymous access area and verify that “Allow IIS to control password” is checked. Click OK twice.
-
Staying on the Directory Security tab, click Edit in the “IP Address and domain name restrictions” area and verify that Granted Access is selected. Click OK twice.
-
Expand the Default Web Site, if it’s not already expanded, click the MSADC virtual directory, and select Properties.
-
Select the Virtual Directory tab and verify that Execute Permissions is set to Scripts and Executables.
-
Right-click msadcs.dll in the right-hand pane and select Properties.
-
Staying on the Directory Security tab, click Edit in the “IP Address and domain name restrictions” area and select the Granted Access radio button. Click OK twice. (See Figure 5-2.)
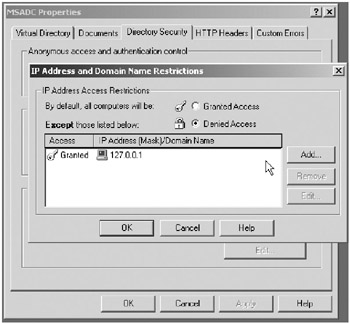
Figure 5-2. By default, IP address and domain restrictions are set to Denied.
Creating Application Accounts
Project Server connects to STS and SQL Analysis Services through COM+. This requires three application identities, one each for the administration and reader roles in STS and one for access to Analysis Services. If you’re installing on one computer, these can be local machine accounts. If you’re using these accounts to access services on another server, then they must be domain logons. The three accounts should look something like this:
-
STS_Reader
-
STS_Admin
-
OLAP_Admin
To create three local accounts, follow these steps:
-
From the Control Panel, launch Administrative Tools, and then open the Computer Management Console.
-
Right-click the Users folder and choose New User.
-
Follow your company’s naming convention and try to use a descriptive name that will let another administrator know what the account is for. Make sure that the “User must change password” option is unchecked and that the “Password never expires” option is checked. Make a note of the name and password for use in installation. Repeat this step for all three accounts.
-
After your new accounts are created, click the Groups folder, double-click the Administrators group, and add all three accounts to the group.
-
Now click the OLAP Administrators group and, repeating the actions in step 4, add the account created for the OLAP administrator to this group.
Verifying SQL Server Settings
Microsoft SQL Server installation defaults to NT Authentication only. If you didn’t install the instance of SQL Server 2000 that you’re using and/or you don’t remember if you selected Mixed Authentication Mode when you installed the instance, follow these steps to make sure that SQL Server is properly configured for STS and Project Server:
-
Open the Enterprise Manager.
-
Expand the Server group.
-
Right-click a server name, and then click Properties.
-
Click the Security tab.
-
Under Authentication, click the SQL Server and Windows option button.
-
Restart SQL Server in order for the change to take effect.
| Note | For multiple server installations, make sure that SQL Server Decision Support Objects (DSO) are installed on the system running Project Server. |
EAN: 2147483647
Pages: 185