Section 12.2. Generated Content
12.2. Generated ContentCSS2 and CSS2.1 include a new feature called generated content. This is content created by the browser but not represented either by markup or content. For example, list markers are generated content. There is nothing in the markup of a list item that directly represents the markers, and you, the author, do not have to write the markers into your document's content. The browser simply generates the appropriate marker automatically. For unordered lists, the marker is a bullet of some kind, such as a circle, disc, or square. In ordered lists, the marker is a counter that increments by one for each successive list item.
To understand how you can affect list markers and customize the counting of ordered lists (or anything else!), you must first look at more basic generated content.
12.2.1. Inserting Generated ContentTo insert generated content into the document, use the :before and :after pseudo-elements. These place generated content before or after the content of an element by way of the content property (described in the next section). For example, you might want to precede every hyperlink with the text "(link)" to mark them for printing. This is accomplished with a rule like the following, which has the effect shown in Figure 12-11: a[href]:before {content: "(link)";} Figure 12-11. Generating text content Note that there isn't a space between the generated content and the element content. This is because the value of content in the previous example doesn't include a space. You could modify the declaration as follows to make sure there's a space between generated and actual content: a[href]:before {content: "(link) ";} It's a small difference but an important one. In a similar manner, you might choose to insert a small icon at the end of links to PDF documents. The rule to accomplish this would look something like: a.pdf-doc:after {content: url(pdf-doc-icon.gif);} Suppose you want to further style such links by placing a border around them. This is done with a second rule: a.pdf-doc {border: 1px solid gray;} The result of these two rules is illustrated in Figure 12-12. Figure 12-12. Generating icons Notice how the link border extends around the generated content, just as the link underline extended under the "(link)" text in Figure 12-11. This happens because generated content is placed inside the element box of the element. As of CSS2.1, there isn't a way to place generated content outside the element box, other than list markers. You might think that positioning would do the trick, except CSS2 and CSS2.1 specifically prohibit the floating or positioning of :before and :after content. List-style properties, along with table properties, are similarly prohibited. In addition, the following restrictions apply:
For example, consider: em:after {content: " (!) "; display: block;} Since em is an inline element, the generated content cannot be made block-level. The value block is therefore reset to inline. In this next example, however, the generated content is made block-level because the target element is also block-level: h1:before {content: "New Section"; display: block; color: gray;} The result is illustrated in Figure 12-13. Figure 12-13. Generating block-level content One interesting aspect of generated content is that it inherits values from the element to which it's been attached. Thus, given the following rules, the generated text will be green, the same as the content of the paragraphs: p {color: green;} p:before {content: "::: ";} If you want the generated text to be purple instead, a simple declaration will suffice: p:before {content: "::: "; color: purple;} Such value inheritance happens only with inherited properties, of course. This is worth noting because it influences how certain effects must be approached. Consider: h1 {border-top: 3px solid black; padding-top: 0.25em;} h1:before {content: "New Section"; display: block; color: gray; border-bottom: 1px dotted black; margin-bottom: 0.5em;} Since the generated content is placed inside the element box of the h1, it will be placed under the top border of the element. It would also be placed within any padding, as shown in Figure 12-14. Figure 12-14. Taking placement into account The bottom margin of the generated content, which has been made block-level, pushes the actual content of the element downward by half an em. In every sense, the effect of the generated content in this example is to break up the H1 element into two pieces: the generated-content box and the actual content box. This happens because the generated content has display: block. If you were to change it to display: inline, the effect would be as shown in Figure 12-15: h1 {border-top: 3px solid black; padding-top: 0.25em;} h1:before {content: "New Section"; display: inline; color: gray; border-bottom: 1px dotted black; margin-bottom: 0.5em;} Figure 12-15. Changing the generated content to be inline Note how the borders are placed and how the top padding is still honored. So is the bottom margin on the generated content, but since the generated content is now inline and margins don't affect line height, the margin has no visible effect. With the basics of generating content established, let's take a closer look at the way the actual generated content is specified. 12.2.2. Specifying ContentIf you're going to generate content, you need a way to describe the content to be generated. As you've already seen, this is handled with the content property, but there's a great deal more to this property than you've seen thus far.
You've already seen string and URI values in action, and counters will be covered later in this chapter. Let's talk about strings and URIs in a little more detail before we take a look at the attr( ) and quote values. String values are presented literally, even if they contain what would otherwise be markup of some kind. Therefore, the following rule would be inserted verbatim into the document, as shown in Figure 12-16: h2:before {content: "<em>¶</em> "; color: gray;} Figure 12-16. Strings are displayed verbatimThis means that if you want a newline (return) as part of your generated content, you can't use <br>. Instead, you use the string \A, which is the CSS way of representing a newline (based on the Unicode linefeed character, which is hexadecimal position A). Conversely, if you have a long string value and need to break it up over multiple lines, you escape out the linefeeds with the \ character. These are both demonstrated by the following rule and illustrated in Figure 12-17: h2:before {content: "We insert this text before all H2 elements because \ it is a good idea to show how these things work. It may be a bit long \ but the point should be clearly made. "; color: gray;} Figure 12-17. Inserting and suppressing newlines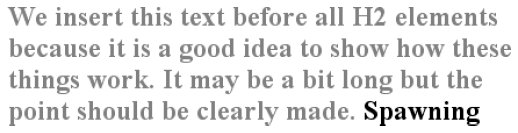 You can also use escapes to refer to hexadecimal Unicode values, such as \00AB.
With URI values, you simply point to an external resource (an image, movie, sound clip, or anything else the user agent supports), which is then inserted into the document in the appropriate place. If the user agent can't support the resource you point it to for any reasonsay, you try to insert an SVG image into a browser that doesn't understand SVG, or try to insert a movie into a document when it's being printedthen the user agent is required to ignore the resource completely, and nothing will be inserted. 12.2.2.1. Inserting attribute valuesThere are situations where you might want to take the value of an element's attribute and make it a part of the document display. To pick a simple example, you can place the value of every link's href attribute immediately after the links, like this: a[href] {content: attr(href);} Again, this leads to the problem of the generated content running smack into the actual content. To solve this, add some string values to the declaration, with the result shown in Figure 12-18: a[href] {content: " [" attr(href) "]";} Figure 12-18. Inserting URLs This can be useful for print style sheets, as an example. Any attribute value can be inserted as generated content: alt text, class or id valuesanything. An author might choose to make the citation information explicit for a block quote, like this: blockquote:after {content: "(" attr(cite) ")"; display: block; text-align: right; font-style: italic;} For that matter, a more complicated rule might reveal the text- and link-color values for a legacy document: body:before {content: "Text: " attr(text) " | Link: " attr(link) " | Visited: " attr(vlink) " | Active: " attr(alink); display: block; padding: 0.33em; border: 1px solid black; text-align: center;} Note that if an attribute doesn't exist, an empty string is put in its place. This is what happens in Figure 12-19, in which the previous example is applied to a document whose body element has no alink attribute. Figure 12-19. Missing attributes are skipped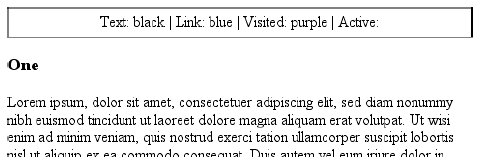 The text "Active: " (including the trailing space) is inserted into the document, as you can see, but there is nothing following it. This is convenient in situations where you want to insert the value of an attribute only when it exists.
12.2.2.2. Generated quotesA specialized form of generated content is the quotation mark, and CSS2.x provides a powerful way to manage both quotes and their nesting behavior. This is possible due to the pairing of content values like open-quote and the property quotes.
Upon studying the value syntax, we find that other than the keywords none and inherit, the only valid value is one or more pairs of strings. The first string of the pair defines the open-quote symbol, and the second defines the close-quote symbol. Therefore, of the following two declarations, only the first is valid: quotes: '"' "'"; /* valid */ quotes: '"'; /* NOT VALID */ The first rule also illustrates one way to put string quotes around the strings themselves. The double quotation marks are surrounded by single quotation marks, and vice versa. Let's look at a simple example. Suppose you're creating an XML format to store a list of favorite quotations. Here's one entry in the list: <quotation> <quote>I hate quotations.</quote> <quotee>Ralph Waldo Emerson</quotee> </quotation> To present the data in a useful way, you could employ the following rules, with the result shown in Figure 12-20: quotation: display: block;} quote {quotes: '"' '"';} quote:before {content: open-quote;} quote:after {content: close-quote;} quotee:before {content: " (";} quotee:after {content: ")";} Figure 12-20. Inserting quotes and other contentThe values open-quote and close-quote are used to insert whatever quoting symbols are appropriate (since different languages have different quotation marks). They use the value of quotes to determine how they should work. Thus, the quotation begins and ends with a double quotation mark. If you want to use "curly quotes" instead of the plain vertical-line quotation marks, as is common in most print media, the quote rule would read: quote {quotes: '\201C' '\201D';} This uses the hexadecimal Unicode positions for the "curly quote" symbols and, if applied to the previous quotation, would surround Emerson's quote with curly quotes instead of the straight quotes in Figure 12-20. With quotes, you can define quotation patterns to as many nesting levels as you like. In English, for example, a common practice is to start out with a double quotation mark, and a quotation nested inside the first one gets single quotation marks. This can be recreated with "curly" quotation marks using the following rules: quotation: display: block;} quote {quotes: '\201C' '\201D' '\2018' '\2019';} quote:before, q:before{content: open-quote;} quote:after, q:after {content: close-quote;} When applied to the following markup, these rules will have the effect shown in Figure 12-21: <quotation> <quote> In the beginning, there was nothing. And God said: <q>Let there be light!</q> And there was still nothing, but you could see it.</quote> </quotation> Figure 12-21. Nested curly quotesIn a case where the nested level of quotation marks is greater than the number of defined pairs, the last pair is reused for the deeper levels. Thus, if you had applied the following rule to the markup shown in Figure 12-21, the inner quote would have had double quotation marks, the same as the outer quote: quote {quotes: '\201C' '\201D';} Generated quotes make possible one other common typographic effect. In situations where there are several paragraphs of quoted text, the close-quote of each paragraph is often omitted; only the opening quote marks are shown, with the exception of the last paragraph. This can be recreated using the no-close-quote value: blockquote {quotes: '"' '"' "'" "'" '"' '"';} blockquote p:before {content: open-quote;} blockquote p:after {content: no-close-quote;} This will start each paragraph with a double quotation mark but no closing mark. This is true of the last paragraph as well, so if you need to add a closing quote mark, you'd need to class the final paragraph and declare a close-quote for its :after content. This value is important because it decrements the quotation nesting level without actually generating a symbol. This is why each paragraph starts with a double quotation mark, instead of alternating between double and single marks until the third paragraph is reached. no-close-quote closes the quotation nesting at the end of each paragraph, and thus every paragraph starts at the same nesting level. This is significant because, as the CSS2.1 specification notes, "Quoting depth is independent of the nesting of the source document or the formatting structure." In other words, when you start a quotation level, it persists across elements until a close-quote is encountered, and the quote nesting level is decremented. For the sake of completeness, there is a no-open-quote keyword, which has a symmetrical effect to no-close-quote. This keyword increments the quotation nesting level by one but does not generate a symbol. 12.2.3. CountersWe're all familiar with counters; for example, the markers of the list items in ordered lists are counters. In CSS1, there was no way to affect them, largely because there was no need: HTML defined its own counting behaviors for ordered lists, and that was that. With the rise of XML, it's now important to provide a method by which counters can be defined. CSS2 was not content to simply provide for the kind of simple counting found in HTML, however. Two properties and two content values make it possible to define almost any counting format, including subsection counters employing multiple styles, such as "VII.2.c." 12.2.3.1. Resetting and incrementingThe basis of creating counters is the ability to set both the starting point for a counter and to increment it by some amount. The former is handled by the property counter-reset.
A counter identifier is simply a label created by the author. For example, you might name your subsection counter subsection, subsec, ss, or bob. The simple act of resetting (or incrementing) an identifier is sufficient to call it into being. In the following rule, the counter chapter is defined as it is reset: h1 {counter-reset: chapter;} By default, a counter is reset to zero. If you want to reset to a different number, you can declare the number following the identifier: h1#ch4 {counter-reset: Chapter 4;} You can also reset multiple identifiers all at once in identifier-integer pairs. If you leave out an integer, then it defaults to zero: h1 {counter-reset: Chapter 4 section -1 subsec figure 1;} /* 'subsec' is reset to 0 */ As you can see from the previous example, negative values are permitted. It would be perfectly legal to set a counter to -32768 and count up from there.
To count up, you'll need a property to indicate that an element increments a counter. Otherwise, the counter would remain at whatever value it was given with a counter-reset declaration. The property in question is, not surprisingly, counter-increment.
Like counter-reset, counter-increment accepts identifier-integer pairs, and the integer portion of these pairs can be zero or negative as well as positive. The difference is that if an integer is omitted from a pair in counter-increment, it defaults to 1, not 0. As an example, here's how a user agent might define counters to recreate the traditional 1, 2, 3 counting of ordered lists: ol {counter-reset: ordered;} /* defaults to 0 */ ol li {counter-increment: ordered;} /* defaults to 1 */ On the other hand, an author might want to count backward from zero so that the list items use a rising negative system. This would require only a small edit: ol {counter-reset: ordered;} /* defaults to 0 */ ol li {counter-increment: ordered -1;} The counting of lists would then be -1, -2, -3 and so on. If you replaced the integer -1 with -2, then lists would count -2, -4, -6 and so on. 12.2.3.2. Using countersTo actually display the counters, though, you need to use the content property in conjunction with one of the counter-related values. To see how this works, let's use an XML-based ordered list like this: <list type="ordered"> <item>First item</item> <item>Item two</item> <item>The third item</item> </list> By applying the following rules to XML employing this structure, you would get the result shown in Figure 12-22: list[type="ordered"] {counter-reset: ordered;} /* defaults to 0 */ list[type="ordered"] item {display: block;} list[type="ordered"] item:before {counter-increment: ordered; content: counter(ordered) ". "; margin: 0.25em 0;} Figure 12-22. Counting the items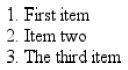 Note that the generated content is, as usual, placed as inline content at the beginning of the associated element. Thus, the effect is similar to an HTML list with list-style-position: inside; declared. Note also that the item elements are ordinary elements generating block-level boxes, which means that counters are not restricted only to elements with a display of list-item. In fact, any element can make use of a counter. Consider the following rules: h1:before {counter-reset: section subsec; counter-increment: chapter; content: counter(chapter) ". ";} h2:before {counter-reset: subsec; counter-increment: section; content: counter(chapter )"." counter(section) ". ";} h3:before {counter-increment: subsec; content: counter(chapter) "." counter(section) "." counter(subsec) ". ";} These rules would have the effect shown in Figure 12-23. Figure 12-23. Adding counters to headings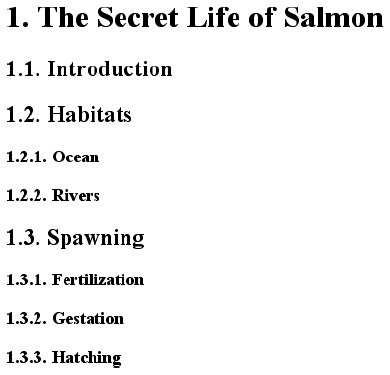 Figure 12-23 illustrates some important points about counter resetting and incrementing. Notice how the h1 element uses the counter chapter, which defaults to zero and has a "1." before the element's text. When a counter is incremented and used by the same element, the incrementation happens before the counter is displayed. In a similar way, if a counter is reset and shown in the same element, the reset happens before the counter is displayed. Consider: h1:before, h2:before, h3:before { content: counter(chapter) "." counter(section) "." counter(subsec) ". ";} h1 {counter-reset: section subsec; counter-increment: chapter;} The first H1 element in the document would be preceded by the text "1.0.0. " because the counters section and subsec were reset, but not incremented. This means that if you want the first displayed instance of an incremented counter to be 0, then you need to reset that counter to -1, as follows: body {counter-reset: chapter -1;} h1:before {counter-increment: chapter; content: counter(chapter) ". ";} You can do some interesting things with counters. Consider the following XML: <code type="BASIC"> <line>PRINT "Hello world!"</line> <line>REM This is what the kids are calling a "comment"</line> <line>GOTO 10</line> </code> You can recreate the traditional format of a BASIC program listing with the following rules: code[type="BASIC"] {counter-reset: linenum; font-family: monospace;} code[type="BASIC"] line {display: block;} code[type="BASIC"] line:before {counter-increment: linenum; content: counter(linenum 10) ": ";} It's also possible to define a list style for each counter as part of the counter( ) format. You can do this by adding a comma-separated list-style-type keyword after the counter's identifier. The following modification of the heading-counter example is illustrated in Figure 12-24: h1:before {counter-reset: section subsec; counter-increment: chapter; content: counter(chapter,upper-alpha) ". ";} h2:before {counter-reset: subsec; counter-increment: section; content: counter(chapter,upper-alpha)"." counter(section) ". ";} h3:before {counter-increment: subsec; content: counter(chapter,upper-alpha) "." counter(section) "." counter(subsec,lower-roman) ". ";} Figure 12-24. Changing counter styles Notice that the counter section was not given a style keyword, so it defaulted to the decimal counting style. You can even set counters to use the styles disc, circle, square, and none if you so desire. One interesting point to note is that elements with a display of none do not increment counters, even if the rule seems to indicate otherwise. In contrast, elements with a visibility of hidden do increment counters: .suppress {counter-increment: cntr; display: none;} /* 'cntr' is NOT incremented */ .invisible {counter-increment: cntr; visibility: hidden;} /* 'cntr' IS incremented */ 12.2.3.3. Counters and scopeSo far, we've seen how to string multiple counters together to create section-and-subsection counting. Often, this is something authors desire for nested ordered lists as well, but it would quickly become clumsy to try to create enough counters to cover deep nesting levels. Just to get it working for five-level-deep nested lists would require a bunch of rules like this: ol ol ol ol ol li:before {counter-increment: ord1 ord2 ord3 ord4 ord5; content: counter(ord1) "." counter(ord2) "." counter(ord3) "." counter(ord4) "." counter(ord5) ".";} Imagine writing enough rules to cover nesting up to 50 levels! (I'm not saying you should nest ordered lists 50 deep. Just follow along for the moment.) Fortunately, CSS2.x described the concept of scope when it comes to counters. Stated simply, every level of nesting creates a new scope for any given counter. Scope is what makes it possible for the following rules to cover nested-list counting in the usual HTML way: ol {counter-reset: ordered;} ol li:before {counter-increment: ordered; content: counter(ordered) ". ";} These rules will all make ordered lists, even those nested inside others, start counting from 1 and increment each item by oneexactly how it's been done in HTML from the beginning. This works because a new instance of the counter ordered is created at each level of nesting. So, for the first ordered list, an instance of ordered is created. Then, for every list nested inside the first one, another new instance is created, and the counting starts anew with each list. However, you want ordered lists to count so that each level of nesting creates a new counter appended to the old: 1, 1.1, 1.2, 1.2.1, 1.2.2, 1.3, 2, 2.1, and so on. This can't be done with counter( ), but it can be done with counters( ). What a difference an "s" makes. To create the nested-counter style shown in Figure 12-25, you need these rules: ol {counter-reset: ordered;} ol li:before {counter-increment: ordered; content: counters(ordered,".") " - ";} Figure 12-25. Nested counters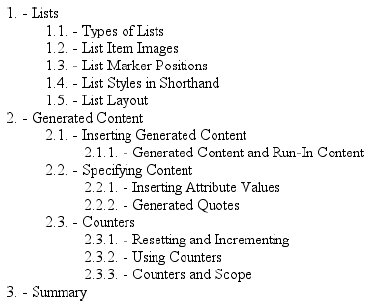 Basically, the keyword counters(ordered,".") displays the ordered counter from each scope with a period appended, and strings together all of the scoped counters for a given element. Thus, an item in a third-level-nested list would be prefaced with the ordered value for the outermost list's scope, the scope of the list between the outer and current list, and the current list's scope, with each of those followed by a period. The rest of the content value causes a space, hyphen, and space to be added after all of those counters. As with counter( ), you can define a list style for nested counters, but the same style applies to all of the counters. Thus, if you changed your previous CSS to read as follows, the list items in Figure 12-25 would all use lowercase letters for the counters instead of numbers: ol li:before {counter-increment: ordered; content: counters(ordered,".",lower-alpha) ": ";} |

EAN: 2147483647
Pages: 130
- Key #1: Delight Your Customers with Speed and Quality
- Key #2: Improve Your Processes
- Making Improvements That Last: An Illustrated Guide to DMAIC and the Lean Six Sigma Toolkit
- The Experience of Making Improvements: What Its Like to Work on Lean Six Sigma Projects
- Six Things Managers Must Do: How to Support Lean Six Sigma